©2020 Cobra Electronics Corporation Version A
CONTENTS CONTENTS......................................................................................................................................................2 INTRODUCTION ..............................................................................................................................................3 SC 201 DASH CAM FEATURES.........................................................................................................................3 PRODUCT SERVICE AND SUPPORT ...........
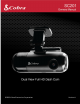
INTRODUCTION Congratulations! You made the smart choice by purchasing an SC Series Dash Cam from Cobra. SC Series cameras provide peace of mind by continuously recording the road in beautiful HD video. With cutting edge features, phenomenal video quality, and an industry-leading focus on user experience, SC Dash Cams are the best solution to record your ride. This User Manual covers the SC 201.
PRODUCT SERVICE AND SUPPORT For any questions about operating or installing this new Cobra product, PLEASE CONTACT COBRA FIRST…do not return this product to the retail store. The contact information for Cobra will vary depending on the country in which you purchased and utilize the product. For the latest contact information, please go to www.cobra.com/support.
OPTIONAL ACCESSORIES – available at www.cobra.
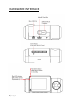
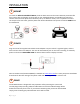
HARDWARE INTERFACE 6|Page
INSTALLATION 1 MOUNT To install the Adhesive Windshield Mount, slide the dash cam onto the mount. Remove protective film from camera lens and display. Find the spot on your windshield where you would like to mount the camera and confirm the placement. Reminder, this is an adhesive mount, so it is important to mount correctly the first time. Next, peel the plastic film off the 3M adhesive and press the mount FIRMLY onto the windshield.
BASIC OPERATION POWERING ON THE DEVICE The device will power on automatically when plugged in and can also be powered by PRESSING AND HOLDING the On/Off button until the display activates (when connected to power). LOOP RECORDINGS: Once the SD card is full, the camera will continuously overwrite the oldest footage recorded with recent recordings. To protect a clip so that it will not be overwritten, press the Emergency Record/Favorites Button so that the clip is moved into the locked content partition.
INITIAL SETUP When first powered on, the device will show you the video stream and automatically begin loop recording. When the Dash Cam is first turned on, we strongly recommend to pair with the Drive Smarter App to download the latest firmware and ensure your camera contains the latest features. Please follow the directions below to pair the app with the camera. DRIVE SMARTER® APP CONNECTION The SC201 uses a Bluetooth® connection to the Drive Smarter app.
iRADAR® APP CONNECTION Connecting to the iRadar App enables your camera to receive real-time driver alerts about what is on the road ahead including: CONNECTION INSTRUCTIONS For iPhone® 6s and later. • Power on your dash cam and be sure that Bluetooth is enabled • Make sure your iPhone’s Bluetooth is ON. The dash cam will NOT APPEAR in the iPhone’s Bluetooth Settings Menu. • Start the Cobra iRadar App. Press the Menu button in the upper left of the app and select Devices.
VIDEO SCREEN The Video Screen is the home screen for the device. With the SC201, based on settings, you can have one view or two (picture-in-picture) views. VIDEO SCREEN BASICS: When first powered on, the display will show you what the camera sees. Note that the button functions are different depending on whether the unit is currently recording or not. When first turned on or connected to power, the dash camera is in Loop Recording mode.
STATUS BAR ICONS: A B C D E F G H I J A - Indicates when camera is loop recording Hazard icon appears in status bar if an Emergency Recording is in progress. The videos is being locked.
VIDEO SETTINGS Video Resolution: This setting allows you to set the following resolutions on your SC 201. Higher resolutions will give you a clearer image but take up more space on the memory card. The available resolutions are: 1080P Full HD 1920x1080 30 Frames per Second 720P HD 1280x720 60 Frames per Second 720P HD 1280x720 30 Frames per Second Loop Clip Time: This setting allows you to control the duration of each individual movie clip on the device.
MEMORY CARD STORAGE LOOP RECORDINGS: Once the SD card is full, the camera will continuously overwrite the oldest footage recorded with recent recordings. To protect a clip so that it will not be overwritten, press the Emergency Record/Favorites Button so that the clip is moved into the locked content partition. EMERGENCY RECORDINGS: An Emergency Recording is triggered when the Emergency Record/Favorites Button is pressed or when the G-Sensor registers a significant impact (hard braking or collision).
SAFETY FEATURES The SC Series Dash Cams come with several safety features designed to protect you and your vehicle. You can adjust the level of protection that fits you via Camera and Drive Smarter App settings. G-Sensor Impact Detection: The SC201 Dash Cam includes a built in G-Sensor which allows the device to determine when the car has been in a collision. If it detects a collision, it automatically locks the recording being made at the time of the accident.
Lane Departure Warning The Lane Departure Warning System (LDWS) provides audible and visual warnings as you approach a lane boundary. It will indicate whether you are departing the lane to the left or to the right. Note that this feature relies solely on analyzing video of the road ahead and, therefore, works best on clearly marked roads with good visibility. This feature is for informational purposes only.
GENERAL SETTINGS Video Resolution: Allows you to select the desired video resolution for loop recordings and emergency videos. Lower resolution settings result in smaller file sizes, which results in more space on the SD card. Loop Clip Time: Loop recordings and emergency videos can be saved in 1 min, 2 min, or 3 min clips depending on your preference. Smaller (1 min) files are easier to transfer to your phone and share.
Note: For Motion Detection to work the camera needs to be connected via hardwire kit (part: CA-MICROUSB-001) or be plugged into an ‘always on’ Cigarette Lighter Socket. You can check if your vehicle has an ‘always on’ CLA adapter online or in the vehicle’s owner’s manual. Parking Mode: Enabling Parking Mode allows your camera to monitor for changes in its internal GSensor/accelerometer. Bumps, Collisions, and break-ins can trigger the G-Sensor to save valuable footage from the moment of impact.
Interior Night Vision: The interior camera’s infrared LEDs allow for clear recording at night. You can set this to be always on, off, or select Auto to allow the camera to detect low-light conditions and automatically enable Interior Night Vision recording. Language: This setting allows you to pick the on-screen language for the unit.
Allows you to raise and lower the volume of notifications and button beeps from your camera. WDR: Enabling Wide Dynamic Range allows your camera to accurately capture footage in very bright conditions. Enabling this feature is recommended for most recording conditions. GPS Format: Choose between Decimals and Degrees as the GPS format that is stamped in the watermark. Frequency: Choose between 50Hz and 60Hz as your operating frequency if you are experiencing flickering in your video.
FIRMWARE UPDATES Ensure the camera is connected to a constant power source during the update process. Failure to do so could result in your unit becoming non-functional.
• Plug the Micro USB cord into a reliable power source such as your home’s outlet or your vehicle’s CLA adapter. The Dash Cam will turn on and automatically boot into the Firmware Update Menu. • Follow the directions on the camera display to update firmware if the unit has one. Units without displays will update automatically. • You can check if your camera is up to date by checking the firmware in your camera’s ‘About’ setting submenu in the camera or via the app.
CAMERA SPECIFICATIONS 20 | P a g e
TROUBLESHOOTING If your unit does not appear to be operating properly, please follow these troubleshooting steps: • • • Make sure the power cord is properly connected. • Make sure you have downloaded the latest firmware to your unit Make sure the socket of your vehicle’s cigarette lighter is clean and free of corrosion. Make sure the power cord’s cigarette lighter adapter is firmly seated in your cigarette lighter FAQ • • Where do I mount/position my Dash Camera on the windshield? a.
TRADEMARKS ACKNOWLEDGEMENT, WARNINGS, and REGULATORY INFORMATION Cobra and the snake design are proprietary trademarks of Cobra Electronics Corporation, USA. Other trademarks and trade names are those of their respective owners. Cobra Electronics Corporation™ is a trademark of Cobra Electronics Corporation, USA. The Bluetooth® word mark is a registered trademark owned by Bluetooth SIG, Inc. and any use of such marks by Cobra Electronics Corporation is under license.