
User Manual


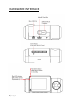
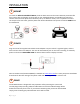


Table Of Contents
- CONTENTS
- INTRODUCTION
- SC 201 DASH CAM FEATURES
- PRODUCT SERVICE AND SUPPORT
- WHAT’S IN THE BOX
- OPTIONAL ACCESSORIES – available at www.cobra.com
- HARDWARE INTERFACE
- INSTALLATIONTo 12V power Sou
- BASIC OPERATION
- INITIAL SETUP
- VIDEO SCREEN
- VIDEO SETTINGS
- VIDEO AND PHOTO PLAYBACK MODE
- VOICE ANNOUNCEMENTS
- MEMORY CARD STORAGE
- SAFETY FEATURES
- GENERAL SETTINGS
- FIRMWARE UPDATES
- CAMERA SPECIFICATIONS
- TROUBLESHOOTING
- FAQ
- TRADEMARKS ACKNOWDLEDGEMENT, WARNINGS, and REGULATORY INFORMATION

7 | P a g e
INSTALLATION
MOUNT
To install the Adhesive Windshield Mount, slide the dash cam onto the mount. Remove protective film
from camera lens and display. Find the spot on your windshield where you would like to mount the
camera and confirm the placement. Reminder, this is an adhesive mount, so it is important to mount
correctly the first time. Next, peel the plastic film off the 3M adhesive and press the mount FIRMLY onto
the windshield.
POWER
Plug one end of the supplied 12V Vehicle Power Adapter into your vehicle’s cigarette lighter, and the
other end into the micro USB port. The unit will automatically turn on and start recording. To manually
power on the device PRESS AND HOLD the Power button until the display activates.
Note: A Hardwire Kit (CA-MicroUSB-001) is available at www.cobra.com for a more permanent installation
that allows for discrete routing of the power cable and recording while your vehicle is off.
DRIVE!
The SC201 dashcam is designed for easy operation. After powering the camera will
instantly begin loop recording. When the MicroSD Card is full the oldest footage will be
deleted to make way for the new. If you witness something that you do not want deleted
simply press the Emergency Record button and it will be saved.
1
3
2