CR-A149 Projection AM/FM Alarm Atomic Clock Radio with Temperature Display O INSTRUCTION MANUAL Please read this manual carefully before operation
PRECAUTIONS The lightning flash with arrowhead symbol within an equilateral triangle is intended to alert the user to the presence of uninsulated “dangerous voltage” within the product’s enclosure that may be of sufficient magnitude to constitute a risk of electric shock. The exclamation point within an equilateral triangle is intended to alert the user to the presence of important operation and servicing instructions in the literature accompanying the appliance.
IMPORTANT SAFETY INSTRUCTIONS 1. Read Instructions: All the safety and operating instructions should be read before the product is operated. 2. Retain Instructions: The safety and operating instructions should be retained for future reference. 3. Heed Warnings: All warnings on the product and in the operating instructions should be adhered to. 4. Follow Instructions: All operating and usage instructions should be followed. 5. Cleaning: Unplug this product from the wall outlet before cleaning.
IMPORTANT SAFETY INSTRUCTIONS 13. Power-Cord Protection: Power supply cords should be routed so that they are not likely to be walked on or pinched by items placed upon or against them, paying particular attention to cords at plugs, convenience receptacles, and at the point which they exit from the product. 14. Protective Attachment Plug: The product may be equipped with an attachment plug with overload protection. This is a safety feature.
IMPORTANT SAFETY INSTRUCTIONS 18. Overloading: Do not overload wall outlets, extension cords, or integral convenience receptacles as this can result in a risk of fire or electric shock. 19. Object and Liquid Entry: Never push objects of any kind into this product through openings as they may touch dangerous voltage points or shout-out parts that could result in a fire or electric shock. Never spill liquid of any kind on the product. 20.
TABLE OF CONTENTS PRECAUTIONS............................................................................... 2 IMPORTANT SAFETY INSTRUCTIONS............................................ 3 TABLE OF CONTENTS.................................................................... 6 FEATURES....................................................................................... 7 GETTING STARTED......................................................................... 8 CR-A149 at a Glance.............................
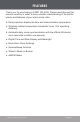
FEATURES Thank you for purchasing a COBY CR-A149. Please read through this manual carefully in order to have a better understanding of the performance and features of your alarm clock radio. Dual projectors display the time and indoor/outdoor temperature Wireless outdoor temperature transmitter (max.
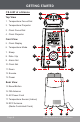
GETTING STARTED CR-A149 at a Glance 1 3 Top View 2 4 1. Temperature Focus Dial 2. Temperature Projector 5 3. Clock Focus Dial 4. Clock Projector Front View 5. Clock Display 6. Temperature Mode 6 7 8 7. Sleep 8. Date / Up 10 9 11 9. Alarm Set O 10. Clock Set 11. Down 12 13 12. Snooze 13. Power 14 Rear View 14. Reset Button 15. FM Antenna 16. AC Power Cord 17. Temperature Sensor (Indoor) 18.
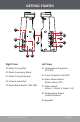
GETTING STARTED 19 ON OFF 24 26 20 29 28 21 25 27 22 23 Right View Left View 19. Radio Tuning Dial 24. Temperature Projection (On/ Off) 20. Radio Frequency Band 21. Radio Tuning Indicator 22. Volume Level Dial 23. Radio Band Switch (FM, AM) 25. Clock Projection (On/Off) 26. Alarm Mode Switch (Radio, Buzz, Off) 27. Alarm Select (Alarm 1, Alarm 2, Alarm 1+2) 28. Temperature Select (Indoor/Outdoor) 29. Speaker www.cobyusa.
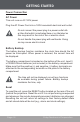
GETTING STARTED Power Connection AC Power This unit runs on AC 120V power. Plug the AC Power Cord into a 120V household electrical wall outlet. Do not connect the power plug to a power outlet other than that which is indicated here or on the label as this may result in the risk of fire or electric shock. Do not handle the power plug with wet hands. Doing so may cause electric shock. Battery Backup The battery backup function maintains the clock time should the AC power be interrupted.
GETTING STARTED Preparing the CR-A149 for Use Plug the clock into an AC 120V outlet. Press the RESET button located on the rear of the clock. Upon resetting the clock: The display will light up and flash The temperature will be displayed for 4 seconds The remote unit will search for the 433MHz transmission signal in 5 minutes The main unit will start searching for the RCC (Radio Controlled Clock) signal automatically.
CLOCK/ALARM MODE Setting the Clock Time and Date It is not necessary to set the clock time unless you cannot receive the RCC synchronization signal. If you cannot receive a signal, or if you want to set your clock manually, set the Clock Set options. To set the Clock Set options: Hold the CLOCK SET button for 2 seconds to enter Clock Set mode. Press the CLOCK SET button again to cycle through the Clock Set options. To change an option value, press UP or DOWN.
CLOCK/ALARM MODE Setting the Alarm Timer The CR-A149 features dual-alarm timers that can be set independently of one another. Set the ALARM SELECT switch to “AL 1” to use Alarm 1, only. Set the ALARM SELECT switch to “AL 2” to use Alarm 2, only. Set the ALARM SELECT switch to “AL 1 + 2” to use both Alarm 1 and Alarm 2 together. To set the Alarm Timer options: Hold the ALARM SET button for 2 seconds to enter Alarm Set mode. Press the ALARM SET button again to cycle through the Alarm Set options.
CLOCK/ALARM MODE Turning the Alarm Timer On/Off (Alarm Mode) To turn the alarm on, set the ALARM MODE switch to the “Radio” or “Buzz” position. To wake to radio, select the “Radio” position. The last radio station will play when the alarm turns on. To wake to a buzzer, select the “Buzz” position. Radio Buzz To turn the alarm off, set the ALARM MODE switch to the “Off” position. When the alarm sounds, the alarm will continue for 30 minutes unless you intervene.
CLOCK/ALARM MODE Setting the Sleep Timer The sleep timer allows you to go to sleep to music. The radio will turn itself off automatically at the end of the timer. To set the sleep timer: Press the SLEEP button. The Sleep Timer will flash on the display. While the Sleep Timer is flashing, you can change the length of the timer by pressing SLEEP again (90, 60, 30, and 15 minutes). To cancel the Sleep Timer, press the POWER button.. www.cobyusa.
TEMPERATURE READING Indoor Temperature The CR-A149 contains a built-in thermometer. The unit will check the indoor temperature every 6 seconds. The indoor temperature range is 0 – 50ºC or 32 – 122ºF. To change between indoor and outdoor temperature display, press the TEMPERATURE SELECT button. Outdoor Temperature The CR-A149 comes equipped with a wireless outdoor temperature sensor. The outdoor sensor will check the outdoor temperature every 6 seconds.
TEMPERATURE READING For best operation: Load the batteries in the outdoor sensor before powering on the main unit. Although the outdoor sensor is weatherproof, it should be placed in an area protected from direct sunlight, rain, and snow. Place the main unit as close to the outdoor sensor as possible. The maximum distance between the main unit and outdoor sensor is 15 to 20 meters (50 to 65 feet).
PROJECTION SYSTEM The CR-A149 contains two built-in projectors that can display the time and temperature on the ceiling or wall of a darkened room. Press the TEMPERATURE PROJECTION button to turn the temperature projector on or off. Press the CLOCK PROJECTION button to turn the clock projector on or off. Turn the dials on the projection mechanism to focus the image on the ceiling or wall. The maximum projection distance is between 3 and 9 feet.
RADIO MODE Basic Operation To turn the radio on, press the POWER button. (To turn the radio off, press the POWER button again.) Set the RADIO BAND switch to: AM: Listen to AM broadcasts. FM: Listen to FM broadcasts. To adjust the volume level, turn the Volume Level dial Tuning Turn the Radio Tuning Dial to tune to a desired broadcast station. The current station is displayed by the Radio Tuning Indicator/ Radio Frequency Band.
TROUBLESHOOTING If you have a problem with this device, please read the troubleshooting guide below and check our website at www.cobyusa.com for Frequently Asked Questions (FAQs) and firmware updates. If these resources do not resolve the problem, please contact Technical Support. COBY Electronics Technical Support Address: 56-65 Rust St. Maspeth, NY 11378 Hours: 8:30 AM–11:00 PM EST, seven days a week Phone: 800-681-2629 or 718-416-3197 Email: techsupport@cobyusa.com Web: www.cobyusa.
SPECIFICATIONS Power Supply AC 120V ~60Hz 5W Battery Backup 3V Flat Lithium CR2025 x 3 Remote Sensor 1.5V “AAA” x 2 Tuning System AM: 530 - 1710kHz FM: 88 - 108MHz RCC Carrier Frequency 60kHz RCC Station WWVB Audio Output Full-Range Speaker Output Power 350mW Speaker Impedance 8Ω Specifications and manual are subject to change without notice. www.cobyusa.
NOTES Page 22 Coby Electronics Corporation
NOTES www.cobyusa.
COBY Electronics Corp. 56-65 Rust Street Maspeth, NY 11378 www.cobyusa.com www.ecoby.