CX-266 DIGITAL MP3 AM/FM DESKTOP STEREO with USB PORT and SD/MMC CARD SLOT Instruction Manual Please read this manual carefully before operation.
PRECAUTIONS CAUTION RISK OF ELECTRIC SHOCK DO NOT OPEN CAUTION: TO REDUCE THE RISK OF FIRE AND ELECTRIC SHOCK, DO NOT REMOVE THE COVER (OR BACK) OF THE UNIT. REFER SERVICING ONLY TO QUALIFIED SERVICE PERSONNEL. For Customer Use: Enter below the serial number that is located on the bottom of the unit. Retain this information for future reference. Model No. CX-266 Serial No.
IMPORTANT SAFETY INSTRUCTIONS In addition to the careful attention devoted to quality standards in the manufacture of this device, safety is a major factor in the design of every instrument. However, safety is your responsibility, too. This sheet lists important information that will help to assure your enjoyment and proper use of this device and accessory equipment. Please read this carefully before operation and use of your device. 1. Read these instructions carefully.
TABLE OF CONTENTS PRECAUTIONS.................................................................................................................................. 2 IMPORTANT SAFETY INSTRUCTIONS.............................................................................................. 3 TABLE OF CONTENTS....................................................................................................................... 4 PACKAGE CONTENTS.....................................................................
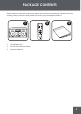
PACKAGE CONTENTS Please make sure that the items shown below are included in the package. Should an item be missing, please contact the local retailer from which you purchased this product. 1 1. CX-266 Main Unit 2. Full Function Remote Control 3.
FEATURES • Digital AM/FM Radio • USB Port and SD/MMC Card Slot for MP3/WMA Playback from USB Drives and SD/MMC Cards • Plays All Portable Audio Devices through a 3.
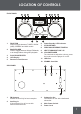
LOCATION OF CONTROLS FRONT PANEL 1. 2. FUNCTION Press to toggle between TUNER, UDISK (USB), SD/MMC and AUX modes. BAND/FOLDER Press to toggle between AM and FM bands, or to change folders during MP3 playback. 3. PLAY/PAUSE/ENTER 4. LCD Display 5. Remote Control Sensor 6. Power/Standby LED Indicator 7. STOP/RETURN 8. PREVIOUS/REVERSE/TUNE DN 9. NEXT/FORWARD/TUNE UP 10. VOLUME/POWER Turn the knob to adjust the volume, press the knob to turn the player On or Off. 11. USB Port 12.
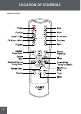
LOCATION OF CONTROLS REMOTE CONTROL
POWERING YOUR STEREO AC Operation • Plug the power cord into an AC 120V wall outlet. • Locate the Main Power switch on the rear of the unit and set it to the ON position. • Press the Volume/Power knob on the front of the unit to turn your stereo on or off. WARNING: • Do not connect the power plug to a power outlet other than that which is indicated here and on the label as this may result in the risk of fire or electric shock. • Do not handle the power plug with wet hands.
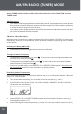
AM/FM RADIO (TUNER) MODE Select TUNER mode to listen to AM or FM radio broadcasts. Press FUNCTION to select TUNER mode. AM/FM Antenna • Your stereo comes equipped with an internal AM antenna. Large appliances or other devices that create an electrical field may interfere with AM reception; for best reception, please try to locate the stereo away from such devices. • Your stereo comes equipped with an external FM wire antenna. Adjust the position and location of the FM antenna for best reception.
USB (UDISK) MODE Select UDISK mode to play digital MP3/WMA audio files from a USB drive. For more information about MP3 or WMA digital audio files, please visit our website at www. cobyusa.com. Press FUNCTION to select UDISK mode. About USB Drives USB drives are storage devices that have a USB interface. Some examples of USB drives are: • USB Thumb drives (flash memory) • USB Micro Drives (mini hard drive) • USB Card Reader with flash memory installed (e.g., Compact Flash, SD/MMC, Memory Stick, etc.
USB (UDISK) MODE MP3/WMA Play Modes and Options • INTRO Mode Press INTRO to toggle Intro Mode on or off. Intro mode will play the first 10 seconds of each track. • RANDOM Mode • Press RANDOM to toggle Random Mode on or off. Random mode will play your tracks in a random, shuffled order.
SD/MMC MODE Select SD/MMC mode to play digital MP3/WMA audio files from an SD/MMC card. For more information about MP3 or WMA digital audio files, please see the About MP3/WMA Files section. Press FUNCTION to select SD/MMC mode. Playing MP3/WMA Files from SD/MMC Cards 1. Transfer the MP3/WMA files onto the SD/MMC card you wish to connect (you may need to use a computer and a SD/MMC card reader to do this). 2. Insert the SD/MMC card into the stereo’s SD/MMC card slot. 3.
SD/MMC MODE Programming a Custom Sequence of Tracks Your stereo can memorize a programmed sequence of up to 20 tracks. To create a program sequence: 14 1. Press to ensure that playback is stopped. 2. Press PROG. The LCD will display “PROG” and the Folder Number will start blinking. 3. Press or to select the folder that contains the track that you want to program and then press PROG. The Track Number will start blinking. 4. Press or to select the track and press PROG to store the track.
AUXILIARY (AUX) MODE Select AUX mode to listen to external audio devices connected through the 3.5mm Auxiliary Stereo Line-In jack. Press FUNCTION to select AUX mode. 1. Use a 3.5mm Male-to-Male Stereo cable to connect any external audio device with a 3.5mm Headphone or Line-Out jack to the AUX IN jack on the rear panel of the stereo. 2. Start playback on the external audio device. Adjust the volume on the audio device (do not set the volume too high to avoid distortion).
MENU OPTIONS (SETUP) Access the Menu Options to set your stereo’s internal options. Press MENU on the remote control to toggle through the Clock, Timer, Equalizer, Bass, and ID3 options. Clock Set the system clock time. 1. Press MENU until the LCD displays “CLOCK” and then press ENTER. The 12/24HR option will start blinking. 2. Press or to toggle the 12/24HR setting and then press ENTER. The Hour option will start blinking. 3. Press or blinking. to set the Hour option and then press ENTER.
MENU OPTIONS (SETUP) EQ (Equalizer) Set the digital preset equalizer. 1. Press EQ on the remote control to cycle through the equalizer settings: FLAT, ROCK, JAZZ, CLASSIC, or POP. Bass Turn the bass enhancement feature on or off. 1. Press BASS on the remote control to toggle the Bass setting on or off. ID3 Turn the ID3 display feature on or off. When this is set to ON, the stereo will display any MP3 or WMA ID3 song information that is available. 1.
MENU OPTIONS (SETUP) Firmware upgrades may be available from time to time on our website at www.cobyusa.com. Please check our site periodically for firmware upgrades. To upgrade your stereo’s firmware: 18 1. Download the latest firmware from our website at www.cobyusa.com 2. Save the new firmware to the root directory of a USB drive or an SD/MMC card. 3. Connect the USB drive or SD/MMC card to the stereo and set it to the corresponding mode (UDISK or SD/MMC). 4.
TROUBLESHOOTING If you have a problem with this player, please read the troubleshooting guide below and check our website at www.cobyusa.com for Frequently Asked Questions (FAQs) and firmware updates. If these resources do not resolve the problem, please contact Technical Support. COBY Electronics Technical Support Hours: Monday to Friday, 8:30 AM–11:00 PM EST Saturday to Sunday, 9:00 AM–11:00 PM EST Email: techsupport@cobyusa.com Phone: 800-681-2629 or 718-416-3197 Web: www.cobyusa.
SPECIFICATIONS Display Type LCD with Backlight Memory No internal memory Interface USB, SD/MMC Card Reader Audio Format Support MP3, WMA Frequency Range FM: 87.5 - 108.0 MHz AM: 522 - 1620 kHz Preset Station Memory FM: 20 AM: 10 Audio Input 3.5mm Stereo Audio Output 3” High-Performance Full-Range Driver (2) Subwoofer Out Output Power 4W x 2 Accessories Included Full Function Remote Control Specifications and manual are subject to change without notice.
COBY Electronics Corp. 56-65 Rust Street. Maspeth, NY 11378 www.cobyusa.com. www.ecoby.