CXCD470 MINI SYSTEM WITH 3-CD CHANGERS AND DOUBLE CASSETTE RECORDER INSTRUCTION MANUAL
WARNING To prevent fire or shock hazard, do not expose this appliance to rain or moisture. IMPORTANT Since the CD circuity may cause interference to other radio tuners nearby, switch this unit off when not in use or move it away from the affected radio tuner.
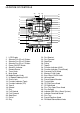
LOCATION OF CONTROLS 42 43 44 2 41 40 39 38 3 37 4 5 6 7 8 9 10 11 12 36 35 1 34 33 32 31 30 29 28 27 13 14 15 16 17 1. 2. 3. 4. 5. 6. 7. 8. 9. 10. 11. 12. 13. 14. 15. 16. 17. 18. 19. 20. 21. 22.
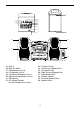
59 45 46 47 48 49 50 51 52 53 60 54 56 57 55 58 45. 46. 47. 48. 49. 50. 51. 52. AUX In Beat Cut Switch Right Speaker Out Let Left Speaker Out Let Left Surround Speaker Out Let Right Surround Speaker Out Let FM Antenna AC Voltage Selector (for dual voltage version only.) 53. 54. 55. 56. 57. 58. 59. 60.
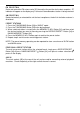
OPERATIONS 1. Carefully unpack the unit and speakers. Remove all packing material from around the unit. 2. Locate the unit horizontally on a heavy duty stand or firm level surface and away from the speaker system to avoid acoustic feedback. CONNECTIONS 1. Connect the Speaker Box speaker wire to the speaker out let on the rear of the main unit. 2. Connect the AC power cord to the AC outlet. 3. Press the POWER Button [5] to turn on the unit.
CLOCK ADJUSTMENT 1. Set to “TAPE” [13] or “AUX” [28] mode. The clock will appear on the LCD display 2. Press the MEMORY/C-ADJ. Button [31] once to adjust the hour. Press the button once more to adjust the minute. 3. Press the /TUNING Button [35] and /TUNING Button [35] to set the time. - Press the /TUNING Button once to add one hour or one minute to the time setting. When keep pressing the button, the “hour” or “minutes” setting is increased continuously until the button is released.
FM RECEPTION Raise and extend the FM antenna wire [51] then adjust the position for the best reception. ST indicator will appear on the display only if an actual stereo broadcast station is being received. AM RECEPTION Rotate horizontally or relocated the unit for best reception as the built-in ferrite bar antenna is directional. PRESET STATIONS 1. Press the TUNER/BAND Button [29] to “RADIO” mode. 2. Press the TUNER/BAND Button [29] to the desired band. 3.
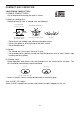
COMPACT DISC OPERATION CONCERNING COMPACT DISC 1. USABLE COMPACT DISCS Use a compact disc bearing the mark as shown. 2. Notes on handling discs Removing the disc from its storage case and loading it. Press the claws at the center of the case Lift out without touching the recorded surface Insert with the label facing up Press the disc gently to insert it Incorrect • Do not touch the rainbow color reflecting recorded surface. • Do not stick paper or write anything on the label surface.
PLAYING CD 1. Push the POWER Button [5] to turn the unit on. The STANDBY INDICATOR [6] will light up. 2. Press the CD Button [14] to “CD” mode. 3. Press the OPEN/CLOSE Button [38] once to open the disc tray [42] and place CDs (label side facing up) on the disc tray, press DISC SKIP Button [39], the carousel rotates, so you can insert another CD. Then, press the OPEN/CLOSE Button [14] again, the CD disc tray [42] will be closed.
3. Press the FORWARD SKIP or BACKWARD SKIP Button [35] to select the desired track. 4. Press the MEMORY/C-ADJ. Button [31] again to ENTER the selection into the program memory. 5. Repeat steps 2, 3 and 4 to enter desired tracks up to maximum of 20 selections. 6. To clear the program memory, press the STOP Button [37] while the system is in stop mode. DISC SELECTOR FUNCTION Press DISC SELECTOR Button [39], the carousel will rotate to the Forward location.
TAPE OPERATION GENERAL INFORMATION ON CASSETTE TAPES • For playback, use normal (low-noise) tape for best sound. (Metal or chrome tape is not recommended) • For recording, use normal tape only. • Do not use C-120 tapes, tapes with internal reels or poor-quality tapes because they can cause malfunctions. • Before loading a tape into the cassette compartment, tighten the slack tape with a pen or pencil. • Cassette have removable tabs which prevent accidental recording from taking place.
BEAT CUT SWITCH If feedback (whistling noise) occurs when recording from AM broadcasts, set the BEAT CUT selector [46] to I or II whichever gives the best reception. RECORDING FROM CD 1. Press the CD Button [14] to “CD” mode. 2. Place a compact disc in the CD compartment. 3. Insert a cassette tape into the cassette compartment. 4. Press the RECORD Button [16], the CD player will begin recording from first track or the first of the programmed track automatically.
OPERATION OF REMOTE CONTROL UNIT LOADING BATTERIES 1. Remove the battery compartment cover. 2. Insert 2 “AAA” size (not included) batteries as indicated by the polarity marking. (Placing the batteries in the wrong way around cause malfunction.) 3. Close the battery compartment cover. OPERATION PROCEDURE Plug the power cord of the system into an AC wall outlet, and press the POWER ON/STAND BY button on the remote control unit to turn the power on.
- MODE/REMAIN Button • In radio operation Press the button to change from frequency display to clock display and press again to return. • In CD operation Press the button to change the display from playing time to remaining time, and then to clock display. Press again to return. - PLAY/PAUSE Button It has the same function as the PLAY/PAUSE Button [36] on the main unit. See “COMPACT DISC OPERATION”. - MEMORY/C-ADJ. Button It has the same functions as the MEMORY/C-ADJ. Button [31] on the main unit.
SPECIFICATION RADIO SECTION Frequency FM: 87.5 — 108 MHz AM: 522 — 1620 kHz CASSETTE SECTION Track System Recording System Tape Frequency Response Compact Cassette Stereo AC Bias Normal 100 — 8000 Hz CD SECTION Sampling Frequency Frequency Response 44.1 Hz 20 Hz — 20 KHz GENERAL Output terminal Output Power Weight Terminal Speaker Sockets 5W + 5W (At 10% THD) 11.
90 DAY LIMITED WARRANTY COBY ELECTRONICS CORP. ("COBY") warrants this product to the original purchaser to be free from defects in material or workmanship under normal use of 90 DAYS from the date of original purchase. COBY agrees under this warranty, to repair or replace it with a new or reconditioned product at no additional charge.