DP-5588 5.
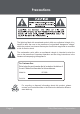
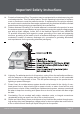
Precautions The lightning flash with arrowhead symbol within an equilateral triangle is intended to alert the user to the presence of uninsulated “dangerous voltage” within the product’s enclosure that may be of sufficient magnitude to constitute a risk of electric shock. The exclamation point within an equilateral triangle is intended to alert the user to the presence of important operation and servicing instructions in the literature accompanying the appliance.
Precautions WARNING: To prevent fire or shock hazard, do not expose this device to rain or moisture. Dangerous high voltage is present inside the enclosure. Do not open the cabinet. CAUTION: To prevent electric shock, match wide blade of plug to wide slot of outlet and fully insert. CAUTION: Changes or modifications not expressly approved in this manual could void your authority to operate this equipment.
Important Safety Instructions 1. Read Instructions: All the safety and operating instructions should be read before the product is operated. 2. Retain Instructions: The safety and operating instructions should be retained for future reference. 3. Heed Warnings: All warnings on the product and in the operating instructions should be adhered to. 4. Follow Instructions: All operating and usage instructions should be followed. 5. Cleaning: Unplug this product from the wall outlet before cleaning.
Important Safety Instructions 14. Protective Attachment Plug: The product may be equipped with an attachment plug with overload protection. This is a safety feature. See the operating instructions for replacement or directions to reset the protective device. If replacement of the plug is required, be sure the service technician has used a replacement plug that has the same overload protection as the original plug as specified by the manufacturer. 15.
Important Safety Instructions 20. Servicing: Do not attempt to service this product yourself as opening or removing covers may expose you to dangerous voltage or other hazards. Refer all servicing to qualified service personnel. 21.
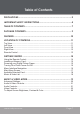
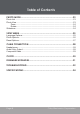
Table of Contents Precautions..........................................................................................2 Important Safety Instructions........................................................4 Table of Contents................................................................................7 Package Contents..............................................................................9 Features................................................................................................
Table of Contents Photo Mode.........................................................................................23 Photo List............................................................................................................... 23 Photo View............................................................................................................. 23 Zoom.............................................................................................................. 24 Rotate....................
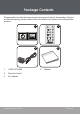
Package Contents Please make sure that the items shown below are included in the package. Should an item be missing, please contact the local retailer from which you purchased this product. 1 MUTE 2 QUARTZ 4 3 1. COBY DP-5588 2. Remote Control 3. AC Adapter www.cobyusa.com 4.
Features • 5.
Location of Controls Top View 1. Menu/Setup Press once for Menu; Press and hold for Setup 2. Enter/Slideshow Press for Enter 3. Down 4. Up 5. Left / Fast Reverse Press for Left during selecting. Press for Fast Reverse during Audio/Video playback 6. Right/ Fast Forward Press for Right during selecting. Press for Fast Forward during Audio/Video playback 7. Volume Level Dial 1 2 3 5 4 6 7 Left View 8. Memory Stick (MS) 8 9. Compact Flash (CF) 9 10. xD-Picture (xD) 10 11.
Location of Controls Front View 15 14 13 13. 5.6” TFT LCD 14. Remote Sensor 15. Clock Right View 16. Video Out 17. Headphone / Audio Out 18. Power Switch (On / Off) 19. Power In Jack 20.
Location of Controls Remote Control 1. Menu 2. Mute 3. Play / Pause 4. Zoom 5. Up (Navigation) 6. Left (Navigation) 7. Down (Navigation) 8. Right (Navigation) 9. Enter 10. Stop 11. Previous / Reverse 2 1 MUTE 3 4 5 8 6 7 9 10 11 16 12 12. Next / Forward 17 13. Volume Down 14. Volume Up 15. Angle 16. Setup 13 14 15 17. Slideshow www.cobyusa.
Getting Started Using the Remote Control To load a battery in the remote: 1. Pull in the direction of the arrow 2. Slide the compartment out 3. Place the battery in the compartment with the positive side ( + ) facing up 4. Push the compartment in to close 1 2 3 4 To use the remote: • Point the remote at the remote sensor of the photo frame at a distance of no more than 15’ and at an angle no greater than 60 degrees. • Batteries will last for about one year under typical usage.
Getting Started Installing a Memory Card Your photo frame supports the following types of memory cards: • Compact Flash cards (CF) • Secure Digital cards (SD) • MultiMedia Card (MMC) • xD-Picture card (xD) • Memory Stick (MS) Simply insert the memory card of your choice into its corresponding card slot located on the left panel of the photo frame. Take care to orient the card in the proper direction.
Getting Started Turning Your Photo Frame On/Off • To turn your photo frame on, set the Power Switch to the “On” position. • To turn your photo frame off, set the Power Switch to the “Off” position. Menu Interface Navigation To select the different menu options and files of your digital photo frame: • • Use the Navigation keys to make a selection: • To move the selection up, press . To scroll up quickly, press and hold • To move the selection down, press .
Getting Started Main Menu Screen Insert a card to the corresponding slot and turn on the player. Your photo frame will display the “Main Menu“ screen shown below. • Use the navigation keys to select a desired photo/audio/video file and press to play. 3 2 1 / AA.MP3 AA BB CC DD EE FF GG HH 4 7 Filter Flat Mode Repeat : off JPEG Preview 6 Name: AA.MP3 5 Main Menu Screen 1. Filename of Current playback file 2. Current Disk Icon 3. Current File Number/Total Number of Files 4.
Getting Started Available Selected Card When a card has been inserted, press the MENU button. Your photo frame will display the “Available Selected Card“ dialogue box shown below. SD MS CF 1 XD 2 USB Available Selected Card Dialogue Box 1 The card has been selected 2 The card is being selected (not confirmed) • Use the navigation keys to select a desired card and then press firm. • The screen will display the main menu of the selected card.
Music & Video Mode Music & Video List Upon entering the Main Menu, use the navigation keys to select a desired audio / video file and press to play. 4 3 2 1 00:00:10 / AA.MP3 AA BB CC DD EE FF GG HH 5 8 Filter Flat Mode Repeat : off Music Playing 7 Name: AA.MP3 6 Music Playback Screen 1. Elapsed time 2. Filename of Current playback file 3. Current Disk Icon 4. Current File Number/Total Number of Files 5. Current Playback File 6.
Music & Video Mode Advanced Settings Filter Use the Filter function to hide unwanted Audio/Video/Photo files. Use the Navigation Keys to select and press to confirm. After confirming the selection, the unwanted Audio/Video/Photo files will be hidden and playback stopped (if it’s being played). Flat Mode There are several custom settings in Flat Mode. Use the Navigation keys to select Repeat or Mode, and then press to confirm a setting (see setting list below).
Music & Video Mode • To add more files in program mode: Select and confirm Browser View below the Edit Mode to browse files in the Main Menu, then follow the steps above to add more files. • To Cancel programmed files: In the Program Screen, select and confirm the unwanted file (which will be checked), and then select and confirm Clear Program below Edit mode. The file will be deleted from program file list. In the Program Mode, Filter function is not available.
Music & Video Mode Video Controls After confirming an Video file, the screen will display its playback screen in full size. • Press or icon for fast reverse or fast forward, each successive press will decrease or increase the speed by: Reverse: Forward: • Press ×2 ×2 ×4 ×4 for normal playback. ×8 ×8 × 16 ×16 To Adjust Screen Brightness, Contrast & Color To adjust Brightness, Contrast & Color, press and hold to show the dialogue box.
Photo Mode Photo List Upon entering the Main Menu, use the navigation keys to select a desired photo file. The photo file selected screen shown below. 3 2 1 / CC.JPG AA BB CC DD EE FF GG HH 4 Filter Flat Mode 7 Repeat : off Music Playing 6 W: 960 H:540 5 Photo File Selected Screen 1. Filename of selected file 2. Current Disk Icon 3. Current File Number/Total Number of Files 4. Current selected File 5. Photo dimension 6. Photo preview 7.
Photo Mode Zoom To increase the level of magnification, press ZOOM. • Each successive press of ZOOM will change the level of magnification as shown below. OFF • To pan around the magnified picture, use the navigation keys. Rotate To rotate the picture, press ANGLE. • Each successive press of ROTATE will change the angle of rotation as shown below. No Rotation To adjust the Photo View Mode, JPEG Interval Settings & Transition, refer to SETUP section for operation details.
Setup Menu To adjust the settings and options of your digital photo frame, press Menu be displayed on screen. . The Setup • Use the navigation keys to highlight and display option / sub-menu. • To confirm a selection, press • To return to a previous menu level, press • To exit the Setup Menu, press . or . . Please choose your desired settings as shown in the screens below. The options marked ‘ ” are the default settings. Language Options OSD language Language DivX subtitle www.cobyusa.
Setup Menu Photo Options If USER is selected in JPEG Interval list, the interval of the photo slideshow will be operated manually.
Setup Menu Reset Options Confirm Yes on Use Default Settings dialogue box, the settings of the player will change to the default settings. www.cobyusa.
Cable Connection Headphones Audio-Only Output To output audio only, use the AV connection but do not connect the Video cables.
Optional Connections To use your DP-5588 to output audio and video to an external home theater system, use the connections diagrammed below. Composite Video not included www.cobyusa.
Clock To insert a battery & adjust the time a. Push and slide out the battery compartment cover. b. To insert a battery: make sure to match its polarities (+/-) to the markings on the inside of the compartment. c. To adjust the time: turn the knob in the compartment . d. Replace the cover.
Firmware Upgrades From time to time, COBY may release firmware updates to improve the performance of the DP-5588 or to add additional features. Please check the COBY website periodically at www.cobyusa.com to see if new firmware has been released for your photo frame. www.cobyusa.
Troubleshooting If you have a problem with this unit, please read the troubleshooting guide below and check our website at www.cobyusa.com for Frequently Asked Questions (FAQs) and firmware updates. If these resources do not resolve the problem, please contact Technical Support. COBY Electronics Technical Support 56-65 Rust Street Maspeth, NY 11378 Email: techsupport@cobyusa.com Web: www.cobyusa.
Troubleshooting The player will not play my music file. • Ensure that the file is in a compatible format (MP3 or WMA). • The file may be copy-protected. This player cannot play copy-protected files. The player will not play my video file. • Ensure that the video file will play on your computer using Windows Media Player 10. If the file works on the computer, use the same computer to convert the video to a compatible format. The picture is noisy or distorted. • Reset the color system of the TV set.
Specifications Display Type 5.6” Full-Color TFT LCD Display Resolution 320 x 3(RGB) x 234 Memory CF Card Slot SD/MMC Card Slot xD Card Slot MS Card Slot Audio Format Support MP3 (32 - 320kbps, CBR/VBR) WMA (64 - 192 kbps) Video Format Support AVI (XviD) MPG MPEG Photo Format Support JPEG (8MB) USB Host USB 2.0 High-Speed (device) Audio Output 3.
Notes www.cobyusa.
COBY Electronics Corp. 56-65 Rust Street Maspeth, NY 11378 www.cobyusa.com www.ecoby.