TF-DVD7006 7” Widescreen TFT LCD Portable DVD/CD/MP3 Player Instruction Manual Please read this manual carefully before operation
PRECAUTIONS For Customer Use: Enter below the serial number that is located on the unit. Retain this information for future reference. Model No. TF-DVD7006 Serial No. The lightning flash with arrowhead symbol within an equilateral triangle is intended to alert the user to the presence of uninsulated “dangerous voltage” within the product’s enclosure that may be of sufficient magnitude to constitute a risk of electric shock.
PRECAUTIONS NOTICE: The LCD panel used in this player contains millions of thin film transistors that have been manufactured using a high-technology process to deliver a crisp, clear, and detailed picture. Occasionally, a few of these transistors may become stuck or non-active; please note that this is a normal result of the manufacturing process and does not affect the performance of the player. NOTICE: This product incorporates copyright protection technology that is protected by U.S.
IMPORTANT SAFETY INSTRUCTIONS 1. Read Instructions: All the safety and operating instructions should be read before the product is operated. 2. Retain Instructions: The safety and operating instructions should be retained for future reference. 3. Heed Warnings: All warnings on the product and in the operating instructions should be adhered to. 4. Follow Instructions: All operating and usage instructions should be followed. 5.
IMPORTANT SAFETY INSTRUCTIONS 14. Grounding or Polarization: This product may be equipped with a polarized alternatingcurrent line plug that has one blade wider than the other. This plug will only fit into the power outlet in one direction. This is a safety feature. If you are unable to insert the plug fully into the outlet, try reversing the direction of the plug. If the plug should still fail to fit, your outlet may be obsolete; contact a licensed electrician to replace it.
IMPORTANT SAFETY INSTRUCTIONS 19. Overloading: Always operate any electrical device in accordance with applicable electrical codes. Never overload wall outlets, extension cords, or integral convenience receptacles as this can result in a risk of personal or property damage or injury, including fire or electric shock. 20.
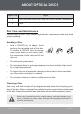
ABOUT OPTICAL DISCS Disc Requirements This DVD player supports playback of the following discs, as well as CD-R and CDRW discs that contain audio titles or JPEG picture files. Disc types not listed here are not supported by this unit (e.g., PC CD-ROM, CD-Extra, CD-G, CD-I, etc.) Type Disc Mark Content Type Disc Size Max.
ABOUT OPTICAL DISCS DVD Features Each DVD disc contains features that may vary depending upon the production of the disc. Some of the icons you may see that represent these features are shown below. Number of Audio Tracks Number of Subtitles Angle Indicator Screen Format (Aspect Ratio) Zoom Some of the DVD features enabled by this player depend on how the DVD was produced. Some features may not be enabled if the disc does not support the feature, or it may require special settings.
ABOUT OPTICAL DISCS Region Code Region 5 Africa, the former Soviet Union, India, North Korea, Pakistan, Turkmenistan 6 China Disc Care and Maintenance Optical discs (DVDs, CDs) contain high-density compressed data and need proper handling. Handling a Disc • Hold a DVD/CD by its edges. Avoid touching the recorded side of the disc. To remove a DVD/CD from its storage case, press down on the center retention mechanism of the case and lift the disc out. • Do not bend or press discs.
TABLE OF CONTENTS PRECAUTIONS...................................................................................................2 IMPORTANT SAFETY INSTRUCTIONS................................................................4 ABOUT OPTICAL DISCS....................................................................................7 Disc Requirements...........................................................................................7 DVD Features............................................................
TABLE OF CONTENTS PLAYER FUNCTIONS...................................................................................... 30 Menu/Title and Setup Controls....................................................................30 Extended Playback Controls.......................................................................30 Random/Program..........................................................................................32 DVD Program Mode.................................................................
PACKAGE CONTENTS Please make sure the following items are included in the package. If any items are missing, contact your local dealer.
FEATURES • Progressive Scan DVD Player • Compact Portable Design with Anti-Skip Circuitry • 7” Widescreen (16:9) TFT Color Display • DVD, DVD±R/RW, CD, CD-R/RW, JPEG and MP3 Compatible • Dolby Digital Decoder • AV Outputs for use with Home Theater Systems • Headphone Jack for Private Listening • Multiple Language, Subtitle, and Camera Angle Support • Parental Lock Control • Picture Zoom Function www.cobyusa.
CONTROLS AT A GLANCE Main Unit: Top View 1 2 3 4 14 5 7 10 13 Page 14 6 9 8 12 11 Coby Electronics Corporation
GETTING STARTED 1. LCD Display Screen 9. Down (Navigation) 2. Stereo Speakers 10. Left (Navigation), Previous/Reverse 3. LCD Mode 11. Power Indicator 4. Setup 12. Remote Sensor 5. Stop 13. Open 6. Up (Navigation) 14. Disc Compartment Lid 7. Play/Pause, Enter 8. Right (Navigation), Next/Forward Main Unit: Right View 1 2 3 4 5 6 1. Volume Dial 4. Video Out 2. Headphone Out 5. Power Switch 3. Audio Out 6. DC Power In www.cobyusa.
GETTING STARTED Remote Control 1 27 2 26 25 3 4 22 5 24 23 21 20 19 6 8 10 Page 16 18 7 16 9 14 17 15 13 11 12 Coby Electronics Corporation
GETTING STARTED 1. Title 14. Slow 2. Power/Standby 15. PBC 3. Menu 16. Search 4. Navigation Keypad: 17. Step 5. Mute 6. Numeric Keypad 7. Clear 8. Repeat A-B 9. Repeat 10. Audio 11. Subtitle 12. Angle 13. Program 18. Reverse 19. Forward 20. Previous 21. Next 22. Zoom 23. Stop 24. Play/Pause 25. Setup 26. LCD Mode 27. Display The remote control transmits a directional infrared beam. Be sure to aim the remote control directly at the infrared remote sensor during operation.
GETTING STARTED • To install batteries in the remote control, refer to the diagram. Remove the battery compartment cover located on the rear of the remote control. Insert batteries, making sure to match their polarities (+/-) to the markings on the inside of the compartment. Replace the cover. • Batteries in the remote will last for approximately 1 year. Replace the batteries if the remote control does not work. Do not mix old with new batteries, or different types of batteries.
CONNECTIONS Power AC Adapter This unit should be used with AC 100-240V 50/60Hz wall outlets, only. Complete all system connections (optional) before connecting the power. • Connect one end of the supplied AC adapter into the DC IN jack of the player. Connect the other end of the adapter into an AC 100-240V wall outlet. • The AC adapter operates on AC 100-240V ~50/60Hz (DC Out: 9V; DC Current: 2.0A minimum).
CONNECTIONS Rechargeable Battery Pack This unit may be powered by a rechargeable battery when an AC outlet is not available. To install the battery pack: This unit comes preinstalled with a 7.4V lithium-ion rechargeable battery pack. Battery Compartment Screw If the battery pack does not work to your expectations, please contact Coby Technical Support or a qualified service technician. To charge the battery pack: 1.
CONNECTIONS Use only the battery supplied with this player. Do not short the terminals. Do not open the terminal covers of the player. Do not allow dust to come into contact with the terminals of the player and battery. Do not disassemble, puncture, impact, heat, or incinerate the battery. Do not leave the battery or player in a car with its windows closed or any place subject to direct sunlight. Keep the battery dry. Dispose of used batteries properly.
CONNECTIONS Power Management If the player will not be in use for a long period of time, turn the player off, unplug the player, and remove any batteries, as applicable. When disconnecting the AC power cord (mains lead), grasp the plug itself and not the cord.
CONNECTIONS Optional Audio/Video Output Connections There are various connection options depending on your TV or other equipment; please refer to the documentation supplied by the manufacturer of your TV or stereo system for more connection information as necessary. Using Headphones or Earphones Your player can output audio to a pair of headphones or earphones for private listening during playback. Headphones or Earphones To PHONE OUT 1. Lower the volume of the unit. 2.
CONNECTIONS Connecting Video and Audio to a Television Your player can output video and audio to an external display (e.g., a television). YELLOW To VIDEO OUT WHITE To AUDIO OUT RED AV Input Panel of Television AV Cable 1. Using an AV patch cable, connect the player’s Video Out jack to the Composite Video In jack (yellow) of your TV. 2. Using an AV patch cable, connect the player’s Audio Out jack to the RCA Stereo In jacks (red and white) of your TV. 3. Set the TV to the correct input line.
CONNECTIONS Connecting Audio to a Stereo Receiver System Your player can output audio to an external stereo system (e.g., a receiver or amplifier). (vi ed) nus u deo RED To AUDIO OUT WHITE Audio Input Panel of Receiver/Amplifier o ide (v ) sed unu AV Cable 1. Using an AV patch cable, connect the player’s Audio Out jack to the RCA Stereo In jacks (red and white) of your stereo system. 2. Set the receiver or amplifier to the correct input line.
GETTING STARTED All instructions refer to the remote control unless indicated otherwise. Basic Operations 1. Prepare the connections and power supply. Set the Power Switch to the ON position to turn the player on. 2. Load a disc. Press the Open button on the player to open the Disc Compartment Lid. Insert a disc with the label-side up. Close the lid by hand until it clicks. • If a single-sided disc is inserted upside-down, the player will display the error message “NO DISC” or “BAD DISC”.
GETTING STARTED 3. Start playback. Press to start playback. • Some discs may start playing automatically or display a DVD menu specific to the disc. If a menu appears, use the Navigation Keypad to select a desired feature or option and then press to confirm. 4. Adjust the volume. Turn the Volume Dial on the player to adjust the volume level. To disable/restore all audio output, press . Basic Playback Controls To control basic playback functions: Remote Key Function Play a disc for the first time.
GETTING STARTED Remote Key Function Reverse-scan through the current track. Each successive keypress will change the scanning speed: To resume normal playback speed, press . Slow the playback speed (slow-motion). Each successive keypress will change the slow-motion playback speed: To resume normal playback speed, press . Play the video frame by frame. Each successive keypress will advance the video one frame. Press to resume normal playback speed. Stop the disc during playback (“Pre-Stop”).
GETTING STARTED When a DVD disc is playing: • Press once to display DVD time info. OSD Time Info: DVD • Press again to display DVD status info. CH1/1 ENG1/1 OSD Status Info: DVD • Press again to exit the OSD display. When a CD is playing: • Press once to display CD time info. Tracks Time 1/20 OSD Time Info: CD • Press again to exit the OSD display. www.cobyusa.
PLAYER FUNCTIONS Menu/Title and Setup Controls To navigate DVD disc menus or the player’s setup menus: Remote Key Function Access the DVD Title Menu (if available). The DVD Title Menu may allow you to access special features. Access the DVD Menu (if available). The DVD Menu may allow you to set camera angle, language, or subtitle options, or allow access to disc chapters. Navigation Keypad Navigation Keypad Select a desired menu feature or option. Confirm a selected menu feature or option.
PLAYER FUNCTIONS Remote Key Function Repeat a specific section of a disc (play on a loop). • Press to set the desired start point (“A”) of the section to be repeated. • Press again to set the desired end point (“B”). • The section “A-B” will now play repeatedly as a loop. Press again to resume normal playback. Press to view alternate camera angles of a DVD, if available. A DVD has may be mastered with up to 9 selectable camera angles. Press to view alternate subtitle tracks, if available.
PLAYER FUNCTIONS Random/Program To play tracks in random order, press press to confirm. twice to display “Random” and then Enter Program mode to create a custom sequence of tracks to be played. Press three times to display “PROGRAM” and then press to confirm. (Program mode is available only when the player is in NAVIGATE OFF mode. Press the PBC key to set the player to NAVIGATE OFF mode.) Use the Numeric Keypad to input numbers directly to the fields.
PLAYER FUNCTIONS CD Program Mode • Load a CD and enter Program mode. • Use the Navigation Keypad to select a field. • The left column designates the program order number. • Enter track numbers in the right “Trk” columns with the Numeric Keypad (or press to clear the field). • To start over, use the Navigation Keypad to select “Clear All” to delete all Track selections. • To play your programmed selections, use the Navigation Keypad to select “Play” or press to cancel.
SETUP Enter Setup mode to adjust the various internal settings of the player. Make sure the player has been completely stopped before entering Setup mode. 1. Press menu. to access the Setup 2. Use the Navigation Keypad to select a desired item. 3. Press to confirm a selection. 4. Press to exit the Setup menu (or select EXIT and then press ). Language Settings Item Description Default Setting OSD Set the language of the player’s on-screen display.
SETUP Audio Settings Item Description Default Setting Channel Output Sets the audio channel mix mode (LT/RT, Stereo). Stereo Parental Settings You must input the four-digit password to access the Parental settings. The initial password is 8888. Item Description Default Setting Change To change the password, you will need to enter the old password first. Choose a new password, and then enter the new password again to verify and confirm. DO NOT FORGET THE PASSWORD; this password cannot be reset.
TROUBLESHOOTING If you have a problem with this unit, please read the troubleshooting guide below and check our website at www.cobyusa.com for Frequently Asked Questions (FAQs) and firmware updates. If these resources do not resolve the problem, please contact Technical Support. COBY Electronics Technical Support 56-65 Rust Street Maspeth, NY 11378 Hours: 8:00 AM–11:00 PM EST, seven days a week. Phone: 718-416-3197, 800-681-2629, or 800-727-3592 Email: techsupport@cobyusa.com Web: www.cobyusa.
TROUBLESHOOTING There is no picture. • Ensure that the TV set has been powered on and is set to the correct AV mode. • Ensure that the connections between the player and the TV are secure and correct. • Check if the connection cables are damaged. • Restore the player to it’s factory-default settings: open the disc tray, and then press and together. The picture is noisy or distorted. • The disc may be damaged or dirty. Clean the disc or try another one. • Reset your TV’s color system.
TROUBLESHOOTING The remote control doesn’t work. • Ensure that the Power Switch has been physically set to the ON position. • Ensure that there are no obstacles between the remote and the player. • Point the remote at the remote sensor on the main unit. • Ensure that the batteries in the remote retain a charge and have been installed correctly. • Try replacing the remote’s batteries. The player has malfunctioned. • Unplug the player.
SPECIFICATIONS Display Type 7” Widescreen (16:9) TFT LCD Display Resolution 480 x 234 (QVGA) Media Support DVD, DVD±R/RW, CD, CD-R/RW, JPEG, MP3 Video Output Composite Video Audio Output 3.5mm Stereo 3.5mm Headphone Digital Audio Decoders Dolby Digital S/N Ratio 90dB typical Dynamic Range 90dB typical Video System NTSC/PAL Operating Conditions 32°F–95°F Power DC 9V 2A Power Consumption ≤9W Unit Dimensions 7.36” x 1.97” x 6.69” (WHD) Weight 2.07lbs.
COBY Electronics Corp. 56-65 Rust Street Maspeth, NY 11378 www.cobyusa.com www.ecoby.