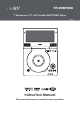
TF-DVD7008 7″ Widescreen TFT LCD Portable DVD/CD/MP3 Player 7008ZR Instruction Manual Please read this manual carefully before operation.
PRECAUTIONS CAUTION For Customer Use: Enter below the serial number that is located on the bottom of the unit. Retain this information for future reference. RISK OF ELECTRIC SHOCK DO NOT OPEN CAUTION: TO REDUCE THE RISK OF FIRE AND ELECTRIC SHOCK, DO NOT REMOVE THE COVER (OR BACK) OF THE UNIT. REFER SERVICING ONLY TO QUALIFIED SERVICE PERSONNEL. Model No. TF-DVD7008 Serial No.
PRECAUTIONS Do not make any changes or modifications to the equipment unless otherwise specified in the manual. If such changes or modifications should be made, you could be required to stop operation of the equipment. For recycling or disposal information about this product, please contact your local authorities or the Electronics Industries Alliance: www.eiae.org.
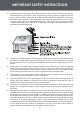
IMPORTANT SAFETY INSTRUCTIONS 1. Read Instructions: All the safety and operating instructions should be read before the product is operated. 2. Retain Instructions: The safety and operating instructions should be retained for future reference. 3. Heed Warnings: All warnings on the product and in the operating instructions should be adhered to. 4. Follow Instructions: All operating and usage instructions should be followed. 5. Cleaning: Unplug this product from the wall outlet before cleaning.
IMPORTANT SAFETY INSTRUCTIONS 15. Outdoor Antenna Grounding: If an outside antenna is connected to the product, be sure the antenna system is grounded so as to provide some protection against voltage surges and built-up static charges.
IMPORTANT SAFETY INSTRUCTIONS 22. Replacement Parts: When replacement parts are required, be sure that your service technician has used replacement parts specified by the manufacturer or have the same characteristics as the original part. Unauthorized substitutions may result in fire, electric shock, or other hazards. 23. Safety Check: Upon completion of any service or repairs to this product, ask the service technician to perform safety checks to ensure that the product is in proper operating condition.
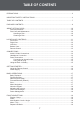
TABLE OF CONTENTS PRECAUTIONS................................................................................................................................2 IMPORTANT SAFETY INSTRUCTIONS.........................................................................................4 TABLE OF CONTENTS....................................................................................................................7 PACKAGE CONTENTS..................................................................................
TABLE OF CONTENTS Repeat Playback of a chapter / Title / All of a Disc...............................................................19 LCD Menu...............................................................................................................................20 SETUP............................................................................................................................................21 Language..................................................................................
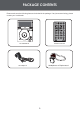
PACKAGE CONTENTS Please make sure the following items are included in the package. If any items are missing, please contact your local dealer.
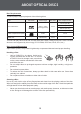
ABOUT OPTICAL DISCS Disc Requirements This DVD player supports playback of the following discs. Type Disc Mark Content Type Disc Size Max. Playback Time 133 min (SS-SL) Audio + Video (moving picture) DVD-Video Discs 12 cm 242 min (SS-DL) 266 min (DS-SL) 484 min (DS-DL) Audio 12 cm 74 min Still Picture 12 cm -- Audio Compact Discs (CDs) JPEG CDs -- This unit can play back CD-R and CD-RW discs that contain JPEG picture files.
LOCATION OF CONTROLS 7″ TFT LCD Speaker Enter Button Direction Buttons Next Button Previous Button Play/Pause Button Stop Button Setup Button LCD Mode Button Open Button Power on Indicator Remote Sensor Charging Indicator Front View 2. Press up/down direction button to select Mode and then press the Enter button to toggle the screen dimension between 16:9 and 4:3. 3. Select RESET and press ENTER to return the settings of brightness, contrast and color to their factory default settings.
LOCATION OF CONTROLS DC 9V in Jack Power Switch Video Jack Audio Jack Headphone Jack Volume Dial Ventilation Slots Battery Compartment Right View DC 9V IN Jack To connect to the AC Adapter / DC Car adapter for power supply. Power Switch To turn on/off the unit. Video Jack To connect to an external TV screen by the AV cable. Audio Jack To connect to an external speaker system by the AV cable. Headphone Jack Volume Dial To Adjust the Volume Level.
LOCATION OF CONTROLS Remote Control Display/Setup Zoom Subtitle Power Direction Buttons Next Repeat A-B Previous Enter Fast Forward Fast Reverse Repeat All Play/Pause Menu Menu Audio Angle Numeric Buttons LCD Mode Title 13 Title
CONNECTIONS Audio and Video Connections 1. Refer to the owner’s manual of the external device as well. 2. Before connecting the power source, ensure that all the connections are properly done. Headphone Connection Be sure that your unit is at low volume level before connecting the headphones. Increase the volume gradually for your comfortable listening. CAUTION: Hearing experts advise against the constant use of personal stereos played at high volume. Constant high volume use can lead to hearing loss.
CONNECTIONS Power Connections • Connecting to the wall outlet To DC 9V in Jack Caution: • Do not connect the power plug to a power outlet other than that which is indicated here and on the label as this may result in the risk of fire or electric shock. • Do not handle the power plug with wet hands. Doing so may cause electric shock. • Only use AC adapters of the type specified here. Failure to do so may case a fire or damage the player. • AC adapter: This AC adapter operates on 100-240V~~50/60Hz 0.
GETTING STARTED Using the Remote Control To load a battery in the remote: 1. Pull in the direction of the arrow. 2. Slide the compartment out. 3. Place the battery in the compartment with the positive side ( + ) facing up. 4. Push the compartment in to close. • • • • • • Point the remote at the remote sensor of the photo frame at a distance of no more than 15″ and at an angle no greater than 60 degrees. Batteries will last for about one year under typical usage.
BASIC OPERATIONS 1. Prepare the connections and power supply. 2. Load a disc. Press the Open button to open the disc compartment lid. Load a disc with the label-side facing up. Close the lid manually. If a single-sided disc is loaded upside-down, the player will display “BAD DISC”. 3. Start playback. Press Play/Pause button to start playback (some discs may start playing automatically). Play/Pause/Stop to play the disc for the first time. • Press during playback to pause.
BASIC OPERATIONS Adjusting the Volume • Turn the Volume Control dial to adjust the volume level up or down. Disc Error Messages The following messages will be displayed on-screen if there is a problem with the format of the loaded disc. • Disc region incorrect. The region code of the disc does not match the player’s region code (Region 1). • Incorrect Password. The parental rating level of the disc is higher than the parental rating level setting of the player. The player will not play the disc.
FUNCTION BUTTONS Display/Setup • • Press the DISPLAY button once to show playback information during playback. Press it twice to enter the player’s setup menu. Enter the Setup menu to adjust the player’s internal settings, please see the SETUP section for more details. Zoom Press ZOOM to change the magnification level of the picture. • During DVD playback, each successive press of ZOOM will change the level of magnification to: Zoom 1x, Zoom 2x, Zoom 3x, Zoom Off.
FUNCTION BUTTONS LCD Menu Press this button to display the LCD menu. Brightness Contrast Color Mode : 16:9 0 0 0 Reset 1. 2. 3. Press up/down direction button to select the desired item and then make adjustment by left/ right direction button. Press up/down direction button to select Mode and then press the Enter button to toggle the screen ratio between 16:9 and 4:3. Select RESET and press ENTER to return the settings of brightness, contrast and color to their factory default settings.
SETUP Various features of the player can be adjusted in the SETUP menu. 1. Press twice to enter the player’s setup menu. 2. Press the direction buttons to select the desired item. 3. Press ENTER to confirm.
SETUP Channel Output Rating Parental Control Set Password Sets the maturity rating level of the player. The player will not play any discs rated higher than this setting. This setting is password protected (the initial password is: 8888). Levels 1 to 8. (8: ADULT is default) Change the Parental Ctrl password. Enter the old password, and then the new password. DO NOT FORGET THE PASSWORD; this password cannot be reset. Misc Use Default Settings Resets all settings to their factory default state.
SPECIFICATIONS 1 6W Specifications and manual are subject to change without prior notice.
TROUBLESHOOTING If you have a problem with this unit, please read the troubleshooting guide below and check our website at www. cobyusa.com for Frequently Asked Questions (FAQs) and firmware updates. If these resources do not resolve the problem, please contact Technical Support. COBY Electronics Technical Support 56-65 Rust Street Maspeth, NY 11378 Email: techsupport@cobyusa.com Web: www.cobyusa.
TROUBLESHOOTING The remote control doesn’t work. • Ensure that the Power Switch has been physically set to the ON position. • Ensure that there are no obstacles between the remote and the player. • Point the remote at the remote sensor on the main unit. • Ensure that the batteries in the remote retain a charge and have been installed correctly. • Try replacing the remote’s batteries. The player has malfunctioned. • Unplug the player.
COBY Electronics Corp. 56-65 Rust Street Maspeth, NY 11378 www.cobyusa.com www.ecoby.