TFDVD7752 PORTABLE DVD / CD / MP3 PLAYER 7” Twin Screen Portable LCD DVD Player Instruction Manual Please read this manual carefully before operation.
PRECAUTIONS CAUTION RISK OF ELECTRIC SHOCK DO NOT OPEN CAUTION: TO REDUCE THE RISK OF FIRE AND ELECTRIC SHOCK, DO NOT REMOVE THE COVER (OR BACK) OF THE UNIT. REFER SERVICING ONLY TO QUALIFIED SERVICE PERSONNEL. For Customer Use: Enter below the serial number that is located on the bottom of the unit. Retain this information for future reference. Model No. TFDVD7752 Serial No.
PRECAUTIONS Do not make any changes or modifications to the equipment unless otherwise specified in the manual. If such changes or modifications should be made, you could be required to stop operation of the equipment. For recycling or disposal information about this product, please contact your local authorities or the Electronics Industries Alliance: www.eiae.org.
IMPORTANT SAFETY INSTRUCTIONS 1. Read Instructions: All the safety and operating instructions should be read before the product is operated. 2. Retain Instructions: The safety and operating instructions should be retained for future reference. 3. Heed Warnings: All warnings on the product and in the operating instructions should be adhered to. 4. Follow Instructions: All operating and usage instructions should be followed. 5. Cleaning: Unplug this product from the wall outlet before cleaning.
IMPORTANT SAFETY INSTRUCTIONS 15. Outdoor Antenna Grounding: If an outside antenna is connected to the product, be sure the antenna system is grounded so as to provide some protection against voltage surges and built-up static charges.
IMPORTANT SAFETY INSTRUCTIONS 22. Replacement Parts: When replacement parts are required, be sure that your service technician has used replacement parts specified by the manufacturer or have the same characteristics as the original part. Unauthorized substitutions may result in fire, electric shock, or other hazards. 23. Safety Check: Upon completion of any service or repairs to this product, ask the service technician to perform safety checks to ensure that the product is in proper operating condition.
TABLE OF CONTENTS PRECAUTIONS................................................................................................................................2 IMPORTANT SAFETY INSTRUCTIONS.........................................................................................4 TABLE OF CONTENTS....................................................................................................................7 PACKAGE CONTENTS..................................................................................
TABLE OF CONTENTS JPEG...............................................................................................................................20 Repeat Mode..........................................................................................................................21 Repeat A-B Mode...................................................................................................................21 Multi-Angle/Subtitle/Audio.................................................................
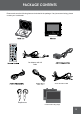
PACKAGE CONTENTS Please make sure the following items are included in the package. If any items are missing, please contact your local dealer.
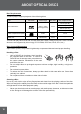
ABOUT OPTICAL DISCS Disc Requirements This DVD player supports playback of the following discs. Type Disc Mark Content Type Disc Size Max. Playback Time 133 min (SS-SL) Audio + Video (moving picture) DVD-Video Discs 12 cm 242 min (SS-DL) 266 min (DS-SL) 484 min (DS-DL) Audio Compact Discs (CDs) JPEG CDs -- Audio 12 cm 74 min Still Picture 12 cm -- This unit can play back CD-R and CD-RW discs that contain JPEG picture files.
LOCATION OF CONTROLS Front View Power on Indicator Charging Indicator Previous / Fast Reverse For your reference: 1. Place a disc with the label side facing up in the CD compartment. 2. To start playback, press the PLAY/PAUSE button. (Some discs will start playback automatically). 3. To stop playback, press the STOP button. 4. To play next / previous track, press the NEXT/PREV button. 5. To fast forward/reverse, repeatedly press and hold the NEXT/PREV button.
LOCATION OF CONTROLS Back View Battery Compartment Using the Stand 1. Lift up the stand from the groove. 2. Support the unit agaist the stand. 3. Set the lock switch to “Lock”. Left View Power Switch Set the power on/off. DC 9V IN Connect to the supplied AC Adapter or the DC Car Cord for power supply. Hold Switch Prevent the unit from the unexpected action. AV Switch Switch between AV IN and AV OUT. Coaxial Output the audio signal. Video Input/Output the video signal.
LOCATION OF CONTROLS Remote Control Title Dispaly Power LCD Mode Menu LCD Mode Setup Play/Pause Enter Direction buttons Stop Mute Zoom Mute Prev.
LOCATION OF CONTROLS Battery Installation Headphone Connection Be sure that your unit is at low volume level before connecting the headphones. Increase the volume gradually for your comfortable listening. CAUTION: Hearing experts advise against the constant use of personal stereos played at high volume. Constant high volume use can lead to hearing loss. If you experience ringing in the ears or hearing loss, discontinue use and seek medical advise.
CONNECTIONS Power, Audio and Video Output Connections Before connecting the power source, ensure that all the connections are properly done. • • Connecting to a wall outlet Outputting audio and video signal from the main unit to the monitor by the DC car cord. AC/DC adaptor for main unit: This AC/DC adaptor should be used with 100-240V~50/60Hz 0.6A MAX AC wall outlets. DC Out: 9V DC Current: 2.0A AC/DC adaptor for monitor: This AC/DC adaptor should be used with 100-240V~50/60Hz 0.5A Max AC wall outlets.
CONNECTIONS • • Using the car plug Outputting audio and video signal from the main unit to the monitor. Main Unit Monitor DC 9V in DC 9V in Video in Audio Jack Audio in Video Jack To the Cigarette Lighter Socket Audio and Video Connections (external device) Main Unit Slide the AV switch to AV IN to input the AV signal. Slide the AV swith to AV OUT to output the AV signal. External Device with AV input / output. To Video Jack To Audio Jack Monitor External Device with AV output.
CONNECTIONS Connecting to an amplifier equipped with a Dolby Pro Logic Surround Amplifier equipped with a DolbyPro Logic Surround To Coaxial Input To Coaxial Out Coaxial cable (not supplied) When connecting the equipment to a receiver equipped with Dolby Digital, refer to the owner’s manual. Rechargeable Battery Pack • • • For new or exhausted rechargeable battery pack, we recommend it be recharged for 4 hours. To charge the battery, just connect the AC adaptor.
BASIC OPERATIONS Open the disc compartment cover manually, load a disc with the label-side facing up. Close the disc compartment cover manually. If a single-sided disc is loaded upside-down, the player will display “NO DISC” or “Invalid Disc”.
BASIC OPERATIONS you can use the numeric keypad to input data.
PLAYER FUNCTIONS , All 20
PLAYER FUNCTIONS 100% In JPEG Mode Clear Search by display the search bar shown below: 02/12 Current Title 03/06 Total Titles Total Chapters Current Chapter _:__:__ In DVD mode, p numeric 5. Play/Pause exit and playback.
PLAYER FUNCTIONS Press the LCD Mode button once to display the LCD menu. • • • Press the Up/Down direction button to select the desired item, press the Left/Right direction button to adjust. When the SCREEN is selected, press the Left/Right direction button to change the screen dimension as 16:9 or 4:3. When RESET is selected, press the ENTER button to confirm the Brightness,Contrast and Color settings to the factory default settings. PROGRAM FUNCTION DVD Program Mode 22 1.
PLAYER FUNCTIONS CD Program Mode Track 1. Load a CD and press the PROGRAM button. 2. Press the DIRECTION buttons to select the Track and press the ENTER button to confirm. 3. The programmed track will be listed in the left column. 4. Repeat steps 1-2 until you have finished programming your selections or when you have programmed the maximum 20 tracks. 5. Press the CLEAR/STOP button to delete. 6. Press the Play/Pause button to start playback. Press the PROGRAM button to cancel.
SETUP Various features of the player can be adjusted in the SETUP menu 1. Press the SETUP button to show the setup menu. 2. Press the direction buttons to select the desired item. 3. Press the ENTER button to confirm.
SETUP W Off Digital Out Downmix Lo/Ro,Lt/Rt SPDIF/RAW Lo/Ro Custom Setup Parental Control Password Style Sets the style of the menus of the player. Angle mark Sets the angle mark of the disc.
SPECIFICATIONS Main Unit 198 165 37 mm 796 Monitor 1 6W NTSC/PAL Video Input Audio Input 198x165x26mm 493 Specifications and manual are subject to change without prior notice.
PLACEMENT Mounting in the Vehicle • • The headrest mounting bags for fitting the main unit and the monitor on to your car headrests. The bag has 2 straps that wrap around the headrest tightly and the main unit / monitor slides in and out of the bag.
TROUBLESHOOTING If you have a problem with this unit, please read the troubleshooting guide below and check our website at www.cobyusa.com for Frequently Asked Questions (FAQs) and firmware updates. If these resources do not resolve the problem, please contact Technical Support. COBY Electronics Technical Support 150 Knowlton Way Savannah, GA 31407 Email: techsupport@cobyusa.com Web: www.cobyusa.
TROUBLESHOOTING • • • • Ensure that the TV and amplifier have been turned on and properly set up. Ensure that the TV and amplifier connections are secure and correct. Try a different Audio track of the DVD by pressing AUDIO. Ensure that the MUTE function of the TV, Amplifier, or Player is not engaged. The remote control doesn’t work. • Ensure that the Power Switch has been physically set to the ON position. • Ensure that there are no obstacles between the remote and the player.
COBY Electronics Corp. 1991 Marcus Avenue,Suite 301 Lake Success, NY 11042 www.cobyusa.com www.ecoby.