COBY OPERATION MANUAL CX-CD425 MINI CD HOME STEREO SYSTEM WITH AM/FM DIGITAL TUNER 1
Safety Precautions * This product is designed for use in moderate dimares. Do not use or install this unit where it would be exposed to direct sunlight or in extremely hot temperatures, or near a radiator, stove or appliance that produces heat. * Do not take this unit into the bathroom, or near a swimming pool. Do not use it where it would be exposed to water, moisture, dripping or splashing. * No objects filled with liquids, such as vases, shall be placed on the product.
Technical specifications Care & Maintenance General Power Supply Cleaning CDs AC 230V ~ 50 Hz AC 110V/220V ~ 60/50 Hz (option) Output Power 2.5 Watt RMS per channel 5.0 Watt RMS per channel (option) Main Unit Dimension Speaker Box Dimension 220 (L) X 160 (W) X 250 (H) mm 197 (L) X 160 (W) X 246 (H) mm Net Weight 4 Kgs with Plastic Speaker Boxes 6 Kgs with Wooden Speaker Boxes (option) Use a soft cloth to wipe off any fingerprints and dust from the disc surface.
Preparation for use Switching on Main Power Carefully unpack the unit from its carton (do not attempt to connect anything at this stage). You should have the following items: Your System cames fitted with a mains power cable and plug. Packing included Plug into the mains socket and switch on. Ensure the voltage is compatible. The Power Standby LED Indicator will On and LCD display the Timer. 1. This User Guide. 2. Main Unit with built in AC plug. 3. Two Speakers Box. 4.
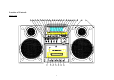
Location of Controls FRONT VIEW 27 26 25 24 23 22 20 21 19 S E NS OR 18 17 15 16 DN/ REW T A NDB S Y RA NDO M 14 M EMO RY DI SPLAY 13 T UNER 12 28 UP/ FF SLEEP/ TIM E L UME VO UP PLA Y/PAU SE STOP B / AN D CD TUN ER RE PEAT M UTE D OWN PHON ES TAPE E Q A. L. C.
Location of Controls (Cont.
Location of Controls (Cont.) 1. PAUSE BUTTON 2. STOP & EJECT BUTTON 3. FAST FORWARD BUTTON 4. REWIND BUTTON 5. PLAY BUTTON 6. RECORDING BUTTON 7. CASSETTE COMPARTMENT 8. VOLUME DOWN : Press to adjust sound level down. 9. VOLUME UP : Press to adjust sound level up. 10. UP/FF : CD - Skip/Search forward or TUNER - Radio frequency tuning up. 11. DN/REW : CD - Skip/Search backward or TUNER - Radio frequency tuning down. 12. EQ : Press to select EQ mode (FLAT/CLASSIC/ROCK/POP). 13.
Location of Controls (Cont.) Remote Control (28 Keys) Rear View Front View 1 13 POW ER 2 EQ MUTE FUN CTION REPEAT M-UP 1 2 3 4 8 3 4 14 5 6 7 9 10 10+ MEMORY R ANDOM INTRO DI SPLAY TIMER 19 15 5 6 7 SLEEP SKI P/ SEARC H 8 9 10 11 16 PLAY/ PAUSE 17 18 + - STOP/ BAN D VOLUME 12 8 1.POWER : ON/OFF-Standby button 2.MUTE : Press to muting the sound. 3.EQ : Press to select EQ mode (FLAT/CLASSIC/ROCK/POP). 4.Program select buttons TUNER - To recall preset stations.
GENERAL OPERATION POWER ON When power is connected for the first time, or if the power cord was unplugged and reconnected: - Press the MEMORY button ONCE. The Minutes segments display "00" . The Hour segments flash continuously - The STANDBY LED lights, and the LCD panel appears Clock Time as follows : - Press the Skip/Search >> or << button to select the desired hour. - Press the MEMORY button again and the minute segments flash. - Press the POWER button.
GENERAL OPERATION (CONT.) TIMER OPERATION TUNER OPERATION To set the wake-up timer - Press the POWER button to turn the unit off STANDBY - Press DISPLAY button. The TIMER indicator appears on the LCD and flashes. Press MEMORY button the hour segment flashes. - Press the Skip/Search >> or << button to select the wake-up hour. - Press the MEMORY button again. The hour segment stops flashing, the minute segment flashes. - Press the Skip/Search >> or << button to select te wake-up minute.
Using the Cassette Player LISTENING TO TAPE RECORDING Stop/Eject button - Press to stop all deck operations. Press again to open the Cassette Doors. Fast Forward Button - Press to start rapid tape Fast winding in forward direction. Fast Rewind Button - Press the to start rapid tape Fast winding in reverse direction. Play Button - Press to start playing a tape. Pause Button - Press to stop tape operation temporarily. Press again to resume tape operation.
Using the CD Player LOADING/PLAYING DISCS - Press Power Button to switch On the unit. - Press the CD Button to select CD mode. - Open the CD door by hand gentlely. Do not force open the CD door by hand at any time. - Place the CD in the compartment with the label side facing upwards. - Close the CD door by hand. When fully closed the CD will rotate briefly. The LCD Display will indicate the total number of tracks on the disc. - Once you have loaded a CD, press the CD Play/Pause Button.
Using the CD Player (Cont.) Programmed track selection You can set your Mini Tower System to play a selection of tracks from your disc. Repeat disc play You can set your CD player to repeat play a single track, the whole disc or your programmed track selection. To select specific tracks Make sure there is no CD playing. To repeat a single track Ensure that the track is first playing by pressing the Play/Pause Button. Press the MEMORY Button once . The LCD Display the desired number to program.
TUNER OPERATION Using the CD Player (Cont.) Basic operation - Press POWER button to turn on the power. - Press the TUNER button and press the BAND button to select AM or FM. - Press and release the Skip/Search >> or << button to select the desire radio station. - Press and hold the Skip/Search >> or << button briefly to search up or down for the next receivable station.
TROUBLESHOOTING Before requesting service, check the chart below for a possible cause of the problem you are experiencing. Some simple checks or a minor adjustment on your part may eliminate the problem and restore proper operation. If you are in doubt about some of the check points, or if the remedies indicated in the chart do not solve the problem, please consult your dealer for instruction. Problem No operation Checkpoint 1. Is the AC plug connected? 2. Is the desired mode selected? 3.