DVD-755 Compact 5.1-Channel Progressive Scan DVD Player Instruction Manual Please read this manual carefully before operation.
PRECAUTIONS For Customer Use: Enter below the serial number that is located on the bottom of the unit. Retain this information for future reference. Model No. DVD-755 Serial No. The lightning flash with arrowhead symbol within an equilateral triangle is intended to alert the user to the presence of uninsulated “dangerous voltage” within the product’s enclosure that may be of sufficient magnitude to constitute a risk of electric shock.
IMPORTANT SAFETY INSTRUCTIONS 1. Read Instructions: All the safety and operating instructions should be read before the product is operated. 2. Retain Instructions: The safety and operating instructions should be retained for future reference. 3. Heed Warnings: All warnings on the product and in the operating instructions should be adhered to. 4. Follow Instructions: All operating and usage instructions should be followed. 5. Cleaning: Unplug this product from the wall outlet before cleaning.
IMPORTANT SAFETY INSTRUCTIONS tion with regard to proper grounding of the mast and supporting structure, grounding of the lead-in wire to an antenna-discharge unit, size of grounding conductors, location of antenna-discharge unit, connection to grounding electrodes, and requirements for the grounding electrode (see figure). 16.
TABLE OF CONTENTS PRECAUTIONS.................................................................................................................................2 IMPORTANT SAFETY INSTRUCTIONS..............................................................................................3 TABLE OF CONTENTS.......................................................................................................................5 ABOUT OPTICAL DISCS......................................................................
TABLE OF CONTENTS SETUP............................................................................................................................................. 20 Language Settings..........................................................................................................................20 Display Settings..............................................................................................................................20 Speaker Settings.........................................
ABOUT OPTICAL DISCS Disc Requirements This DVD player supports playback of the following discs. Type Disc Mark Content Type Disc Size Max. Playback Time 133 min (SS-SL) Audio + Video (moving picture) DVD-Video Discs 12 cm 242 min (SS-DL) 266 min (DS-SL) 484 min (DS-DL) Audio Compact Discs (CDs) JPEG CDs -- Audio 12 cm 74 min Still Picture 12 cm -- This unit can play back CD-R and CD-RW discs that contain audio titles or JPEG picture files.
FEATURES • Progressive Scan DVD Player • Compact and Slim Design • DVD, DVD±R/RW, CD, CD-R/RW, and JPEG Compatible • Dolby Digital Decoder • 5.
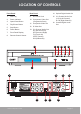
LOCATION OF CONTROLS Front Panel Rear Panel 14. Optical Digital Audio Out 1. Disc Tray 9. 2. Power Indicator 3. Open/Close Button 10. Component Video Out (Progressive Scan) 15. 2.1-Channel Audio Out: L-CH (Left Channel) R-CH (Right Channel) 4. Play/Pause Button 5. Stop Button 6. Power Button 7. Front Panel Display 8. Remote Control Sensor AC Power Cord 16. Coaxial Digital Audio Out 11. Composite Video Out 12. S-Video Out 13. 5.
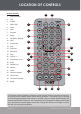
LOCATION OF CONTROLS Remote Control 1. Power/Standby 2. Title 3. Subtitle 4. Menu PBC 5. Audio 6. Mute 7. Program 8. Setup 9. Navigation Keypad 10. Slow 11. Play/Pause 12. Stop 13. Prev/Rev 14. Next/Fwd 15. Step 16. Volume + / 17. Progressive Scan 25 24 1 23 2 3 22 4 5 21 20 19 6 7 18 8 17 18. Zoom 19. Repeat A-B 9 20. Repeat 21. Clear 22. Numeric Keypad 16 10 15 23. Open/Close 24. On-Screen Display 25.
www.cobyusa.com Connect the AC power cord to the wall outlet AFTER all other cables are connected. S-VIDEO Cable 5.1-Channel Audio 2-Channel Audio Y Optical Input Amplifier with 5.1-ch RCA Jacks S-VIDEO Coaxial Input Connect only one type of audio or video connection at a time to minimize interference.
CONNECTIONS Standard Television Connection Yellow White Connect the player’s Composite Video Output to the TV’s Composite Video Input (yellow). Connect the player’s 2-Channel L&R Audio Outputs to the TV’s L&R Audio Inputs (red/white). Y Red To TV Composite Video Input Progressive Scan Video (480p) Connection Green Blue Connect the player’s Component Video Output to the TV’s Component Video Input (red/green/blue).
CONNECTIONS Stereo (2-Channel) Audio Connection with Amplifier Component or Composite Video Connection Surround (5.1-Channel) Audio Connection with Amplifier Use only ONE of the following connections to avoid signal interference: 1) 5.1-Channel Audio Out 2) Optical Digital Audio Out* 3) Coaxial Digital Audio Out* *requires a Digital Decoding Amplifier Component or Composite Video Connection Digital Output can be output in two formats: Raw or PCM.
GETTING STARTED Remote Control • Refer to the diagram. Remove the battery compartment cover located on the rear of the remote control. Insert batteries, making sure to match their polarities (+/-) to the markings on the inside of the compartment. Replace the cover. • To use the remote, point it at the remote sensor of the player. Operate the remote within 15 feet of the sensor and at an angle of +/- 60 degrees. • Batteries in the remote will last for approximately 1 year.
BASIC OPERATIONS Basic Playback 1. Prepare the connections and power supply. Set the Power Switch to the ON position to turn the player on. 2. Load a disc. Press the Open/Close button to open the disc tray. Insert a disc with the label-side up. Press the Open/Close button again to close the disc tray. • 3. If a single-sided disc is inserted upside-down, the player will display “NO DISC” or “BAD DISC”. Start playback. Press PLAY to start playback (some discs may start playing automatically).
BASIC OPERATIONS Menu Navigation To navigate DVD disc menus or the player’s setup menus: • Press the NAVIGATION keys (arrows) to select a desired feature or option in the menu. • Press ENTER to confirm a selection in the menu. • • For some menu options, you may be able to use the numeric keypad to input data. Press Clear to cancel an entry. Numeric Keypad • Use the numeric keypad to skip directly to a DVD chapter or CD track. (Some discs may not allow direct access function.
PLAYER FUNCTIONS Menu / Title • Press the MENU/PBC key during DVD playback to return to the disc’s Main menu. • Press the TITLE key during DVD playback to return to the disc’s Title menu. Setup Press the SETUP key to enter the player’s setup menu. Enter the Setup menu to adjust the player’s internal settings; please see the SETUP section for more details. On-Screen Display The On-Screen Display (OSD) indicator is a user-friendly interface designed to display playback type status.
PLAYER FUNCTIONS Repeat A-B Mode To repeat a specific section of a disc (play on a loop): 1. Press A-B to set the desired start point (“A”) of the section to be repeated. 2. Press A-B again to set the desired end point (“B”) of the section to be repeated. 3. The section “A-B” will now play repeatedly as a loop. Press A-B again to resume normal playback.
PLAYER FUNCTIONS DVD Program Mode • Load a DVD and enter Program mode. • Use the navigation keys to select a field. • Use the numeric keypad to enter track numbers in the left “Tt” columns (or press CLEAR to delete). • Use the numeric keypad to enter chapter numbers in the right “Chp” columns (or press CLEAR to delete). • To start over, use the navigation keys to select “Clear All” to delete all Track/Chapter selections.
SETUP Enter Setup mode to adjust the various internal settings of the player. Make sure the player has been completely stopped before entering Setup mode. 1. Press SETUP to enter Setup mode. 2. Use the NAVIGATION keys to select a desired item. 3. Press ENTER to confirm a selection. 4. Press SETUP to exit Setup mode (or select EXIT and press ENTER). Language Settings Use the NAVIGATION keys to highlight the desired language selection and press ENTER to confirm.
SETUP Speaker Settings Use the NAVIGATION keys to highlight the desired speaker selection and press ENTER to confirm. Item Description Default Setting 3D/EQ Sets the audio equalizer option (Off, 3D, Rock, Classic, Jazz, Pop). Off Reverb Sets the audio reverb effects option (Normal, Living Room, Hall, Arena, Cave, Concert Hall, Bathroom, Church). Off Surround Delay Sets the surround delay (in milliseconds). 0ms Center Delay Sets the center delay (in milliseconds).
SPECIFICATIONS Display Type Front Panel, On-Screen Disc Support DVD, DVD±R/RW, CD, CD-R/RW, JPEG Video Output Component Video (Progressive Scan) S-Video Composite Video Audio Output Optical Digital Audio Coaxial Digital Audio RCA 5.1-Channel Surround Audio RCA 2-Channel Stereo Audio Digital Audio Decoders Dolby Digital Video System NTSC/PAL Power AC 100-240V 20W (max) Unit Dimensions 8.86” x 2.0” x 10.43” (WHD) Specifications and manual are subject to change without notice.
TROUBLESHOOTING If you have a problem with this player, please read the troubleshooting guide below and check our website at www.cobyusa.com for Frequently Asked Questions (FAQs) and firmware updates. If these resources do not resolve the problem, please contact Technical Support. COBY Electronics Technical Support 56-65 Rust Street Maspeth, NY 11378 Hours: 8:00 AM–11:00 PM EST, seven days a week. Email: techsupport@cobyusa.com Phone: 718-416-3197, 800-681-2629, or 800-727-3592 Web: www.cobyusa.
TROUBLESHOOTING There is no sound or distorted sound. • Ensure that the TV and amplifier have been turned on and properly set up. • Ensure that the TV and amplifier connections are secure and correct. • Try a different Audio track of the DVD by pressing AUDIO. • Ensure that the MUTE function of the TV, Amplifier, or Player is not engaged. The remote control doesn’t work. • Ensure that the Power Switch has been physically set to the ON position.
NOTES www.cobyusa.
NOTES Page 26 Coby Electronics Corporation
NOTES www.cobyusa.
COBY Electronics Corp. 56-65 Rust Street Maspeth, NY 11378 www.cobyusa.com www.ecoby.