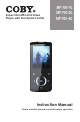
Super-Slim MP3 and Video Player with Touchpad Control MP-705-1G MP-705-2G MP-705-4G Instruction Manual Please read this manual carefully before operation
Precautions The lightning flash with arrowhead symbol within an equilateral triangle is intended to alert the user to the presence of uninsulated “dangerous voltage” within the product’s enclosure that may be of sufficient magnitude to constitute a risk of electric shock. The exclamation point within an equilateral triangle is intended to alert the user to the presence of important operation and servicing instructions in the literature accompanying the appliance.
Precautions NOTICE: This product is protected by certain intellectual property rights of Microsoft. Use or distribution of such technology outside of this product is prohibited without a license from Microsoft. Content owners use Windows Media digital rights management technology (WMDRM) to protect their intellectual property, including copyrights. This device uses WMDRM software to access WMDRM-protected content.
Precautions FCC Statement: This device complies with Part 15 of the FCC Rules. Operation is subject to the following two conditions: (1) This device may not cause harmful interference, and (2) This device must accept any interference received, including interference that may cause undesired operation. Note: This equipment has been tested and found to comply with the limits for Class B digital devices, pursuant to Part 15 of the FCC rules.
Important Safety Instructions 1. Read Instructions: All the safety and operating instructions should be read before the product is operated. 2. Retain Instructions: The safety and operating instructions should be retained for future reference. 3. Heed Warnings: All warnings on the product and in the operating instructions should be adhered to. 4. Follow Instructions: All operating and usage instructions should be followed. 5. Cleaning: Unplug this product from the wall outlet before cleaning.
Important Safety Instructions This plug will only fit into the power outlet in one direction. This is a safety feature. If you are unable to insert the plug fully into the outlet, try reversing the direction of the plug. If the plug should still fail to fit, contact an electrician to replace the obsolete outlet. Do not defeat the safety purpose of the polarized plug. 12.
Important Safety Instructions 16. Power Lines: An outside antenna system should not be located in the vicinity of overhead power lines or other electric light or power circuits, or where it can fall into such power lines or circuits. When installing an outside antenna system, extreme care should be taken to keep from touching such power lines or circuits, as contact with them might be fatal. 17.
Table of Contents Precautions.................................................................. 2 Important Safety Instructions............................... 5 Table of Contents........................................................ 8 Package Contents.................................................... 10 Features........................................................................ 11 Getting Started.......................................................... 12 Controls at a Glance......................
Table of Contents Radio Mode.................................................................30 Radio Controls...............................................................30 Quick Option Menu.............................................. 31 E-Book Mode...............................................................32 EBook List........................................................................ 32 EBook Controls............................................................... 32 Manual Mode Display......
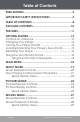
Package Contents Please make sure that the items shown below are included in the package. Should an item be missing, please contact the local retailer from which you purchased this product. 1. COBY MP3 Player 2. USB Cable 3. Instruction Manual 4. Professional Stereo Earphones 5.
Features Integrated Flash Memory Touchpad controls with backlight 2” TFT LCD Full-color display Plays Music, Video, Photos and Text Plays Digital Music from most online stores and subscription services* ID3 and LRC Support for song and synchronized lyric information display Integrated FM Radio USB 2.0 Hi-speed for fast file transfers * Music Service must support Windows Media DRM (WMDRM). WMDRM10 requires Windows XP and Windows Media Player 10 or newer. www.cobyusa.
Getting Started Controls at a Glance 1 2 3 4 5 8 9 6 7 12 10 11 Top View 1.
Getting Started Front View 2. LCD Display 3. Menu 4. Option 5. OK 6. Left / Previous 7. Down / Volume Down 8. Up / Volume Up 9. Right / Previous Bottom View 10. USB Port 11. Headphone Jack Rear View 12. Reset Button www.cobyusa.
Getting Started Charging Your Player Your player can be charged through a PC USB connection. Plug one end of the USB cable into the player’s USB Port and plug the other end into the USB port of a powered-on computer. When connected to a USB hub, the hub must be selfpowered to charge the player’s battery. The battery used in this device may present a fire or chemical burn if mistreated. Do not disassemble, incinerate, or heat the battery.
Getting Started Turning Your Player On/Off To turn the player on, slide the switch to the right and hold it until the screen turns on. To turn the player off, slide the switch to the right and hold it until the screen turns off. Slide switch to the right & hold Locking/Unlocking Your Player’s Keys (Hold) When the Hold switch is engaged, the Key Lock feature disables your player’s controls to prevent accidental key presses when it is in your pocket or bag.
Getting Started Resetting Your Player Reset your player if it should freeze and not respond or otherwise malfunction. 1. Disconnect your player if it is connected to a computer. 2. Use a paper clip to gently press the Reset button located on the rear of the player. Using the Touchpad Controls Your player comes equipped with a touch-sensitive control pad. To use the controls, touch the arrow keys on the front of the player lightly just as you would a button and the controls will light up.
Getting Started Touch Touch and hold any time. to confirm a selection. www.cobyusa.
Main Menu The Main Menu gives you access to the different function modes of your player. To access the Main Menu at any time, touch and hold . Touch or to confirm.
Music Mode Enter Music mode from the Main menu to play your MP3, WMA, or WAV audio files. To enter MUSIC mode, select and confirm MUSIC from the Main Menu. The main Music Explorer screen will appear. MUSIC Now Playing Artist Album Tracks Genre Playlist Folder Explorer For more information about how to get music onto your player, please refer to the section “USB Connections > Transferring Files”. www.cobyusa.
Music Mode Music Explorer Controls Use the Music Explorer to view all compatible music tracks loaded on your player. Key Function Touch Move the selection down. Touch Move the selection up. Touch Display folder contents if a folder is selected. Start track playback if a track is selected. Touch Return to the previous screen. Hold Return to Main Menu. To access the Now Playing screen, select the “Now Playing” option from the main Music Explorer screen.
Music Mode Now Playing Controls (Music Playback) Select a track from the Music Explorer and touch to start playback. The Now Playing screen will appear. A-B Repeat Indicator Lock Icon Time Clock Play Mode Battery Level Play Status Current Track / Equalizer Total Tracks File Name Artist Album Progress Bar Elapsed Time Total Time Use the following controls during music playback. Key Function Touch Start/Resume track playback. During playback, touch to pause playback. Touch Play the next track.
Music Mode Key Function Touch Increase the volume level. Touch Decrease the volume level. Touch Return to the Music Explorer screen. Hold Return to the Main Menu. Touch Start A-B Repeat mode. Hold Access the Quick Option Menu. Quick Option Menu The Quick Option menu gives you easy access to your player’s option settings. Touch and hold to access the Quick Option menu during music playback. Touch to move the selection down; touch to move the selection up.
Music Mode Equalizer Select a digital equalizer preset. The options are: Normal, Classic, Jazz, Rock, Pop, Bass, and SRS. SRS WOW® improves the dynamic audio performance of compressed and uncompressed audio by expanding the size of the audio image and creating a deep, rich bass response. Repeat Adjust the Repeat settings to change the repeat options. Item Description Normal Play tracks in normal order. Repeat One Play the current track repeatedly. Repeat All Play all tracks repeatedly.
Pictures Mode Enter PICTURES mode from the Main Menu to find and display JPEG image files loaded on your player. To enter Pictures mode, select and confirm PICTURES from the Main Menu. The Picture Explorer screen will appear. Picture Explorer Controls Use the Picture Explorer to view all picture files loaded on your player. Key Function Touch Move the selection down. Touch Move the selection up. Touch Display folder contents if a folder is selected. View a picture if a picture file is selected.
Photo Mode Key Function Touch Display the next picture. Touch Display the previous picture. Touch Rotate the picture. Touch Start or stop slideshow mode. Touch Return to the previous screen. Hold Access the Quick Option Menu. Touch Return to the Picture Explorer. Hold Return to Main Menu. You can change the duration of time between pictures during Slideshow mode from the Quick Option menu. Quick Option Menu The Quick Option menu gives you easy access to your player’s option settings.
Photo Mode Showtimer Touch or to adjust the amount of time between pictures during slideshow mode. Zoom Magnify the picture (Zoom In or Zoom Out). While the picture is magnified: Use the arrow keys to pan around the magnified picture. Touch Touch and hold menu. to return to Normal (100%) magnification. to access the Quick Option Rotate Rotate the picture. View Mode Adjust the orientation of the player during picture display. Horizontal: Hold the player horizontally.
Movies Mode Enter Movies mode to play AVI video files loaded on your player. To enter Movie mode, select and confirm MOVIE from the Main Menu. The Movie Explorer will appear on screen. Your player supports AVI files encoded with XviD at 220 x 176 and 30 fps. Videos must be encoded with the included software for device playback. For more information about converting video, please refer to the section “Movie Conversion”.
Movie Mode Movie Playback Controls When a movie is playing, hold the player horizontally. Use the following controls during movie playback. Key Function Touch Start/Resume video playback. During playback, touch to pause playback. Touch Play the next video. Hold Fast-forward through the current video. Touch Play the previous video. Hold Reverse through the current video. Touch Decrease the volume level. Touch Increase the volume level. Hold Access the Quick Option Menu.
Movie Mode Quick Option Menu The Quick Option menu gives you easy access to your player’s option settings. Touch and hold to access the Quick Option menu during while a movie is being played. Brightness Touch or www.cobyusa.com to adjust the brightness of the screen.
Radio Mode Enter Radio Mode to listen to FM radio broadcasts. To enter Radio mode, select and confirm RADIO from the Main Menu. You must have a pair of headphones connected to the headphone jack to receive FM broadcasts; your player will utilize the headphone cord as an antenna. Radio Controls Upon entering FM Radio mode, you can tune to stations manually or to preset stations. You must save preset stations prior to using preset tuning mode. See the Quick Option Menu section below for details.
Radio Mode Quick Option Menu The Quick Option menu gives you easy access to your player’s option settings. Touch and hold to access the Quick Option menu. Add/Delete Preset Save or delete the current station to/from the Preset Station list. FM Preset View the Preset Station list. Select a preset from the list to tune to the station. Sensitivity Set the sensitivity of the Auto Scan feature. Auto Scan Scan for all stations in broadcast reception range.
E-Book Mode Enter E-BOOK mode from the Main Menu to play text files (TXT) loaded on your player. EBook List Use the EBook List to view all text files loaded on your player. Touch while in EBOOK Mode to view the EBook List. Touch to move the selection up; touch move the selection down. Touch to confirm and play a selection. Touch to return to the previous screen. Hold to to return to the Main Menu.
E-Book Mode Auto Mode Display Select a file from the EBook List and touch confirm. Touch to start the slideshow. Touch stop the slideshow. to again to You can change the duration of time between the text files in the Quick Options menu. Adding a Bookmark Touch to save the current location as a bookmark tag. “Tag has been saved!” will appear on the screen. Quick Option Menu The Quick Option menu gives you easy access to your player’s option settings.
Explorer Mode Enter Explorer mode to view all folders and files loaded on your player. To enter Explorer mode, select and confirm EXPLORER from the Main Menu. If a compatible file is selected and confirmed, the file will be played in its corresponding mode. Music Mode: MP3, WMA Video Mode: AVI Photo Mode: JPEG EBook Mode: TXT Browser Controls Touch to move the selection up; touch move the selection down. Touch to to confirm a selection.
Setup Mode Enter the Setup mode to set your player’s system options. To enter Setup mode, select and confirm SETUP in the Main menu. To select an option, touch and enter, touch . Touch screen. To return to the Main Menu, hold Sound . To confirm to cancel and return to the previous Item Time or . Description Equalizer Set a digital equalizer preset (Normal, Classic, Jazz, Rock, Pop, Bass, SRS). Repeat Mode Set a Repeat Mode option. Normal: Play all tracks in sequential order.
Setup Mode Display Item Backlight Adjust the duration of time (in seconds) that the backlight will remain on after a key press. A setting of “Always On” will keep the backlight on continuously. Brightness Adjust the brightness of the display. Langauge System Description Set the language that the on-screen menus appear in. Music Auto Play Set the Auto Play feature on or off. When Auto Play is set to ON, you player will automatically resume playback when it wakes from standby.
USB Connections Connect the Coby player to a computer with the USB 2.0 cable provided to: Transfer files to and from your player Perform basic file management functions. USB Driver Installation (Win 98 SE Only) It is not necessary to install the USB driver if your computer is running Microsoft Windows ME/2000/XP/Vista, or Macintosh OS X. Computers running these operating systems will recognize your player automatically when connected. If your computer is running Windows 98 SE: 1.
USB Connections Connecting to a Computer Connect the player to your computer with the supplied USB cable. Upon connection: Your computer will automatically recognize the player as an MTP Device. An icon representing your player will appear under “Audio Devices” when you open “My Computer”. It may take Windows several minutes to recognize and set up the device the first time it is connected depending on your hardware configuration.
USB Connections If you need further assistance with transferring files, please refer to your operating system’s instruction manual or on-screen help. If you are using media management software such as iTunes, Winamp, or Windows Media Player, please refer to their documentation for support. Do not disconnect or otherwise interrupt the player during transmission—this could damage or corrupt the player’s firmware or your files.
USB Connections 2. Your player contains two folders: Data and Media. Drag your media files to the Media folder (e.g., MP3, WMA files). Drag all other types of files to the Data folder for storage. Data files are only visible from a computer; these files will not be available from within the player itself. Macintosh OS X 1. Open a finder window. Located the files you would like to transfer from your computer. Select the files/folders with the mouse and press APPLE-C (copy) on the keyboard. 2.
USB Connections Disconnecting from a Computer Disconnect your player as instructed below to detect data loss or file/firmware corruption. Microsoft Windows 1. Double-click the green arrow in the taskbar located on the lower-right side of the computer screen (Safely Remove Hardware). 2. Safely Remove Hardware: Select “USB Mass Storage Device” from the list that appears and then click on “Stop”. Stop a Hardware Device: Select “USB Mass Storage Device” from the list that appears and then click on “OK”. 3.
USB Connections Macintosh OS X 1. On the left side of the Finder Window, identify the appropriate Removable Disk icon. 2. Click on the “Eject” arrow on the right of the Removable Disk icon. 3. Disconnect the USB cable from the player and your computer.
Video Conversion Use the video conversion software utility included on the Installation CD to create video files that are suitable for playback on the player. Your player supports XviD-encoded AVI files with the following specifications: 220 x 176 resolution at 30 frames per second (fps). The video conversion software is included for your convenience and is compatible with Microsoft Windows operating systems only.
Video Conversion Minimum System Requirements OS Support Microsoft 2000/XP/Vista (32-bit only) CPU Pentium class equivalent or better Memory (RAM) > 64MB Free HD Space 10MB Video 24-bit color adapter WMP Windows Media Player 9 or better Installation 1. Locate the MP3 Player Utilities setup file on the Installation CD: setup.exe. 2. Double-click the file to start the installation process. 3. Follow the on-screen instructions to complete the installation process.
Video Conversion Converting Video To start the program, locate the Video Converter program in your Windows Start menu. www.cobyusa.
Video Conversion The application window shown below will appear. 1 2 4 5 3 6 1. Click the “Input File” button to select the source video file to convert. The source file must be one of the following video types: AVI, RM, RMVB, MPG, MPEG, MP4, ASF, WMV, MKV, DAT, or VOB. DirectX 9.0, Media Player 9.0, and other codecs must be installed to support all media types. 2. Click the “Output File” button to choose a name and location for the completed file after conversion. 3.
Video Conversion 4. [Optional] Click the “Settings” button to change the conversion options. Do not change these settings if you are not familiar with digital video conversions. 5. Click the “Convert” button to begin converting all of the files in the Job Queue. 6. The progress bar displays the progress of the conversion job. When the progress bar reaches “100%”, the conversion job has been completed. www.cobyusa.
Windows Media Player You can use Windows Media Player and a USB-MTP connection to manage your music media library with Microsoft Windows XP or newer. The latest version of Windows Media Player can be downloaded from the Microsoft website: http://www.microsoft.com/windows/windowsmedia/default.mspx Please refer to the Quick Start Guide included with your player for more information.
Firmware Upgrades From time to time, COBY may release firmware upgrades to improve the performance of the Player or to add additional features. Please check the COBY website periodically at www.cobyusa.com to see if new firmware has been released for your player. If you are experiencing abnormal behavior with your player, you may choose to restore (format) your player before updating its firmware. Do not interrupt the firmware upgrade process—doing so could damage your player and render it inoperable.
About MP3/WMA Files For more information about digital MP3 and WMA files, please visit our website at www.cobyusa.com.
Troubleshooting If you have a problem with this device, please read the troubleshooting guide below and check our website at www.cobyusa.com for Frequently Asked Questions (FAQs) and firmware updates. If these resources do not resolve the problem, please contact Technical Support. Address COBY Electronics Technical Support 56-65 Rust Street Maspeth, NY 11378 Email techsupport@cobyusa.com Web www.cobyusa.
Troubleshooting I cannot transfer files to the player. Ensure that your computer is running a supported operating system. If using a USB extension cable, ensure that it is securely attached to the player and the PC, or try using another USB cable. If you have connected the player through a USB hub, try connecting the player directly to your computer. Ensure that the player’s memory capacity is not full. Ensure that the Hold switch is disengaged. There is no sound during playback.
Troubleshooting Ensure that the headphones are attached securely to the player. The player will not play my music file. Ensure that the file is in a compatible format. The file may be copy-protected and you no longer have authorization to play this file. If you feel this is in error, please contact the service from which you downloaded the file. The LCD characters are corrupted or something is wrong with the display. Ensure that the correct menu language has been set.
Specifications Display Type 2” Full-Color TFT @ 176x220 Memory MP705-1G: 1GB Flash MP705-2G: 2GB Flash MP705-4G: 4GB Flash Audio Format Support MP3, WMA, WMA-DRM, WAV Video Format Support MPEG-4 (XviD): 220x176, 30fps Photo Format Support JPEG DRM Support WMDRM10* Song Info Support ID3, Windows Media FM Frequency Range 87.5 - 108.0MHz PC Interface USB 2.0 (MSC or MTP) OS Support Windows 2000/XP/Vista Audio Output 3.
Notes www.cobyusa.
Notes Page 56 Coby Electronics Corporation
Notes www.cobyusa.
Coby Electronics Corporation 56-65 Rust Street Maspeth, NY 11378 www.cobyusa.com www.ecoby.com Coby is a registered trademark of Coby Electronics Corporation. Printed in China.