MP-C951 20GB DIGITAL MUSIC PLAYER with COLOR SCREEN and VIDEO PLAYBACK Instruction Manual Please read this manual carefully before operation.
SAFETY INSTRUCTIONS CAUTION RISK OF ELECTRIC SHOCK DO NOT OPEN CAUTION: TO REDUCE THE RISK OF FIRE AND ELECTRIC SHOCK, DO NOT REMOVE THE COVER (OR BACK) OF THE UNIT. REFER SERVICING ONLY TO QUALIFIED SERVICE PERSONNEL. For Customer Use: Enter below the serial number that is located on the bottom of the unit. Retain this information for future reference. Model No. MP-C951 Serial No.
SAFETY INSTRUCTIONS In addition to the careful attention devoted to quality standards in the manufacture of this device, safety is a major factor in the design of every instrument. However, safety is your responsibility, too. This sheet lists important information that will help to assure your enjoyment and proper use of this device and accessory equipment. Please read this carefully before operation and use of your device. 1. Read these instructions carefully. Keep these instructions for future reference.
TABLE OF CONTENTS SAFETY INSTRUCTIONS.................................................................................................................... 2 TABLE OF CONTENTS....................................................................................................................... 4 FEATURES.......................................................................................................................................... 7 PACKAGE CONTENTS....................................................
TABLE OF CONTENTS MOVIE MODE................................................................................................................................ 21 PHOTO MODE................................................................................................................................ 22 FM RADIO MODE.......................................................................................................................... 23 Basic FM Radio Operation...............................................
TABLE OF CONTENTS CREATING MOVIES WITH VIRTUALDUB....................................................................................... 33 Installing VirtualDub and Media Codecs on your Computer..................................................33 Installing XviD.................................................................................................................33 Installing LAME...............................................................................................................
FEATURES • Plays Music, Video, Photos, and Text • Plays digital music from most online stores and subscription services. • Bright 2” TFT LCD color display. • 20GB hard disk for all your storage needs. • Elegant touchpad interface control. • USB 2.0 for ultra-fast file transfers (up to 40x faster than USB 1.0). • Real-Time MP3 recording allows you to encode your CDs without a computer. • USB On-the-Go Host support allows you to transfer files from other USB-enabled devices without a computer.
PACKAGE CONTENTS Please make sure that the items shown below are included in the package. Should an item be missing, please contact the local retailer from which you purchased this product.
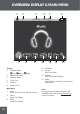
LOCATION OF CONTROLS 13 12 11 14 10 9 15 16 BOTTOM TOP 1 2 7 3 5 6 4 8 FRONT BACK 17 Front View Bottom View 1. Menu 14. DC 5V Power Jack 2. Up / Volume Up 15. USB-MSC Port 3. Left / Previous 16. USB-MTP/HOST Port 4. Down / Volume Down 5. Right / Next 6. Enter 7. Play / Pause 8. Record / A-B Top View 9. Back View 17. Reset To use the touchpad interface, press lightly on the red-lit markings to activate the control. Power On / Off (slide right) 10.
OVERVIEW: DISPLAY & MAIN MENU 1 2 3 8 9 Display 1. 6 10 11 12 13 10. FM Radio Playback Status: Play; Pause; 2. Repeat Play Status 3. Equalizer Status 4. Clock Time 5. AM/PM 6. Battery Level Stop Main Menu 10 5 NORMAL 12:30 P 1 7 4 7. Music: Music, Encode, Voice, Playlists, Search 8. Movie: Movie File (Folder) 9. Photo Image File (Folder) 11. E-book Text File (Folder) 12. Explorer Tree View (Folder Display) 13.
POWER SUPPLY Charging Your Player Your player has a rechargeable lithium-polymer battery that will provide up to 12 hours of play time. The battery should be charged fully (minimum 4 hours) before its initial use to ensure optimum lifetime performance. To charge your player: • AC Adapter: Plug one end of the supplied AC Adapter into the DC 5V Power Jack and plug the other end into a 100240V wall outlet. • USB Port: Your player can be charged through its USB MSC Port.
USB CONNECTIONS USB-MSC versus USB-MTP The MP-C951 comes equipped with two types of USB ports: USB-Mass Storage Class (USBMSC) and USB-Media Transfer Protocol (USB-MTP). Both USB connections allow for simple, high-speed transfers of files between your player and a computer, and allow you to use your computer’s operating system to view, manage, and transfer files to your player from your computer There are, however, a few differences to take note of.
USB CONNECTIONS USB Driver Installation (Required for Windows 98 SE Only) It is not necessary to install the USB driver if your computer is running Microsoft Windows ME/2000/XP or newer, or Macintosh OS X. Computers running these operating systems will recognize your player automatically when connected. If your computer is running Windows 98 SE: 1. Insert the Installation CD into your computer’s CD or DVD drive. Make sure to place the mini-CD in the center, recessed well of the drive tray. 2.
USB CONNECTIONS Macintosh OS X 1. On the left side of the Finder window, identify the appropriate Removable Disk icon. 2. Click on the “Eject” arrow on the right of the Removable Disk icon. 3. Disconnect the USB cable from the player and your computer. Transferring Files USB connections makes it easy to transfer music, video, photo, and text files (or any other data) quickly between the player and your computer.
USB HOST CONNECTION The USB HOST connection allows you to transfer data from other USB drives directly to your player -- without the use of a computer. This makes it easy to use the MP-C951 to save photos from a digital camera or documents from a thumb-drive while you’re on the go. The USB Host connection will work with most USB devices that are formatted as FAT16 drives and are USB Mass Storage Class devices. To use the USB Host connection: 1. Connect the USB Host cable to your player’s USB-MTP/HOST port.
BASIC OPERATIONS Using the Touchpad Controls Your player comes equipped with a touch-sensitive control pad. The active key areas glow red; touch these areas lightly to use the controls as you would a button. If you touch and hold a key, it will register as a continuous button press. Basic Navigation To navigate through the different menu options and files on your player: • Touch the Navigation keys to move the selection in the direction of the arrow.
BASIC OPERATIONS Play Mode Options Play Mode options change the order in which music tracks are played. The current Play Mode is indicated at the top of the screen. Note: Play Mode options can be used for music or voice playback only. To change the Play Mode options: 1. Enter Music mode and play a track. 2. Touch to cycle through and change the Play Mode.
MUSIC MODE Enter Music mode to play your MP3, WMA, OGG, or WAV audio files. To enter Music mode, select and confirm MUSIC in the Main menu. Upon entering Music mode, you will have the following options: Music, Encode, Voice, Playlists, and Search. Music Select and confirm MUSIC in the Music Mode menu to access the File Browser to look for music files in the ROOT folder of your player. • Use the Navigation keys to select folders and music files to play. Refer to the Basic Operations section for details.
MUSIC MODE Encode Select and confirm ENCODE in the Music Mode menu to access the File Browser to look for LineIn and FM Radio recording files in the ENCODE folder of your player. This is where your player stores Line-in and FM Radio recordings; refer to the Recording section for more details). • Use the Navigation keys to select folders and recording files to play. Refer to the Basic Operations section for details.
MUSIC MODE Advanced Functions: Music Favorite (+/-) Use the Favorite function to quickly add a song to your Favorites Playlist. Favorite tracks can be found in by selecting Music > Playlists > Favorite. • If a track has not been stored as a Favorite, the Favorite option will have a (+) symbol next to it. Select and confirm the option to add the track to your Favorites Playlist. • If a track has been stored as a Favorite, the Favorite option will have a (-) symbol next to it.
MOVIE MODE Enter Movie mode to play your XviD-encoded AVI video files. The MP-C951 supports playback of XviD-encoded AVI files. Please see the Creating Movies with VirtualDub section for details on how to create video files that are compatible with the MP-C951. To enter Movie mode, select and confirm MOVIE in the Main menu. Upon entering Movie mode, you can use the File Browser to look for movie files in the MOVIE FILE folder of your player.
PHOTO MODE Enter Photo mode to play your JPEG and BMP photo files. To enter Photo mode, select and confirm PHOTO in the Main menu. Upon entering Photo mode, you can use the File Browser to look for photo files in the IMAGE FILE folder of your player. • Use the Navigation keys to select folders and photo files to play. • While a photo is displayed: • 22 to skip to the next photo; touch to skip to the previous photo • Touch • Touch to view thumbnails of your photos.
FM RADIO MODE Enter FM Radio mode to play tune into FM Radio broadcasts. You must have a pair of headphones connected to the headphone jack to receive FM broadcasts; your player will utilize the headphone cord as an FM antenna. To enter FM Radio mode, select and confirm FM RADIO in the Main menu. Basic FM Radio Operation Upon entering FM Radio mode, you can tune into stations manually (FREQ) or by using preset stations (PRESET). • Touch to toggle between FREQ and PRESET tuning modes.
E-BOOK MODE Enter E-Book mode to read TXT E-book files. To enter E-Book mode, select and confirm E-BOOK from the Main menu. Upon entering E-Book mode, you can use the File Browser to look for text files in the TEXT FILE folder of your player. • Use the Navigation keys to select folders and text files to play. • While a text file is displayed: • to skip forward one line; press to skip forward one page.
RECORDING Your player can record from 3 types of sources: Microphone, Line-In, or FM Radio. (See the SETUP section for details about changing your player’s recording options.) Voice Recording Make voice recordings through the integrated microphone located on the top of your player. 1. Place the player in MUSIC mode. 2. Disconnect any cables from the Line-In jack located on the top of your player. 3. Touch and hold 4. to start recording through the microphone.
RECORDING FM Recording Make recordings of FM Radio broadcasts. 1. Place the player in FM RADIO mode. 2. Tune to the FM broadcast station you would like to record. 3. Touch and hold • 4. 26 Touch Touch to start recording the FM Radio broadcast. to pause recording; press again to resume recording. to stop and save the recording. • The resulting file will be saved to the ENCODE folder. • The file will be named FMXXX.
EXPLORER MODE Enter Explorer mode to view and manage the folders and files on your player. To enter Explorer mode, select and confirm EXPLORER from the Main menu. Upon entering Explorer mode, you will see a “Tree View” which will display all of the folders on your player (see figure below). Use the Navigation keys to select a folder and touch to view its contents.
EXPLORER MODE Cut (Move) 1. From “Tree View”, use the Navigation keys to select a folder and touch contents. to view its 2. Use the Navigation keys to select a file/folder to delete. Touch and hold and confirm CUT. , and then select 3. Select and confirm NO to cancel, or YES to move the file/folder. The player will prompt you to select a destination folder and will display the Tree View of your folders. Info 28 1. From “Tree View”, use the Navigation keys to select a folder and touch contents.
SETUP MODE Enter Setup mode to set the system options of your player. To enter SETUP mode, select and confirm SETUP in the Main menu. Upon entering Setup mode, you will have the following options: Sound, Display, General, Timer, Record, and Information. Sound Select and confirm SOUND in the Setup Mode menu to set options relating to the way audio is processed by your player. The Sound options are: User EQ and Balance. User EQ Selected Band Set your custom, user-defined equalizer setting. 1.
SETUP MODE Brightness Set the brightness of the LCD screen. 1. Touch to decrease the screen’s brightness; touch to increase the screen’s brightness. A setting of 0 is darkest; a setting of 10 is brightest. 2. Touch when you are finished to save. 0 [5] 10 Selected Value Language Set the language of the player’s on-screen menu. The language options are: English, Korean, Dutch, Italian, French, Spanish, Portuguese, and Chinese. 1. Touch and 2. Touch when you are finished to save.
SETUP MODE Load Default Restore all of the player’s settings to their factory-default state. Timer Select and confirm TIMER in the Setup Mode menu to set options relating to your player’s internal clock features. The Timer options are: Sleep, Date / Time, and Alarm. Sleep Set the Sleep Timer (in minutes). The player will automatically turn off after the set amount of time. 1. Touch to decrease the time interval; touch to increase the time interval.
SETUP MODE Record Select and confirm RECORD in the Setup Mode menu to set options relating to your player’s recording features. The Record options are: MIC Quality, Line-In Quality, Radio Quality, Sync On/Off, and Voice Detect. MIC Quality Set the quality of recordings made through the integrated microphone. The options are: L (Low), M (Medium), and H (High). High-quality recordings will sound best, but will take up more of the player’s memory.
CREATING MOVIES WITH VIRTUALDUB Use the VirtualDub video conversion software utility included on the Installation CD to create movies that are suitable for playback on the MP-C951. Your player supports XviD-encoded AVI files with the following specifications: • QCIF+ resolution (220x176), 12 frames per second (FPS) • QCIF resolution (176x144), 15 frames per second (FPS) Note: QCIF+ and QCIF are standard video resolution sizes.
CREATING MOVIES WITH VIRTUALDUB Installing LAME The LAME audio codec must be installed on your computer in order to properly encode videos using VirtualDub. 34 1. Insert the Installation CD into your computer’s CD or DVD drive. Make sure to place the mini-CD in the center, recessed well of the drive tray. 2. Navigate to MY COMPUTER and double-click on the CD/DVD drive icon (usually “D:”). 3. Double-click on the folder “lame 3.96.1”. 4. Double-click on the folder “ACM”. 5.
CREATING MOVIES WITH VIRTUALDUB Installing VirtualDub VirtualDub is a standalone application and does not need to be “installed” like a regular program. Simply copy the folder to a location on your computer and double-click the application icon to start VirtualDub. 1. Insert the Installation CD into your computer’s CD or DVD drive. Make sure to place the mini-CD in the center, recessed well of the drive tray. 2. Navigate to MY COMPUTER and double-click on the CD/DVD drive icon (usually “D:”). 3.
CREATING MOVIES WITH VIRTUALDUB • 3. Load a Processing Setting preset. • 36 Use the dialog box that appears to find and select the source video file and then click the OPEN button. From the top menu bar, select File > Load Processing Settings. Alternately, you may press Ctrl+L on the keyboard.
CREATING MOVIES WITH VIRTUALDUB • Select “QCIF.vcf” for smaller (176x144) video files; select “QCIF-plus.vcf” for larger (220x176) video files. Click the OPEN button to load the selected preset.
CREATING MOVIES WITH VIRTUALDUB 4. 38 Convert the source file to an XviD-encoded AVI output file. • From the top menu bar, select File > Save as AVI. Alternately, you may press F7 on the keyboard. • Use the dialog box that appears to select a destination folder to save the converted output file to. Type a file name for the file in the “File name” box, and then click the SAVE button.
RESTORE & FIRMWARE UPDATES From time to time, COBY may release firmware updates to improve MP-C951 performance or to add additional features. Please check the COBY website at www.cobyusa.com periodically to see if a new firmware has been release for your player. If you are experiencing abnormal behavior with your player, you may choose to first restore (format) the player and then update its firmware.
RESTORE & FIRMWARE UPDATES Updating Your Player’s Firmware Firmware updates may be found on the COBY Electronics website at www.cobyusa.com. Check this site periodically for new updates. Firmware updates may improve performance or add new functionality to your player. IMPORTANT: Do not disconnect your player from the computer or otherwise interrupt the firmware upgrade process—doing so could damage your player and render it inoperable. To upgrade your player’s firmware: 40 1.
TROUBLESHOOTING If you have a problem with this player, please read the troubleshooting guide below and check our website at www.cobyusa.com for Frequently Asked Questions (FAQs) and firmware updates. If these resources do not resolve the problem, please contact Technical Support. COBY Electronics Technical Support Hours: Monday to Friday, 8:30 AM–11:00 PM EST Saturday to Sunday, 9:00 AM–11:00 PM EST Email: techsupport@cobyusa.com Phone: 800-681-2629 or 718-416-3197 Web: www.cobyusa.
TROUBLESHOOTING There is something wrong with the LCD display. • Ensure that battery is charged or that the player is operating on AC power. • Try rebooting the player by sliding and holding the Power/Lock switch to the right for several seconds, or try using a pin to press the Reset button on the rear of the player. The player has malfunctioned.
SPECIFICATIONS Display Type 2” Full-Color TFT LCD Display Resolution 220 x 176 Memory 20GB HDD Audio Format Support MP3, WMA, OGG, WAV Video Format Support AVI (XviD): Photo Format Support JPEG, BMP E-Book Format Support TXT Song Info Support ID3, LRC PC Interface USB MSC: USB 2.0 High-Speed USB MTP/HOST: USB 2.
COBY Electronics Corp. 56-65 Rust Street Maspeth, NY 11378 www.cobyusa.com www.ecoby.