TF-DVD1256 5.6” TFT Portable DVD/MP3/CD Player and NTSC TV Tuner Instruction Manual Please read this manual carefully before operation.
PRECAUTIONS CAUTION RISK OF ELECTRIC SHOCK DO NOT OPEN CAUTION: TO REDUCE THE RISK OF FIRE AND ELECTRIC SHOCK, DO NOT REMOVE THE COVER (OR BACK) OF THE UNIT. REFER SERVICING ONLY TO QUALIFIED SERVICE PERSONNEL. For Customer Use: Enter below the serial number that is located on the bottom of the unit. Retain this information for future reference. Model No. TF-DVD1256 Serial No.
IMPORTANT SAFETY INSTRUCTIONS 1. Read Instructions: All the safety and operating instructions should be read before the product is operated. 2. Retain Instructions: The safety and operating instructions should be retained for future reference. 3. Heed Warnings: All warnings on the product and in the operating instructions should be adhered to. 4. Follow Instructions: All operating and usage instructions should be followed. 5. Cleaning: Unplug this product from the wall outlet before cleaning.
IMPORTANT SAFETY INSTRUCTIONS 15. Outdoor Antenna Grounding: If an outside antenna is connected to the product, be sure the antenna system is grounded so as to provide some protection against voltage surges and built-up static charges.
IMPORTANT SAFETY INSTRUCTIONS 22. Replacement Parts: When replacement parts are required, be sure that your service technician has used replacement parts specified by the manufacturer or have the same characteristics as the original part. Unauthorized substitutions may result in fire, electric shock, or other hazards. 23. Safety Check: Upon completion of any service or repairs to this product, ask the service technician to perform safety checks to ensure that the product is in proper operating condition.
TABLE OF CONTENTS PRECAUTIONS.................................................................................................................................. 2 IMPORTANT SAFETY INSTRUCTIONS.............................................................................................. 3 TABLE OF CONTENTS....................................................................................................................... 6 PACKAGE CONTENTS.....................................................................
TABLE OF CONTENTS MORE DVD FUNCTIONS............................................................................................................... 18 Display....................................................................................................................................18 Menu / Title / Return...............................................................................................................18 Setup...............................................................................
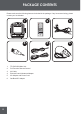
PACKAGE CONTENTS Please make sure the following items are included in the package. If any items are missing, please contact your local dealer. 1 Standby 2 3 5 6 DVD/AV Previous Exit 4 1. TF-DVD1256 Main Unit 2. Full Function Remote Control 3. AV Cable 4. External Coaxial Antenna Adapter 5. AC Adapter and Power Cord 6.
ABOUT OPTICAL DISCS Disc Requirements This DVD player supports playback of the following discs. Type Disc Mark Content Type Disc Size Max. Playback Time 133 min (SS-SL) Audio + Video (moving picture) DVD-Video Discs 12 cm 242 min (SS-DL) 266 min (DS-SL) 484 min (DS-DL) Audio Compact Discs (CDs) JPEG CDs -- Audio 12 cm 74 min Still Picture 12 cm -- This unit can play back CD-R and CD-RW discs that contain JPEG picture files.
LOCATION OF CONTROLS Top View Side View (Right) TUNING CONTROL (Radio) STEREO SPEAKERS ANTENNA HANDLE DISC COMPARTMENT OPEN BUTTON TV-MENU BAND SWITCH FUNCTION SWITCH DVD: STOP TV: LEFT DVD: PLAY/PAUSE TV: RIGHT DVD: NEXT TV: CH + / UP DVD: PREVIOUS TV: CH - / DOWN Front View SCREEN MASTER VOLUME CONTROL TUNING CONTROL (Radio) REMOTE SENSOR POWER BUTTON HEADPHONE JACK FREQUENCY PANEL 10
LOCATION OF CONTROLS Remote Control Standby DVD/AV Previous Exit Battery Installation To open the battery compartment: 1) Press in the direction of the arrow; 2) Slide the compartment out. CR2025 + To install the battery: 1) Place the battery in the compartment with the positive side ( + ) facing up; 2) Push the compartment in to close.
CONNECTIONS RCA Audio/Video Output Use the built-in DVD player with another TV or external display. 1. Connect a TV to the unit’s Rear AV jacks with the supplied AV Cable (L, R, VIDEO). • You may opt to use the Digital Coaxial Audio connection INSTEAD of the RCA Audio (L, R) connection (refer to the Digital Coaxial (5.1-Channel) Audio section for details. • Note that the Rear AV jacks are used for both DVD output and AV input. 2. Set the Function Switch to the DVD position. 3.
CONNECTIONS Digital Coaxial (5.1-Channel) Audio The DVD player can output 5.1-channel surround sound audio through the Coaxial Digital Audio jack. You will need a Dolby Pro Logic Surround amplifier and a digital coaxial cable to use this feature. Dolby Pro Logic Surround Amplifier To Digital Coaxial Input Coaxial Cable (not supplied) To COAXIAL Out (TV-DVD1260) Note: • Please refer to your receiver’s instruction manual for more information on how to properly set up your surround sound system.
GETTING STARTED Remote Control • To use the remote, point it at the remote sensor of the player. Operate the remote within 15 feet of the sensor and at an angle of +/- 60 degrees. • Replace the battery if the remote control does not work. • Remove the battery from the remote if it will not be used for a long period of time. Power Supply Using the AC/DC Adapter This AC/DC adapter should be used with 100-240V 50/60Hz AC wall outlets. • DC Out: 13.5V, 3.5A max.
BASIC OPERATIONS Radio Mode 1. Press POWER to turn on the unit. 2. Set the Function Switch to the RADIO position. 3. Set the Band Switch to the AM or FM position. 4. Tune into a desired broadcast station by turning the Tuning Control dial. 5. Adjust the volume level by turning the Volume Control dial. TV Mode 1. Press POWER to turn on the unit. 2. Set the Function Switch to the TV position. 3. Extend the telescopic antenna. Adjust the position of the antenna to maximize broadcast reception.
BASIC OPERATIONS Play/Pause/Stop • Press to play the disc for the first time. • Press during playback to pause. Press • Press during playback to stop the disc (“Pre-Stop”). Press time-point at which the disc was stopped. • Press when the disc is “Pre-Stopped” to stop playback completely. (When the disc will start playing from the beginning.) again to resume playback. to resume playback at the is pressed, Next/Previous (Skip) • Press to skip forward one track (DVD, CD, etc).
BASIC OPERATIONS Adjusting the Volume • Turn the Volume Control dial to adjust the volume level up or down. • Press MUTE to turn the volume off completely; press mute again to restore the volume to its previous level. Disc Error Messages The following messages will be displayed on-screen if there is a problem with the format of the loaded disc. • WRONG REGIONAL DISC. The region code of the disc does not match the player’s region code (Region 1). • WRONG PASSWORD.
MORE DVD FUNCTIONS Display • Press the DISPLAY button once to show time information on-screen; press it twice to show status information on-screen; press it a third time to exit the on-screen display mode. • When the player is in AV IN mode, press the DISPLAY button to toggle between TV System modes (NTSC or PAL). Menu / Title / Return • Press the MENU button during DVD playback to return to the DVD’s Main menu. • Press the TITLE button during DVD playback to return to the DVD’s Title menu.
MORE DVD FUNCTIONS Repeat Mode Press REPEAT to change the repeat mode of the player. Each successive press of REPEAT will change the mode as follows: Track Chapter Track Folder Disc Off Title Disc Off Disc Off Note: Some DVD discs do not allow Repeat mode. Repeat A-B Mode To repeat playback of a specific section of a disc (loop): 1. Press A-B to set the desired start point (“A”) of the section to be repeated. 2. Press A-B again to set the desired end point (“B” of the section to be repeated.
MORE DVD FUNCTIONS DVD Program Mode 1. Load a DVD and press PROGRAM. 2. Press the right DIRECTION button to select the “Title” column; press the up/down DIRECTION buttons to select a title. 3. Press the right DIRECTION button to select the “Chapter” column; press the up/down DIRECTION buttons to select a chapter. 4. Press PLAY (or OK) to confirm the selection. 5. Repeat steps 2-4 until you have finished programming your selections or when you have programmed the maximum 20 tracks. 6.
DVD SETUP Enter DVD Setup mode to adjust the various internal settings of the built-in DVD player. Make sure the player has been completely stopped before entering Setup mode. 1. Press DVD SETUP to enter Setup mode. 2. Use the DIRECTION buttons to select a desired item. 3. Press OK to confirm a selection. 4. Press DVD SETUP to exit Setup mode (or select EXIT and press OK). Language Setup Use the DIRECTION buttons to highlight the desired language selection and press OK to confirm.
DVD SETUP Audio Setup Use the DIRECTION buttons to highlight the desired audio selection and press OK to confirm. Item Digital Out Description Sets the player’s Digital Coaxial Out (audio) signal. For use with 5.1-channel receivers (see your receiver’s manuals for more details). Options (Default is in Bold) SPDIF/RAW, SPDIF/PCM, Off Custom Setup Use the DIRECTION buttons to highlight the desired Custom Setup selection and press OK to confirm.
TV SETUP Enter TV Setup mode to adjust the various internal settings of the Television. Using the Remote: 1. Press TV SETUP to enter TV Setup mode. 2. Use the UP and DOWN direction buttons to select a desired item. 3. Press the RIGHT direction button to confirm a selection, or press the LEFT direction button to cancel. • 4. If necessary, you may use the numeric keypad to input data and then press RIGHT to confirm. Press TV SETUP to exit Setup mode. Using the Main Unit buttons: 1.
TV SETUP P.Lock (Parental Lock/V-Chip) Setup The P.LOCK options control the built-in V-Chip feature of the television. TV broadcasts include a signal that classifies the contents of the program. When this feature is activated, the TV will detect this signal and block any programs that are rated higher than what you have set. There are two different rating systems: MPAA (movies) and TV (television broadcasts).
TV SETUP Timer Setup The Timer options control the internal clock and alarm features of the television. Item Description On Timer Set a time for the TV to turn on automatically On CH Set the channel the TV will be tuned to Clock Set the internal clock time of the TV Preset Setup The Preset options control the channel preset options of the television.
SPECIFICATIONS Display Type 5.6” TFT LCD with LED backlight Key Features TV Tuner, DVD Player, AM/FM Radio Other Features V-Chip, Closed Caption TV Tuner System NTSC TV Tuner Range Full Over-the-Air Channels Full Cable Channels Disc Support DVD, DVD±R/RW, CD, CD-R/RW, MP3, JPEG AV Input RCA Audio/Video 75Ω Coaxial (with included adapter) AV Output RCA Audio/Video (DVD) Coaxial Digital Audio (DVD) 3.
TROUBLESHOOTING If you have a problem with this player, please read the troubleshooting guide below and check our website at www.cobyusa.com for Frequently Asked Questions (FAQs) and firmware updates. If these resources do not resolve the problem, please contact Technical Support. COBY Electronics Technical Support Hours: Monday to Friday, 8:30 AM–11:00 PM EST Saturday to Sunday, 9:00 AM–11:00 PM EST Email: techsupport@cobyusa.com Phone: 800-681-2629 or 718-416-3197 Web: www.cobyusa.
TROUBLESHOOTING The remote control doesn’t work. • Ensure that the Power Switch has been physically set to the ON position. • Ensure that there are no obstacles between the remote and the player. • Point the remote at the remote sensor on the main unit. • Ensure that the batteries in the remote retain a charge and have been installed correctly. • Try replacing the remote’s batteries. The player has malfunctioned. • 28 Unplug the player and remove the battery pack for 30 minutes.
NOTES 29
NOTES 30
NOTES 31
COBY Electronics Corp. 56-65 Rust Street. Maspeth, NY 11378 www.cobyusa.com. www.ecoby.