TF-DVD7307 7” Wide Screen TFT LCD Portable DVD/CD/MP3 Player with Swivel Screen Instruction Manual Please read this manual carefully before operation.
SAFETY INSTRUCTIONS CAUTION For Customer Use: Enter below the serial number that is located on the bottom of the unit. Retain this information for future reference. RISK OF ELECTRIC SHOCK DO NOT OPEN CAUTION: TO REDUCE THE RISK OF FIRE AND ELECTRIC SHOCK, DO NOT REMOVE THE COVER (OR BACK) OF THE UNIT. REFER SERVICING ONLY TO QUALIFIED SERVICE PERSONNEL. Model No. TF-DVD7307 Serial No.
SAFETY INSTRUCTIONS 1. Read these instructions carefully. Keep these instructions for future reference. . Heed all warnings and follow all instructions. 3. Do not expose to water or moisture. . Clean only with a dry cloth. 5. Keep objects away from ventilation openings. Do not block ventilation openings at any time. 6. Do not install near any apparatus that produces heat such as stoves, radiators, amplifiers, etc. 7. Do not force the power plug into a wall outlet.
TABLE OF CONTENTS SAFETY INSTRUCTIONS.................................................................................................................... 2 TABLE OF CONTENTS....................................................................................................................... 4 ABOUT OPTICAL DISCS................................................................................................................... 6 Disc Requirements...............................................................
TABLE OF CONTENTS Repeat Mode..........................................................................................................................17 Repeat A-B Mode...................................................................................................................17 Multi-Angle/Subtitle/Audio......................................................................................................18 Zoom..........................................................................................
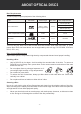
ABOUT OPTICAL DISCS Disc Requirements This DVD player supports playback of the following discs. Type Disc Mark Content Type Disc Size Max.
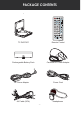
PACKAGE CONTENTS Mute Clear Step TF-DVD7307 Remote Control Rechargeable Battery Pack Car/Boat DC Power Adapter AC Power Adapter Power Cord AV Cable (RCA) Headphones - -
LOCATION OF CONTROLS Main Unit TFT LCD Speaker DC 9V IN AV Switch VIDEO In/Out OPTICAL/AUDIO In/Out POWER ON Indicator HEADPHONE Jack VOLUME Control Battery Charge Indicator Remote Sensor POWER Switch Note: The Power On Indicator lights green during normal playback, and red when in Standby mode. SCREEN The Battery Charge Indicator lights red while the battery is charging, and green when it is fully charged.
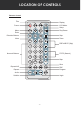
LOCATION OF CONTROLS Remote Control Title Display LCD Mode Power Setup Menu Play/Pause Enter Direction Buttons Stop Mute Zoom Mute PREV/NEXT (Skip) FF/FR (Search) Numeric Buttons Step Clear Step Slow PBC Program Repeat A-B Repeat Audio Subtitle Angle - -
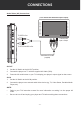
CONNECTIONS Audio/Video (AV) Connections (TV or monitor with audio/video input or output) To VIDEO In/Out To Audio/Video Input or Output To OPTICAL/AUDIO In/Out Audio/Video RCA cable (supplied) AV OUT 1. Set the AV Switch to the AV OUT position. . Connect the player to a TV with the supplied AV Cable (RCA). 3. Press the AV mode button on your TV to display your player’s output signal on the screen. AV IN 1. Set the AV Switch to the AV IN position. .
CONNECTIONS Dolby Pro Logic Surround (Optical Audio) Connection Your player can output 5.1-channel surround sound audio through the Optical/Audio jack. You will need a Dolby Pro Logic Surround amplifier and an optical cable to use this feature. Dolby Pro Logic Surround Amplifier To Optical Input Optical Cable (not supplied) To OPTICAL/AUDIO Out Note: Please refer to your receiver’s instruction manual for more information on how to properly set up your surround sound system.
GETTING STARTED Remote Control • Refer to the diagram. Remove the battery compartment cover located on the rear of the remote control. Insert batteries, making sure to match their polarities (+/-) to the markings on the inside of the compartment. Replace the cover. • To use the remote, point it at the remote sensor of the player. Operate the remote within 15 feet of the sensor and at an angle of +/- 60 degrees. • Batteries in the remote will last for approximately 1 year.
GETTING STARTED Using the Battery Pack (DC) The rechargeable battery pack can be used for approximately 300 charge-cycles without any noticeable change in performance. Important: The battery should be charged fully (minimum 4 hours) before its initial use to ensure optimum lifetime performance. To install the battery pack: 1. Place the battery into the recessed cradle located on the bottom of the player. . Insert the battery hooks into their slots and slide the battery into place.
BASIC OPERATIONS Basic Playback 1. Prepare the power supply. Set the Power Switch to the ON position to turn the player on. . Load a disc. Press the Open button to open the disc compartment lid. Insert a disc with the label-side up. Close the lid by hand (the lid will click into place). • 3. If a single-sided disc is inserted upside-down, the player will display “NO DISC” or “BAD DISC”. Start playback. Make sure the AV Switch is set to AV OUT to use the player’s built-in LCD screen.
BASIC OPERATIONS Menu Navigation To navigate DVD disc menus or the player’s setup menus: • Press the DIRECTION buttons to select a desired feature or option in the menu. • Press ENTER to confirm a selection in the menu. • • For some menu options, you may be able to use the numeric keypad to input data. Press Clear to cancel an entry. Numeric Keypad • Use the numeric keypad to skip directly to a DVD chapter or CD track.
FUNCTION BUTTONS LCD Mode Press the LCD MODE button to adjust the brightness, contrast, and color of the LCD screen. 1. Press the up/down DIRECTION buttons to select the desired setting to adjust. From top to bottom, the settings are: Screen, Brightness, Contrast, Color, and Reset. . Press the left/right DIRECTION buttons to adjust the selected setting. SCREEN 16 : 9 4 : 3 • Use the SCREEN adjustment to switch between 4:3 (standard) and 16:9 (wide screen) aspect ratios.
MORE FUNCTIONS Search Press SEARCH to go directly to a desired point of a disc (eg, Title, Chapter, Time). DVD Chapter/Title Search: • Press SEARCH once to display the Chapter/Title Search Bar shown to the right. • Press the left/right DIRECTION buttons to select (highlight) an entry field. • Use the Numeric keypad to input the desired chapter/title number, or press the up/down DIRECTION buttons to increase/decrease the chapter/title number.
MORE FUNCTIONS Multi-Angle/Subtitle/Audio • During playback of a DVD that has been mastered with multiple angles, press ANGLE to view the available alternate camera angles. (A DVD may have up to 9 selectable angles.) • During playback of a DVD that has been mastered with subtitles, press SUBTITLE to view the available subtitle tracks. (A DVD may have up to 32 selectable subtitles.
MORE FUNCTIONS CD Program Mode 1. Load a CD and press PROGRAM. . Press the right DIRECTION button to select the “Track” column; press the up/down DIRECTION buttons to select a track. 3. Press PLAY (or ENTER) to confirm the selection. . Repeat steps 2-3 until you have finished programming your selections or when you have programmed the maximum 20 tracks. 5. Press PLAY to start playback. Press PROGRAM to cancel. MP3 Program Mode 1. Load an MP3-CD and press PROGRAM. .
SETUP Enter Setup mode to adjust the various internal settings of the player. Make sure the player has been completely stopped before entering Setup mode. 1. Press SETUP to enter Setup mode. . Use the DIRECTION buttons to select a desired item. 3. Press ENTER to confirm a selection. . Press SETUP to exit Setup mode (or select EXIT and press ENTER). Language Setup Use the DIRECTION buttons to highlight the desired language selection and press ENTER to confirm.
SETUP Audio Setup Use the DIRECTION buttons to highlight the desired audio selection and press ENTER to confirm. Item Digital Out Description Options (Default is in Bold) Sets the player’s Optical Out (audio) signal. For use with 5.1-channel receivers (see your receiver’s manuals for more details). SPDIF/RAW, SPDIF/PCM, Off Custom Setup Use the DIRECTION buttons to highlight the desired Custom Setup selection and press ENTER to confirm.
SPECIFICATIONS Power Supply AC: 100-240V UL Listed Adapter DC: 9V, 2A Power Consumption ≤ 9.8W Video Signal System NTSC / PAL Video Output 3.5mm mini-jack to RCA Composite Video Audio Output 3.5mm Stereo Headphone 3.5mm Stereo Line-Out Optical Out Video Input 3.5mm mini-jack to RCA Composite Video Audio Input 3.5mm Stereo Line-In S/N Ratio 90dB Typical Dynamic Range (Audio) 90dB Typical Display Type 7” TFT LCD (16:9 Wide Screen) Display Resolution 480 x 234 Unit Dimensions 7.76” x 1.
TROUBLESHOOTING If you have a problem with this player, please read the troubleshooting guide below and check our website at www.cobyusa.com for Frequently Asked Questions (FAQs) and firmware updates. If these resources do not resolve the problem, please contact Technical Support. COBY Electronics Technical Support Hours: Monday to Friday, 8:30 AM–11:00 PM EST Saturday to Sunday, 9:00 AM–11:00 PM EST Email: techsupport@cobyusa.com Phone: 800-681-2629 or 718-416-3197 Web: www.cobyusa.
TROUBLESHOOTING The remote control doesn’t work. • Ensure that the Power Switch has been physically set to the ON position. • Ensure that there are no obstacles between the remote and the player. • Point the remote at the remote sensor on the main unit. • Ensure that the batteries in the remote retain a charge and have been installed correctly. • Try replacing the remote’s batteries. The player has malfunctioned. • Unplug the player and remove the battery pack for 30 minutes.