
User`s manual


72
will apply in this table; and, if Military was selected, the AM/PM field will not appear here. If
the entire delay start screen is to be aborted, press the “NO” key at the ACCEPT field. When
the start time and date are entered and the data is accepted after the “YES/ENTER” key is
pressed, the infusion is set to start at the programmed time. The display then returns to the
next field in the Pre-Prescription Menu.
After the entire prescription program is accepted, if the pump is turned OFF and back ON,
press “YES” at PROGRAM and “YES” to REPEAT Rx. The cursor will automatically
scroll through the program. No changes will be allowed in the Pre-Prescription Menu during
this time, thus maintaining the originally programmed Delay Start time. To change the Delay
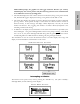
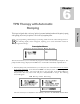
Start time, press the “NO/CHANGE” key when the Run Options Screen is displayed:
Run Options Screen
This will allow the clinician to go back to review the program and at this point a change can
be made to the delay start time.
Note: If the pump is not connected to the patient’s access site at this time, the patient or
caregiver should be taught proper techniques to access the infusion site before the
scheduled start time.
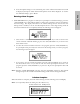
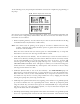
When the “”RUN” key is pressed, the Green and Yellow LED lights will flash to indicate that
the pump will automatically start when the delay start countdown period is up. During the
delay start time, the following screen appears:
If the KVO rate is set to 0, the pump will beep ten minutes prior to the beginning of the
therapy start time. To stop the audible beep, press the “Silence” key.
During the delay start period, if the KVO rate is set to 0
, no fluid is
infusing. Be sure the access device is patent and has been flushed
per facility policy to maintain patency during this time period. If a
KVO rate is programmed, then that KVO rate will be used in the
Delay Start period.
2 NEXT?: If there are any changes to be made, use the up or down arrow keys to locate the
field to be changed, use the numeric keys to enter the corrected information, and press
“YES/ENTER” to accept the new data. If all the fields are acceptable, move the cursor to
the “NEXT?” field and press the “YES/ENTER” key to move on to the next screen.
IMPORTANT
INFORMATION