
Instruction manual


18
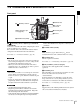
Attaching a Lens
Chapter 2 Installation and Preparations
2-3 Attaching a Lens
Attach a lens that conforms to the PL lens mount.
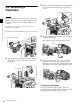
Always use a lens whose projection from the flange (A in
the figure) is less than 31.5 mm (1
1
/
4
inch). Use of any lens
that protrudes more than 31.5 mm (1
1
/
4
inch) will damage
the internal filter.
For information on handling lenses, refer to the operation
manual for the lens.
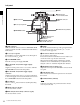
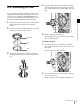
1
Rotate the lens fixing lever counterclockwise and
remove the lens mount cap from the lens mount.
2
Align the lens’ alignment pin with the notch in the
upper part of the lens mount and insert the lens into the
mount.
3
While supporting the lens, rotate the lens fixing lever
clockwise to secure the lens.
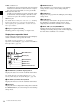
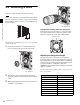
Changing the position of the lens fixing lever
Remove the four screws from the face of the lens fixing
lever indicated in the figure. Change the position of the
fixing lever, reinsert the screws and securely tighten.
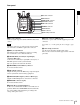
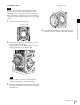
Adjusting the flange focal length
The optical section uses materials not susceptible to
thermal expansion, so flange back adjustment is generally
not required. However, if you want to make an adjustment,
remove the lens mount and replace the shim with one of the
appropriate thickness. At shipment, a 0.05 mm
(0.0020 inch) shim is installed. The following replacement
shims are available.
For information about replacing shims, consult your local
Sony representative.
Note
Lens fixing lever
Part number Thickness
4-260-711-03 0.02 mm (0.0008 inch)
4-260-711-13 0.03 mm (0.0012 inch)
4-260-711-23 0.04 mm (0.0016 inch)
4-260-711-33 (standard) 0.05 mm (0.0020 inch)
4-260-711-43 0.06 mm (0.0024 inch)
4-260-711-53 0.07 mm (0.0028 inch)
4-260-711-63 0.08 mm (0.0032 inch)
4-260-711-73 0.09 mm (0.0036 inch)
4-260-711-83 0.10 mm (0.0040 inch)
Lens alignment pin
Remove screws