
Instruction manual


23
Setting the Date and Time
Chapter 2 Installation and Preparations
2-8 Setting the Date and
Time
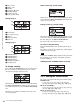
When the camera is used for the first time, the menu for
setting the date and time is displayed in the viewfinder. Set
the current date and time on the <Date/Hour Meter> page
in the Config menu.
To set the menu using a monitor screen, connect a monitor
to an SDI OUT connector.
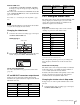
1
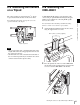
Turn on the camera power supply.
2
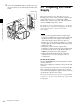
Press the VF MENU button.
The menu appears in the viewfinder.
3
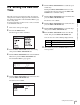
Turn the MENU SEL/ENTER dial to select Config,
then press the MENU SEL/ENTER dial.
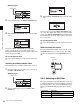
4
Turn the MENU SEL/ENTER dial to select Date/Hour
Meter, then press the MENU SEL/ENTER dial.
The <Date/Hour Meter> page appears.
5
Turn the MENU SEL/ENTER dial to select Date, then
press the MENU SEL/ENTER dial.
The date becomes editable.
6
Turn the MENU SEL/ENTER dial to set the date (year,
month, day).
Turning the MENU SEL/ENTER dial moves to the
next digit. Select the day, then press the MENU SEL/
ENTER dial to confirm the setting.
7
Turn the MENU SEL/ENTER dial to select Time, then
press the MENU SEL/ENTER dial.
The time becomes editable.
8
Turn the MENU SEL/ENTER dial to set the time, then
press the MENU SEL/ENTER dial.
9
Turn the MENU SEL/ENTER dial to select Date Type,
then press the MENU SEL/ENTER dial.
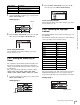
10
Turn the MENU SEL/ENTER dial to select the date
format, then press the MENU SEL/ENTER dial.
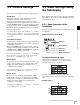
You can select one of the following display formats.
11
When finished, press the VF MENU button to exit
menu operation.
Setting Example display (18th December, 2011)
Y/Mn/D 2011/12/18
Mn/D 12/18