
Instruction manual


35
Setting the Shooting Mode
Chapter 3 Basic Adjustments and Settings
3-5 Setting the Shooting
Mode
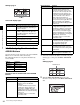
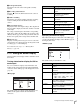
The shooting mode can be set to RAW mode or HD mode.
You select the mode on the <System Format> page of the
Camera menu (page 43). You can also set the frame rate
and the encoding on the <System Format> page.
<System Format> page
RAW/HD
Selects the shooting mode.
F65RAW: Records 16-bit linear RAW data.
HD: Develops RAW data to HD internally, and records
HD data.
F65RAW-HFR: 16-bit linear RAW data recorded at
120 fps (max.).
• If a frame rate setting with “ForPB” is set for Frame
Rate, color bars are displayed when the camera is
powered-on and the camera switches to video when
you start playback.
• In F65RAW-HFR mode, switching quickly from
playback to stop and back to playback may display
color bars during playback or may not display color
bars when stopped. In this case, stopping and
starting playback restores normal operation.
• The viewfinder display cannot be magnified when
playing back in F65RAW-HFR mode.
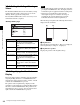
Frame Rate
Selects the frame rate. The frame rates that can be selected
vary depending on the RAW/HD mode selection. For
details about the frame rates that can be selected, see “3-3-
2 Setting the Video Format” (page 26).
Signal Mode
Selects the signal format in HD mode. 4:4:4 RGB or 4:2:2
YCbCr can be selected.
Configurable in HD mode only.
Bit Depth
Displays the number of recording bits. “10bit” or “12bit”
is automatically displayed according to the Encode setting.
When Encode is set to Lite or SQ, 10-bit recording is
selected. When set to HQ, 12-bit recording is selected.
Encode
Selects the recording mode.
In F65RAW mode, “F65RAW-SQ” or “F65RAW-Lite”
can be selected.
In HD mode, “SR-HQ” or “SR-SQ” can be selected when
Signal Mode is set to 4:4:4 RGB, and “SR-SQ” or “SR-
Lite” can be selected when Signal Mode is set to 4:2:2
YcbCr.
Not configurable in F65RAW-HFR mode.
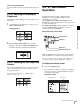
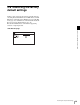
To enable a setting
1
Select each parameter on the <System Format> page,
select Set, and then press the MENU SEL/ENTER
dial.
2
After confirming the setting in the confirmation
dialog, select Execute, then press the MENU SEL/
ENTER dial.
The settings are reflected on the camera.
Note