
Specifications


www.pulsar.pl PowerSecurity
18
The diagram window can be scaled by pressing the left mouse button and selecting the area to be
enlarged. To enlarge the selected diagram, press the mouse button and move the mouse from left to right. To
return to normal scale, move the mouse from right to left.
The program enables storing the read data for further analysis. Press the button to save the data in
.csv or .dat format, allowing reloading and displaying data in a chart window.
The information about the type of power supply, its position in the manager list and the communication
address can be obtained by pressing the button. This information is particularly useful when importing a file
from another PSU.
5.3 The „History’’ tab
The „History’’ tab enables reading the history of events stored in the memory of the PSU in case of any
incorrect parameters during operation.
There are two history windows available, depending on the type of power supply:
- The power supplies with seven-segment LED can display the history of the last 30 events.
- The power supplies with LCD displays are fitted with an additional memory system that allows storing
over 2000 events containing more detailed information about the status of the power supply.
5.3.1 Reading the history of events of the power supply with LED display.
To read the history of events of the power supply with LED display press the button. The reading starts
from the most recent entries. The reading can be stopped at any time by pressing the button.
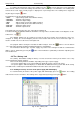
Fig. 18. The „History” tab.
The table of the history of events of the power supply includes information about:
The time elapsed since the event – the time that has elapsed since the occurrence of the event. For example
4h 54m means that the event occurred 4 hours and 54 minutes ago.
In case of power loss (no 230V AC mains supply) during the PSU operation while the battery is
not connected or fully discharged, the information about the time until the next switch of the
power supply is lost. In such a case, an asterisk symbol appears next to the time display e.g. 4h
53m *.
Event description – event code and its description. Appendixes A, B and C at the end of the manual
summarize all the failure and event codes that may occur during the power supply operation.
The individual codes are accompanied by appropriate optical indication on the panel, acoustic
indication and activation of the dedicated technical output.
Uaux, Iaux – output voltage and output current saved in the memory at the time of a given event.