
Specifications


Pelco Manual C1920M-D (4/03) 33
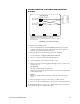
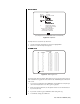
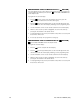
CUSTOM VCR SETUP (LIVE/VCR OR DISPLAY/RECORD
BUTTON)
NORMAL RECORD SETUP
RECORD SPEED 2/6/8 Hr
SWITCH INTERVAL 003
ALARM RECORD SETUP
RECORD SPEED 2/6/8 Hr
SWITCH INTERVAL 003
EXIT
BACK
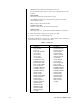
003 TO 509 **
*2, 6, or 8 Hr 120 Hr
12 Hr 168 Hr
16 Hr 180 Hr
18 Hr 240 Hr
24 Hr 360 Hr
48 Hr 480 Hr
72 Hr 600 Hr
84 Hr 720 Hr
96 Hr 960 Hr
* 2/6/8 HR FOR NTSC/EIA MODEL MULTIPLEXERS, 3 HR FOR PAL/CCIR MODELS.
REMAINING RECORD SPEEDS DEPEND UPON VCR MODEL.
** VCR TYPE IN RECORD SETUP MENU MUST BE SET TO CUSTOM IN ORDER TO
MAKE SELECTIONS.
Figure 24. Custom VCR Setup Menu
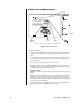
To program advanced VCR parameters:
1. Press the LIVE/VCR (duplex) or DISPLAY/RECORD (simplex) button for approxi-
mately three seconds until the Record Setup menu appears. Type the password if
requested. The currently selected menu item blinks.
2. Make sure VCR Type in the Record Setup menu is set to CUSTOM.
3. Use the arrow buttons to highlight CONFIGURE CUSTOM VCR.
4. Press the +/- button. The Custom VCR Setup menu appears.
5. Use the arrow buttons to move between items on the screen.
6. When the menu item you desire is highlighted (blinking), press the +/- button to cycle
through the options.
Record Speeds
Sets VCR’s normal and alarm recording speeds.
Setting speeds in the Custom VCR Setup menu also sets speeds in the System Setup
and Record Setup menus.
Interval
Interval is the number of fields recorded by the VCR before switching to the next
camera.
7. When you finish all the changes you want to make, go to EXIT or BACK.
8. Press the +/- button to exit programming mode or to return to the Record Setup menu.
When HELP is highlighted, you can press the +/- button to display a help screen that tells
you which buttons to press to configure specific options.