User Manual Code Reader™ 2600 Manual Version 01 Release Date: July 2012 C007964_01_CR2600_User_Manual C007964_01_CR2600_UserManual
Statement of Agency Compliance The Code Reader™ 2600 (CR2600) has been tested for compliance with FCC regulations and was found to be compliant with all applicable FCC Rules and Regulations. IMPORTANT NOTE: To comply with FCC RF exposure compliance requirements, this device must not be colocated or operate in conjunction with any other antenna or transmitter.
Code Reader™ 2600 User Manual Copyright © 2012 Code Corporation. All Rights Reserved. The software described in this manual may only be used in accordance with the terms of its license agreement. No part of this publication may be reproduced in any form or by any means without written permission from Code Corporation. This includes electronic or mechanical means such as photocopying or recording in information storage and retrieval systems. NO WARRANTY. This technical documentation is provided AS-IS.
Table of Contents 1.0 - Unpacking............................................................................................................................................................... 1 2.0 - Battery Installation and Removal............................................................................................................................. 1 3.0 - Charging the CR2600..............................................................................................................................
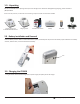
1.0 - Unpacking Remove the CR2600 from its packing and inspect it for damage. If the reader was damaged during shipping, please call Code at (801) 495-2200. Based on the kit purchased, a combination of the following components will be included with the CR2600: Charging Station with Embedded CodeXML Modem Charging Station CodeXML® M3 Modem Battery USB Cable Power Supply 2.0 - Battery Installation and Removal Place the battery into the reader as shown below.
3.0 - Charging the CR2600 Cont. 2. Plug the USB cable into the computer’s USB port or the power adapter into the wall outlet. 3. Remove the plastic ‘Remove Before Use’ cap, and place the reader into the Charging Station. Note: Batteries ships with approximately 50% battery life and should be completely charged before initial use. Approximate time to charge a depleted battery is 4 hours via USB cable, and 2 1/2 hours via AC power supply.
4.0 - Fuel Gauge Battery Status Indicators Check the Battery Life Press the fuel gauge button to determine remaining battery life. If the battery has less then 10% capacity, the first LED will flash rapidly. For 25% or greater capacity, the LEDs will flash ON for 4 seconds. Fuel Gauge Indicators Fuel Gauge Button Fuel Gauge Status Indicator While Charging If the battery has less then 10% capacity, the first LED will flash rapidly while charging.
6.0 - Establishing a Bluetooth® Connection 1. If establishing a Bluetooth connection using the Charging Station with embedded CodeXML® Modem, slide the Communication Mode Switch on the Charger/Modem Station, to Bluetooth mode (the direction of the arrow). 2. Scan the QuickConnect Code located on the front of the Charging Station with embedded CodeXML® modem or on the external CodeXML® M3 Modem.
7.1 - Batch Mode via USB 1. The CR2600 can be configured for Batch Mode to capture and transmit data over standard USB communication modes. Select and scan one of the following configuration codes that will best suits data storage needs: Batch Mode Enable - Scan and Log Batch Mode Enable - Log Only 2. Scan one of the following communication modes to configure the communications setting on your reader: USB Keyboard Mode USB Downloader Mode USB Virtual Comm Mode 3.
8.0 - Attaching the CodeXML® M3 Modem Included with the CodeXML® M3 Modem is a USB or RS232 cable: RS232 Cable USB Cable 1. Attach the 8-pin DIN end of the cable to the CodeXML® M3 Modem. 2. Plug the USB connector into the USB port on the computer, or RS232 (Serial) cable to a serial port on the computer. Once plugged in, the modem’s blue LED light will flash (reference modem image on page 4, section 6). Follow steps 1 and 2 of page 4, section 6 to establish the Bluetooth connection.
10.0 - Using the CR2600 Press and hold one of the buttons or trigger on the CR2600, the two blue bars emitting from the reader are used for targeting. Center the blue bars in the middle of a bar code. The optimal reading distance from reader to bar code is approximately 4.0” (10 cm). Once the reader is at the optimal distance, the reader will automatically read the bar code. The CR2600 will beep, vibrate and the good read indicator will flash green to indicate a ‘good read’ has occurred. 11.
.0 - Reader Feedback Scenario LEDs on Reader Sound Vibration CR2600 Successfully Powers Up All LEDs Flash 1 Beep Palm or Handle Unit Vibrates CR2600 Successfully Connects with Host Wireless Icon Flashes 1 Beep Palm or Handle Unit Vibrates Successful Decode and Data Transfer Good Read Indicator will Flash 1 Beep Palm or Handle Unit Vibrates Configuration Code Successfully Decoded and Processed Good Read Indicator will Flash 2 Beeps Palm or Handle Unit Vibrates Batch Mode Enabled and Dat
15.0 - Reader ID and Firmware Version To find out the Reader ID and firmware version, open a text editor program (i.e., Notepad, Microsoft Word, etc.
16.0 - CR2600 Dimensions CR2611 CR2612 16.
17.0 - CR2600 Maintentance The CR2600 needs only minimum maintenance to operate. The tips below for maintenance suggestions. Cleaning the CR2600 The CR2600 window should be clean to allow the best performance of the device. The window is the clear plastic piece inside the head of the reader. Avoid touching the window. Your CR2600 uses CMOS technology that is much like a digital camera. A dirty window may stop the CR2600 from reading bar codes.
18.0 - Warranty Code’s CR2600 carries a standard three year limited warranty as described herein. Charging Station follow the warranty of the reader. The CR2600 battery carries a one year limited warranty. Customers may purchase either a one or two year CodeOne extended warranty plan. Please contact a Code representative for more information. Limited Warranty Code manufactures its hardware products in accordance with industry-standard practices.