
Use and Care Manual


which vents to the outside (non-recirculating type) will also help
remove these combustible products from the kitchen.
This model 0910 has a SMART HUSH
TM
control that is extremely
useful in a kitchen area or other areas prone to nuisance alarms.
For more information refer to Section 4, OPERATION AND TESTING.
If the alarm does sound, check for fires first. If a fire is discovered,
get out and call the fire department. If no fire is present, check to
see if one of the reasons listed in Section 2 may have caused the
alarm.
6. MAINTENANCE
BATTERY ACTIVATION AND DEACTIVATION
NOTE: Three Lithium-Ion batteries, permanently sealed inside the
alarm, power this unit; no battery installation or replacement is
necessary for the life of the alarm.
WARNING! DO NOT ATTEMPT TO OPEN THE ALARM FOR
ANY REASON!
To activate the alarm, attach the alarm to the mounting bracket by
rotating in the direction of the arrows on the cover, see ACTIVAT-
ING ALARM in Section 3 (INSTALLATION INSTRUCTIONS).
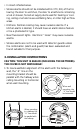
This alarm has a low battery monitor circuit which will cause the
alarm to “chirp” approximately every 40-45 seconds, for a mini-
mum of thirty (30) days, at the end of the life of the alarm to indi-
cate that the alarm needs replacement. To deactivate the alarm
remove the alarm from the mounting bracket by rotating the
alarm in the direction indicated by the arrows on the cover of the
alarm and locate the crosshatched area on product label. NOTE:
If the tamper resist feature has been activated, see TAMPER RESIST
FEATURE in Section 3 (INSTALLATION INSTRUCTIONS).
WARNING! DO NOT DEACTIV
ATE THE ALARM UNTIL THE
END OF THE ALARM LIFE, WHEN A “CHIRP” IS HEARD EVERY
40-45 SECONDS. ONCE THE ALARM IS DEACTIVATED THE
BATTERIES WILL BE DEPLEATED AND THE ALARM WILL NO
LONGER FUNCTION.
WARNING! ONCE THE ALARM HAS BEEN DEACTIVATED, IT
CANNOT BE REACTIVATED!
WARNING! ONCE THE ALARM HAS BEEN DEACTIVATED, IT
CANNOT BE MOUNTED ONTO THE MOUNTING BRACKET!