USER GUIDE CODEX TRANSFER STATION FOR MAC OS X PROCESSING ARRIRAW REVISION 11.14.2012 CODEX TRANSFER STATION FOR MAC OSX - PROCESSING ARRIRAW REV 11.14.
CODEX TRANSFER STATION FOR MAC OS X PROCESSING ARRIRAW CONTENTS 4 4 5 5 6 7 10 11 12 15 19 21 26 Introduction Software Loading and Unloading a Capture Drive or Datapack Codex Software Overview Creating a first ALE Filtering the Shot Table Creating a PDF Shot Report Creating a final ALE Cloning from a Capture Drive or Datapack to the Internal Storage Getting RAW image files Getting Proxy files for editing Using the Disk and Tape Offloader Deleting media to return to set CODEX TRANSFER STATION FOR MAC OSX
Safety Warnings Please observe any warnings and follow all instructions. l l l l l l l l l l l l l Do not use this equipment near water and clean only with a dry cloth. Do not block any ventilation openings. Install in accordance with the manufacturer’s instructions. Do not install near any heat sources such as radiators, heat registers, stoves, or other equipment (including amplifiers) that produce heat. Do not expose to excessive vibration, or drop this product.
Introduction This guide is written to describe using the Transfer Station for Mac OS X in a workflow for ARRIRAW. After an Onboard S or M has been used to record ARRIRAW, the media (Capture Drive or Datapack) is loaded into the Transfer Station, which can be used to: • • • • • • • Check and correct shot metadata Produce PDF reports for the production Produce ALE files for editorial Clone the data to RAID protected internal storage (with Mac Pro) Process the data to RAW image files (.
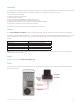
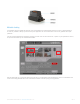
Loading and Unloading a Capture Drive or Datapack Capture/Transfer Drive – fully insert the Capture Drive into one of the ports on the Transfer Station. The LED on the Capture Drive will flash green once it has loaded. To unload press the eject button on the front of the Capture Drive. When the LED is solid blue it is safe to remove the Capture Drive. Datapack – the Datapack should find a natural position when placed on the Transfer Station due to the interlocking design of the loading mechanism.
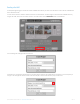
Creating a first ALE An ALE (Avid Log Exchange) is a text file that contains metadata information for your shots. In the file there is a column for each metadata item that is stored for the shots. It can be useful to create an ALE when media first arrives at the Transfer Station. This ALE file gives a record of all shot metadata before any changes are made, and this can be useful for reference.
Next choose the Source shots for the ALE. This is normally done per Roll, so open the drop down list to set Source shots to Specified roll and then choose the Roll from the list: Then click DO IT to create the ALE file. Now you have a record of all the original metadata for reference. Filtering the Shot Table It is possible to have more than one Codex storage media loaded at the same time (e.g. a Capture Drive and the Internal Storage disks).
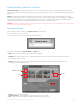
Metadata checking It is advised to check the metadata for shots when they are first loaded on the Transfer Station for Mac OS X. This is a valuable opportunity to correct any mistakes or identify any issues that may have happened on set. This will minimise the chance of any problems later in postproduction. Click on the thumbnail/shotname to highlight the first shot on the Roll.
In the event of a problem during recording the Onboard S / M can put information in the Log Note box automatically. Here are some examples you should check the Log Note box for: “No video input signal detected”, or “Video frame dropped”, or “Timecode break detected” Any messages like this should be cross referenced with the camera sheet to check if the problem was recognised on set, and reported if necessary.
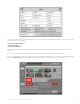
Then click the EDIT SHOTS button to view/edit metadata for all the selected shots: The Date information should be in the format YYYYMMDD to be applied correctly to PDF reports (which will be discussed later in this guide). After entering any changes click the check box and you can choose to apply the new metadata to all the shots: Creating a PDF Shot Report A PDF Shot Report can be created giving an overview of the media, which can be very useful for a production.
Like when creating the ALE, the initial settings need to be completed. Set the destination Filename including the correct extension (.pdf). Set Source shots as Specified Roll and choose the correct Roll from the list. You can also enter a name for the Author of the Shot Report, and set the Timecode frame rate to be correct for the project: Then click DO IT to create your PDF Shot Report.
Then click DO IT to save the ALE. Cloning from a Capture Drive or Datapack to the Internal Storage With the correct licence installed the Codex software can use disks fitted to the Internal Drive bays of the Mac Pro. Contact support@codexdigital.com if you require a licence for this feature. Skip to the section ‘Getting RAW image files’ if this licence is not installed, or if you do not need to clone the data to the internal disks.
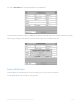
Datapack drop down list to select the location to copy from: Click Filter button to choose shots for clone 3. Click the Shots View button (above the Filter button) to view the shots on the media you have chosen. From the bottom left of the screen click COPY and set the Copy Mode as Clone. Open the Target drop down list to chose Internal as the target for your copy: 4.
5. To begin the copy click DO IT. The copy progress will be shown: 6. When the copy has finished a COPY SUCCEEDED message will be shown at the bottom of the Codex UI: CODEX TRANSFER STATION FOR MAC OSX - PROCESSING ARRIRAW REV 11.14.
Getting RAW image files To maintain maximum quality the Codex software can package the ARRIRAW data recorded from the Alexa into .ari files. These contain the original camera sensor data along with a range of useful metadata, and there is a file per frame. IMPORTANT NOTE: Before copying files from the Codex VFS always check there is only one copy of the shots loaded. There could be more than one copy, for example, if you have cloned shots to the Internal storage.
The first time the software is used, Configuration is set to . Click the arrow to open the Configuration drop down list and choose Codex ARRIRAW (preset): This preset configuration needs to be customised for your project.
This opens up more options for that File Type. THE NEXT STEP IS CRITICAL TO A SUCCESSFUL CONFORM PROCESS. Now set the Tc Rate for the selected File Type to be correct for your project: This setting means that the timecode in the files will be at the correct rate for your project. Now you have set the type of files that the Codex software will process, and the timecode rate for them. Then go to the Codex VFS drive to access the files: CODEX TRANSFER STATION FOR MAC OSX - PROCESSING ARRIRAW REV 11.14.
The ‘Codex VFS’ drive should normally be visible with Finder and on the Desktop. If not then make sure that Finder Preferences is set to show Hard disks on the Desktop: Files can be copied from the ‘Codex VFS’ drive using any copy tool. The Codex software offers the Disk and Tape Offloader feature for making verified copies of files from the ‘Codex VFS’ drive to disk or LTFS tape. This will be discussed later in this guide in the section “Using the Disk and Tape Offloader”.
Getting Proxy files for editing IMPORTANT NOTE: Before copying files from the Codex VFS always check there is only one copy of the shots loaded. There could be more than one copy, for example, if you have cloned shots to the Internal storage. Performing this check will prevent duplicate RAW or proxy files being copied from the Codex VFS. There are two Configuration preset examples for creating proxy files for editing: 1. Codex FCP Editorial (preset) - this will create ProResLT files.
This setting means that the files will be at the correct editing rate for your project. DNxHD files will always be scaled to 1920x1080. If setting up ProRes files (starting with FCP Editorial preset) it is also generally recommended to set Scaling as Fixed, Height to 1920, and Width to 1080. Applying LUTs and Burn-Ins is detailed in the VFS Guide. Now you have set the type of files that the Codex software will process, and the frame rate for them.
Using the Disk and Tape Offloader With the correct licence installed the Codex software provides the Disk and Tape Offloader feature. This feature can perform a byte-for-byte (or md5) verified backup to 2 disk and 2 LTFS tape targets simultaneously (or combinations thereof). Contact support@codexdigital.com if you require a licence for this feature.
Go to the OFFLOAD screen and set the Mode to Manual: Then click to open the OPTIONS: These are set at zero (0) by default. Set these to how many LTFS tape and Disk offloads you required: CODEX TRANSFER STATION FOR MAC OSX - PROCESSING ARRIRAW REV 11.14.
Then click the File Browser icon to choose the destination for the disk offloads: Confirm that Operation is set to Backup+Verify. Then click the MOUNT button and the target(s) for the offload should be shown next to Devices: CODEX TRANSFER STATION FOR MAC OSX - PROCESSING ARRIRAW REV 11.14.
At this point it is advised to view the contents of the Codex VFS drive, to confirm it contains the files you want to offload. If required you can choose a VFS Directory – for example you may want to offload just one Roll from all those that are loaded: Then click START. After scanning the VFS the software will you to enter a user friendly name for the offload. The default is ‘unnamed’, so this could be changed to the Roll name for example: CODEX TRANSFER STATION FOR MAC OSX - PROCESSING ARRIRAW REV 11.
Then you will be asked to enter the name(s) of the media being used, for logging purposes: The software will then proceed with the offload, showing the names of the files as they are copied, and the estimated time remaining to completion: When the offload has completed successfully the software will show how many files have been backed up and verified: CODEX TRANSFER STATION FOR MAC OSX - PROCESSING ARRIRAW REV 11.14.
Deleting the media to return to the set To delete the media go to the STORAGE tab of the Codex UI. Here you can select the Roll in the top half of the screen, and then click the DELETE button. The software will ask if you are sure you want to delete. If you are sure that your data is backed up then click OK and the Roll will be deleted: CODEX TRANSFER STATION FOR MAC OSX - PROCESSING ARRIRAW REV 11.14.
Notes 24 hour support line +44 7985 467 665 CODEX DIGITAL LIMITED 60 POLAND STREET LONDON ENGLAND W1F 7NT UK TEL +44 207 292 6918 CODEXDIGITAL.COM INFO@CODEXDIGITAL.COM Codex TRANSFER Digital Limited reserve alter the specification any time and without prior notice. © Copyright Codex Digital Limited November 2012. CODEX STATION FOR the MACright OSXto- PROCESSING ARRIRAW atREV 11.14.