
User`s manual


Technical Brief
Windows
®
NT 4.0 Driver
Installation: EP-1000
™
Overview
The Codonics
®
EP-1000
™
Print Driver for Windows
®
NT 4.0 allows users to print directly from Windows
applications to the EP-1000 printer over a network.
This document describes the procedure to install the
EP-1000 Print Driver on Windows NT.
The installation of the EP-1000 Print Driver is unlike
most other print drivers, so be sure to follow the steps
in this document carefully. The installation steps are
summarized below:
1. Unzip the self-extracting archive file. This will
automatically create the special EP-1000 printer
port and allow you to set the printer’s IP address.
2. Add Printer Wizard will automatically launch. Add
the printer as a local
printer on the special port,
EPR1
.
3. Manually launch the network module
configuration tool to set the IP address at the
printer.
4. Select Parallel
interface at the printer. (The network
interface module connects to the parallel port)
Release Notes
The currently released Windows driver requires the
Network Interface Module and does not work with a
direct connection to the Parallel or USB Ports.
Preparation
The following items are required to complete this
installation procedure:
◆ An EP-1000 printer with a loaded paper cassette
and a ribbon installed. A or A4 size paper can be
used.
◆ An Ethernet connection between the host PC and
the Network Interface Module on the EP-1000.
◆ The EP-1000 Windows Print Drivers CD.
◆ The host PC administrator password. Contact your
system administrator if help is needed.
Configuring the EP-1000
The following instructions describe how to configure
the EP-1000 printer for proper operation with the
Windows NT 4.0 Operating System.
1. Unpack the EP-1000. Unpack the EP-1000
according to the instructions shipped with the
printer. Remove all retaining clips, plastic wrap,
tape and foam.
2. Connect the EP-1000 to the PC. Connect the EP-
1000 printer to a PC with Ethernet using the
Network Interface Module. The recommended PC
configuration is at least a 500MHz Pentium III class
processor, 256MB of memory and 10 MB of free
disk space.
3. Load media into the EP-1000. The EP-1000 imager
must have media loaded and the top cover closed
before sending any print jobs to the imager. Load
A-size or A4-size ChromaVista® paper into the
cassette as shown in the User’s Manual, and insert
the cassette into the printer. Be sure there is a
ribbon installed.
4. Power-on the printer. After the printer has been
connected to the PC and media has been loaded,
power-on the printer and connect the Network
Interface Module using the provided transformer.
Wait for the front panel indicators to show
POWER
and
MEDIA with steady green lights. This will take
about 10 seconds. If the printer is cold, the power-
on time will be longer.
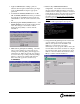
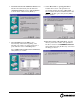
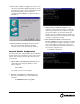
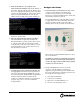
Windows Driver Installation
The Windows NT 4.0 Print Driver is distributed on a
CD-ROM as a single file named
EP1000_WinDriver.exe. This file will automatically
unzip the necessary driver files into a temporary
directory and start the Windows “Add Printer
Wizard.” The following instructions describe the print
driver installation procedure.
Note: The EP-1000 power should be turned off
before connecting any cables or external devices to
the printer.