A799 Two-Color Thermal Receipt Printer User Guide Contains TPG LogoEZ® colorization utility information. Made under one or more of the following U.S. patents: 4886381, 5579043, 5613787, 5651624, 5713678, 5752779, 5789916, 5800080, 5879090, 5887999, 5975776, 6027266, 6085973, 6089450, 6129465, 6155483, 6404452, 6486902, 6504331, 5749277, 6722754, 6739773, 6784909.
Federal Communications Commission (FCC) Radio Frequency Interference Warning Statement Changes or modifications to this unit not expressly approved by the party responsible for compliance could void the user’s authority to operate the equipment. Note This equipment has been tested and found to comply with the limits for a Class A digital device, pursuant to Part 15 of the FCC Rules.
Contents 3 Contents Contents................................................................................................3 Chapter 1: About this Guide..................................................................5 How to use this guide..........................................................................5 Where to find advanced technical information.................................5 Download manuals and drivers.......................................................................5 Support.....
Contents Configuring the printer.....................................................................20 To enter the configuration mode:................................................................ 21 Monochrome paper print density....................................................23 Color density......................................................................................23 When to change the receipt paper...................................................24 Printhead Setting..............
Chapter 1: About this Guide 5 Chapter 1: About this Guide How to use this guide The guide is designed to help you find the information you need quickly and easily, whether you are installing, servicing, or making adjustments to a TPG printer. The chapter headings are self-explanatory, and the index at the back can also point you in the right direction. For basic printer setup, refer to Chapter 3: Setting up the Printer.
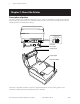
Chapter 2: About the Printer Chapter 2: About the Printer Description of printer The A799 ColorPOS® two-color thermal receipt printer is easy to install, use, and maintain. Utilizing TPG’s Clam shell design, simply snap open the receipt cover and drop the paper roll in place. You never need to change a printer ribbon or cartridge because it uses thermal print technology.
Chapter 2: About the Printer 7 Printer controls LED (Green) Paper Feed Button Configuration switch (DIP switch 1) The configuration switch allows you to change the configuration settings of the printer. Paper feed button During normal use, the paper feed button advances the paper. It is also used to access the configuration menu. LED The green LED indicates basic information about the printer status. A steady green light means the printer is on and operating normally.
Chapter 2: About the Printer Available printer configurations There are several configurations of the printer, depending on the combination of desired options. Printer configuration identification See the sample below to determine the printer configuration. The printer configuration identification (Model ID) is located on the model label attached to the back of the printer. This information is also shown on the installation quality report card. The Model ID description is shown below.
Chapter 2: About the Printer 9 Standard Features Interfaces Interfaces vary according to specific configuration: USB/RS232 , 25-pin serial, Ethernet, PUSB Parallel Memory/Firmware 4 MB flash memory, History EEROM, 4K buffer (see factory-installed options below for additional memory) Resident character sets PC code pages 437 (US), 850 (Multilingual), 737 (Greek), 852 (Slavic), 857 (Turkish), 858 (with Eurosymbol), 860 (Portuguese), 862 (Hebrew), 863 (French Canadian), 865 (Nordic), 866 (Cyrillic), 125
Chapter 2: About the Printer Printing features The A799 printer is versatile, with diverse printing options available. Text, graphics, and bar codes can be presented in many different forms and sizes. For more information on available options, LogoEZ® colorization utility and programming the printer to change text, graphics, or other characteristics, refer to the A799 Programming Guide.
Chapter 3: Setting up the Printer 11 Chapter 3: Setting up the Printer Unpack the printer Check the packing list Save the packing materials in case you need to repack the printer for shipping or storage.
Chapter 3: Setting up the Printer Load or change the receipt paper Caution: You must use qualified paper rolls with TPG printers. The list of qualified paper is in Chapter 5. Using unqualified paper may void the warranty. You will later use the same procedure to change the receipt paper as you will to load it during installation. The minor difference is noted in the directions below.
Chapter 3: Setting up the Printer 13 Adjusting Paper Low Setting The amount of paper left on the roll when the “paper low” indication is given by the printer should be approximately 5-20 feet. If too much paper is left, there is an adjustable setting in the configuration menu that can be modified. To enter the configuration menu, see “Configuring the printer” in Chapter 4. Enter the “Hardware Options” section and vary the “paper low extension” setting.
Chapter 3: Setting up the Printer Mounting the printer on a vertical surface (using optional kit TPG-K260) 1 Select a location that allows adequate support for the printer and is within easy cable length of the host. 2 Follow the instructions provided with wall-mount kit (K260) to attach the bracket to the vertical surface and the printer to the bracket.
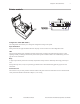
Chapter 3: Setting up the Printer 15 Connect the cables Cable connections are made at the back of the printer. Caution: Connect the cables to the printer before applying power. The host computer should always be turned off before connecting communication cables. Cash drawer cables The cash drawer cable connects the printer to one or two cash drawers. (For pin-out, see Service Guide.) To install the cash drawer cable: 1 Open the connector cover.
Chapter 3: Setting up the Printer Communication cables According to your printer configuration, the printer has different communication connection options. Select and attach either 9-pin RS-232C, 25-pin RS-232C, standard USB, powered USB, or Ethernet communication cable to the printer and host computer. For printers with both 9-pin RS-232C and USB connectors, only a single communication connection is to be used during operations.
Chapter 3: Setting up the Printer 17 USB cable Unlike the other connections, the USB cable may be attached and detached while the system is operating. Using the USB connector with the printer requires that you install the TPG USB driver appropriate for your system. If you are replacing a USB-equipped TPG printer, you may not need to reinstall the driver. Printer end of USB cable Computer end of USB cable To install the USB cable: 1 Open the connector cover at the rear of the printer.
Chapter 3: Setting up the Printer Ethernet communication cable Ethernet communication connector panel Ethernet connector Power supply connector 1 You don’t need to turn off the computer. Plug the printer end of the Ethernet cable into the Ethernet connector port on the printer (A). Make sure the connector snaps firmly in place. 2 Plug the computer end of the Ethernet cable into the Ethernet port of the computer. Make sure the connector snaps firmly in place.
Chapter 3: Setting up the Printer 19 Cable routing To prevent the printer from becoming unplugged accidentally, make sure the cables are routed as shown in the illustration below. For USB printers only: Guide the USB cable through the strain relief and out the slot in the connector cover, as shown in the illustration. The USB cable fits underneath the power supply and cash drawer cables. The RS-232C cable routes straight out the back when attached.
Chapter 4: Using the Printer Chapter 4: Using the Printer Configuring the printer The configuration menu allows the user to set general printer parameters. The test prints the diagnostics form, which details settings for all functions. The printer will partially cut the paper between each variation. The printouts may vary for each model. The test ends with a partial cut of the paper. A complete test printout may require the use of several feet of paper.
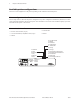
Chapter 4: Using the Printer To enter the configuration mode: 21 ������������������� ������������������ ��� �� � � ������������ ��������� ���������� 1 Turn power off to printer. 2 Open connector cover (1). 3 Set DIP switch 1 to the ON position (down) (2). 6 To communicate with the printer, you will press the paper feed button using either short or long clicks. Use a long click for “yes” (more than one second) and a short click for “no.” Follow the printed instructions to make selections.
Chapter 4: Using the Printer �������������������������������� ������������������������������� ������������������������������� ������������ ������������� ������������� �������� ��� ��� �������������� �������� ��� ��� �������������� ����������������� ����������������� ������������������ ��������� ������������ �� ��������������� ����������������� �������������������� ��������� ����������� ��������� ����� ����������� ���������������� ��������������� �������������� �������������� ���������� ��������� �����
Chapter 4: Using the Printer 23 Monochrome paper print density This function makes it possible to adjust the energy level of the printhead to darken the printout or adjust for paper variations. An adjustment should only be made when necessary. The factory setting is 100%. Warning: Choose an energy level no higher than necessary to achieve a dark printout.Failure to observe this rule may result in a printer service call or voiding of the printer warranty.
Chapter 4: Using the Printer When to change the receipt paper Change the paper when it is near the end of the roll or out. When the paper is low, you will want to monitor usage to avoid running out part way through a transaction. When the paper is out, you must load a new roll immediately or data may be lost! When paper is low: • Colored stripe appears on the receipt paper, (if paper is purchased with stripe) and indicates enough paper remains for a small transaction.
Chapter 4: Using the Printer 25 Preventing overheating of the printhead There are restrictions on the duty cycle because of the heat generated by the thermal printhead when printing solid blocks (regardless of the length of the block in relation to the print line). The restrictions are ambient temperature, the percentage of time (measured against one minute) of continuous solid printing, and the amount of coverage.
Chapter 4: Using the Printer Troubleshooting the printer The printer is simple and generally trouble-free, however unexpected conditions may arise. Use the charts below to diagnose and solve these printer conditions. To resolve complex issues, you may need to contact a service representative. If unexpected conditions arise while installing the USB driver, take a look in the FAQ section located at www.CognitiveTPG.com.
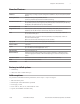
Chapter 4: Using the Printer 27 Printing issues Condition Possible Causes What to Do Where to Go Colored stripe on Paper is low Change the paper the receipt Receipt does not come Paper is jammed out all the way Chapter 3: Setting up the printer, “Load or change the receipt paper” (See page 12) Open the receipt cover, inspect the knife, and clear any jammed paper Printer starts to print, but Paper is jammed stops while the receipt is being printed Open the receipt cover, inspect th
Chapter 4: Using the Printer Printer does not function Condition Possible Causes What to Do Where to Go Printer does not function Printer not plugged in when turned on Check that printer cables are properly connected on both ends Chapter 3: Setting up the printer, “Connect the cables” (See page 15) Check that the host or power supply is getting power Chapter 3: Setting up the printer, “Connect the cables” (See page 15) Receipt cover not fully closed Close and latch the receipt
Chapter 5: Paper and Supplies 29 Chapter 5: Paper and Supplies Ordering from TPG Printer parts, accessories, and small quantities of paper can be ordered directly from TPG. While the TPG part numbers are listed here for your convenience, keep in mind that these numbers may change before this guide is outdated. To place an order or get more non-technical information, call your TPG representative or the sales line at (800) 732-8950.
Chapter 5: Paper and Supplies Qualified Paper Grades Contact the converter of your choice to order paper. TPG recommends the following paper grades produced by their respective manufacturers. There are a number of paper converters qualified to provide this paper, provided the POS rolls are from these recommended grades.
Chapter 5: Paper and Supplies 31 Ordering miscellaneous supplies Cash drawers Order cash drawers from the following suppliers: Cash Drawers Number NCR 7052-K657TM M-S Cash Drawer Corp. EP-125 K seriesTM, EP-127TM, EP-102TM APG Cash Drawer Model 322TM Indiana Cash Drawer Model SLDTM Power supply and power cords Other suppliers may use different part numbers. Item Type Number 55-Watt power supply with attached TPG-K330 cable to printer and U.S.