Receipt Marketing Software Solution 189-9200418 Rev.
Introduction Copyright Terms and Conditions Copyright TPG IPB, Inc. dba Transaction Printer Group (TPG), a subsidiary of ATSI Holdings, Inc., 2005. All rights reserved. This edition of TPG's ReceiptWare™ User Guide applies to Version 1.1.X, of ReceiptWare for Windows® and to future releases and modifications unless otherwise indicated in new editions. Readers may address comments concerning this publication to: TPG, 25 Tri-State International, Suite 200, Lincolnshire, IL 60069.
CD Contents Along with the ReceiptWare software, materials have been provided on the CD to familiarize users with the product features and functions. Contents include: 1. ReceiptWare Users Guide.pdf 2. Sample BMP Graphics Cayuga Grocery.bmp Cayuga Mmess.bmp Cay Shoppers Club.bmp Cayuga Coup.bmp Cayuga Grocery Receipt.txt 3. Installer (ReceiptWare) a. setup.
Table of Contents Introduction . . . . . . . . . . . . . . . . . . . . . . . . . . . . . . . . . . . . . . 2 Conditional Surround Graphics . . . . . . . . . . . . . . . . . . . . . . 16 Copyright Terms and Conditions . . . . . . . . . . . . . . . . . . . . . . 2 Legacy Color Triggers . . . . . . . . . . . . . . . . . . . . . . . . . . . . . 20 Registration . . . . . . . . . . . . . . . . . . . . . . . . . . . . . . . . . . . . . . 2 Logo Suspension . . . . . . . . . . . . . . . . . . . . . . . . . . .
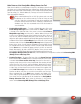
Installation Insert the ReceiptWare CD into your CD-ROM drive to start the installation program. If it does not start automatically, do the following: a. Click Start>Run from the Windows® taskbar. b. Click on the Browse button and find your CD drive. c. Double click on the application called ReceiptWareV1.0.0.exe, or, select it and click on the Open button. d. Click OK. During installation, you’ll see the following windows: Welcome – Welcome to the TPG ReceiptWare Setup program.
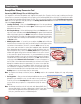
Functionality ReceiptWare Bitmap Conversion Tool Converting BMP (Bitmap) Files to LGO (Logo) Files It is important to note that ReceiptWare only supports LGO graphic files. Therefore, the first step in making your Receipt Format file is to convert all of the graphics that you wish to use from Bitmap (BMP) files to LGO files. This is done with a built in tool called the ReceiptWare Bitmap Conversion Tool. This tool can be accessed by selecting Tool>Bitmap Conversion Tool.
Other Features of the ReceiptWare Bitmap Conversion Tool Aside from the ability to convert bitmaps to logo files, the bitmap conversion tool also allows you to create Margin Messages and text logos. Margin Messages are printed on the vertical right and left margins of the receipt and are generally made up of text strings, (i.e., website addresses). Text logos are useful in the absence of logos with graphical elements.
Legacy Functions Many existing POS applications cannot support Top Logos, Watermarks, Margin Messages, or color graphics. With TPG’s ReceiptWare software, you can configure your printer to print these graphics automatically without any change to the data stream from the point of sale application. These capabilities are referred to as Legacy Functions. Before we discuss these functions, it is important to define and explain the different types of Legacy Graphics. Legacy graphics include: 1.
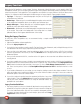
Legacy Functions Advanced Topics The Advanced options allow you to fine tune the printing performance of the Legacy Graphics. Within this section, spacing, logo print speed, and justification can all be adjusted and saved. 1. To use the Advanced options, click on the Advanced button located on the bottom right-hand side of the screen. 2. A dialog box will appear with tabs labeled Top Logo, Bottom Logo, Watermark, and Margin Message.
Bottom Logo 1. Bottom Logo spacing – Occasionally, you may want to change the spacing above and below the Bottom Logo(s). To do this, there are two parameters to adjust: “Distance from the bottom of the print data to start of bottom logo” and “Distance from end of bottom logo to end of receipt.” a. “Distance from the bottom of the print data to start of bottom logo” – This option allows you to adjust the margins above the Bottom Logo. The default setting for this parameter is 48 dot rows or about a 0.
Margin Messages 1. Margin Message spacing – There are two ways that you can change the print spacing of the Margin Messages on your receipt: “Distance from start of print data to Margin Message” and “Distance between consecutive margin messages in mm.” a. “Distance from start of print data to Margin Message” – This parameter can be changed to adjust where the Margin Message will be printed relative to the start of the print data. The default setting for this parameter is 1 dot rows or about 0.0” (0.
Text Attribute Substitution The Text Attribute Substitution feature lets you select attributes that your application currently uses and has your printer change or re-map them to a different set of attributes, most likely including color. For example, if your application uses underlined text to indicate a sale item, you can instruct the printer to print all underlined text as red and bold for an extra visual punch! Before: Save $2.00 on your next purchase After: Save $ 2.
Retail Conditional Graphics The Retail Conditional Graphics feature of ReceiptWare gives your printer the ability to print stored graphics when text triggers, that you define, are present in the receipt data. It supports up to 112 different Trigger Graphics as well as instruction sets (i.e., justification) on how to print each one. With this ability, your imagination is the only limit when creating a unique and customized receipt for every customer.
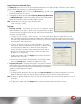
Enable Total The Enable Total option allows you to specify a total in several common formats. You can also specify preceeding characters to ignore. That will allow you to ignore any other text on the line and only look for the specified total. You can also specify Greater Than or Less Than your specified total to print graphics for specific customers.
To use Retail Conditional Graphics: 1. Open the ReceiptWare software application. 2. Click on the Retail Conditional Graphics tab. 3. Click on the Enable Total and/or Enable Time/Date button. Note: You must click on Enable Total and/or Enable Time/Date before you can define a Retail Conditional Graphic. 4. Identify the graphics that you want to print. You may want graphics for the holidays, one for a local sports team or school, or special ones to reward loyal customers.
Conditional Surround Graphics Many retailers use the receipt to convey to their customers the money that they saved or the loyalty points that they have earned. Given the limitations of the POS application, the messages that the retailers intended to “call out” get lost within the receipt. The Conditional Surround Graphic feature of ReceiptWare gives you the ability to replace your current method of highlighting with surround graphic shapes and color.
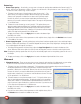
8. Now that you have determined the Conditional Surround Graphic shape and color, you need to determine its size. Change all the parameters for the Conditional Surround Graphic row. Please note that as you alter the values in these boxes, the changes will be made dynamically in the Conditional Surround Graphic Sample window. The parameters are as follows: a.
10. Identify the Mode. Choosing a Mode will determine how the Conditional Surround Graphic shape is positioned with respect to the lines above and below the shape. Options include: a. Mode 1: Pre-surround line, surround line(s) – Circles the data surround area line and the line immediately above that data. b. Mode 2: Pre-surround line, surr line(s), post-surr line – Circles the data surround area line, the line immediately above that data, and the line immediately below the data. c.
11. Identify your trigger type: a. Trigger Type – Tells the printer where the trigger string is located. 1. “Trigger is on line above line(s) to surround” – Instructs the printer that the trigger string in located one line above the line to be circled. 2. “Trigger is on first line to surround” – Instructs the printer that the trigger string is located on the first line to be surrounded. 3. “Trigger is char.
Legacy Color Triggers Most POS applications do not support two-color thermal printing, while many POS printers are fully capable of doing so. The cost of changing the application to support this feature has precluded the majority of retail end users from doing so, and therefore has kept them printing in monochrome. The Legacy Color Trigger feature of TPG’s ReceiptWare gives you the ability to print an entire line in color when it recognizes a user-defined text string sent down from the POS application.
Logo Suspension As mentioned in the Legacy Functionality portion of this guide, Legacy Graphics (Top Logo, Bottom Logo, Watermarks, and Margin Messages) included within your Receipt Format (AXI file), will be printed on every receipt that is generated. However, you may wish to print these graphics on every transaction receipt, but not on the Credit Authorization Slips that are sometimes subsequently printed.
Logo Suspension Trigger Guidelines • Attempting to trigger off a text string already specified as a trigger in the other tools will lead to unknown results. • Make sure that you choose trigger strings that will not appear in other parts of the receipt or the printer will print the Legacy Graphic at an undesired location. • To disable Logo Suspension Triggers, remove any trigger string from the user entry field.
User Additions The User Additions feature of ReceiptWare gives you access to printer functions that are not currently automated by ReceiptWare. It is an advanced tool that allows you to manually change the behavior of the printer. Unless you are very familiar with HEX command sets and printer firmware, we do not suggest that you use this feature. Using the User Additions Tool As with every other ReceiptWare tool, we recommend having a sample receipt present with you when creating Receipt Formats.
Make Download Package TPG’s ReceiptWare gives you the ability to create Receipt Format files (AXI) that contain triggers, graphics (LGO files), and instruction sets, which can be saved, edited, and downloaded to numerous printers and computers. To share an AXI or Receipt Format file with other computers or printers, creating a Download Package is necessary. A Download Package contains all of the files that are necessary to be sent to the printer to produce the desired Receipt Format.
Other Tools While ReceiptWare makes it simple for you to turn your receipts into customer retention tools that you control, its additional tool set makes it even easier. Using the Other Tools 1. To access these tools, click on the Tools drop-down menu located on the main menu bar of the main ReceiptWare window. Tools include: a. Bitmap Conversion Tool – Tool that converts all of the graphics that you wish to use fromBMP files to LGO files. b.
Legacy Settings Legacy settings inform the user of the settings of the active legacy settings (Legacy Graphics and Text Attribute Switching). Information includes: 1. Precut Logo – Indicates whether a Top Logo is specified. i) Active ii) Disabled a. Dot rows before logo – Margin specified above the Top Logo b. Dot rows after logo – Margin specified below the Top Logo 2. Post Cut Logo – Indicates whether a Bottom Logo is specified. i) Active ii) Disabled a.
Frequently Asked Questions What does ReceiptWare do? ReceiptWare is an “application independent” software tool for Windows® that allows POS printers to print customized Receipt Formats, graphics, and promotions based on individual customer transactions. What can I do to my receipt using ReceiptWare software? TPG’s ReceiptWare changes the way you use and think about your receipts.
How do I receive technical support? Before contacting the Technical Support Center, you must have the following information readily available: • Your name and the product’s serial number. • Information about your computer: processor type, speed, amount of RAM installed, and available hard-disk space. • Product name and version level. To see this, click Help>About, which will display the product and version information. • Other applications that you are using in conjunction with ReceiptWare.
Customer Service and Technical Support You can contact technical support for ReceiptWare by telephone, or email. Information Required Before You Contact Technical Support Before contacting the Technical Support Center, you must have the following information readily available: • Your name and product ID (located on the label affixed to the product packaging). • Information about your computer: processor type, speed, amount of RAM installed, and available hard-disk space. • Product name and version level.
Glossary of Terms AXI Proprietary file type created by ReceiptWare that contains graphics, instructions, and settings, which can be downloaded to a ReceiptWare capable printer. Margin Message Margin Messages are user-defined graphics that print along the margins of a printed receipt at locations that you specify. Baud Rate A variable unit of data transmission speed (as one bit per second). Set or change the POS printers baud rate to change the printing speed.
This page is intentionally left blank 31
This page is intentionally left blank 32