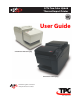
A776 Two-Color Hybrid Thermal/Impact Printer AS OYD'S RE LL G R QUAL IT Y TE IS • SURANC E IS O9001 User Guide A776 Printer without Imaging A776 Printer with Imaging New TPG LogoEZ® colorization utility information included.
Federal Communications Commission (FCC) Radio Frequency Interference Statement Warning Changes or modifications to this unit not expressly approved by the party responsible for compliance could void the user’s authority to operate the equipment. Note This equipment has been tested and found to comply with the limits for a Class A digital device, pursuant to Part 15 of the FCC Rules.
Contents Contents Table of Contents Chapter 1: About This Guide.................................................................................................................. 1 Chapter 2: About the Printer.................................................................................................................. 2 The A776 ColorPOS printer without imaging.................................................................... 2 The A776 ColorPOS printer with imaging................................
ii Contents Test printing of both A776 printers.............................................................................................19 Printer and imager configurations..............................................................................................22 Configuring the printer...................................................................................................................23 Communication interface.........................................................................
Contents iii Chapter 6: Ordering Paper and supplies.........................................................................................42 Ordering thermal paper..................................................................................................................42 Thermal paper specifications.................................................................................................42 Manufacturers.......................................................................................
Chapter 1: About this Guide Chapter 1: About This Guide This guide is for users of TPG Point of Sale printers and for any in-house service staff who are responsible for maintaining them.
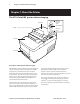
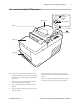
Chapter 2: About the Printer and Imaging Chapter 2: About the Printer The A776 ColorPOS® printer without imaging Receipt Cover On-line, Paper status, Error Light (green) Paper Feed Button Receipt Slip in Light (green) Front Cover Slip or check Description of A776 printer without imaging The TPG A776 is a small, efficient point of sale printer for retailers. It features fast black and white or ColorPOS® receipt printing.
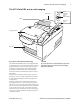
Chapter 2: About the Printer and Imaging The A776 ColorPOS® printer with imaging Receipt Cover On-line, Paper status, Error Light (green) Paper Feed Button Receipt Slip in Light (green) Imaging Module Cover Slip or check Description of A776 printer with imaging CAUTION The TPG A776 ColorPOS® printer is also available with To prevent document or printer damage, top inserted documents cannot be fed down to the curved paper path of the slip station. an imaging feature.
Chapter 2: About the Printer and Imaging Operating systems supported by the imaging feature TPG provides with each printer a UPOS compatible driver for the following operating systems for any applications that use TPG printers: 1. Windows 98SE 2. Windows 2000 3. Windows XP 4. Linux, Red Hat version 9.0 or later (this is a Java POS driver) TPG may provide drivers for other operating systems in the future.
Chapter 2: About the Printer and Imaging User controls for both A776 printers 2 Receipt Cover Receipt 1 On-line, Paper status, Error Light (green) Paper Feed Button 3 Slip in Light (green) 4 Reset Button Front Cover Slip or check The printer and imager have the following controls: 1. The Paper Feed button advances the receipt paper and allows you to step through the configuration menu items. 2. The On-line, Paper Status, Error light shows the printer status by shining or flashing. 3.
Chapter 2: About the Printer and Imaging Printer Configurations Your printer’s ID code Communication interfaces Look for the printer’s model ID number on the label attached to the back of the printer. This information is also shown on the installation quality report card. The model ID description is shown below.
Chapter 2: About the Printer and Imaging Printer and Imager Specifications (continued) MICR Reader: Character sets/fonts E-13B and CMC-7, auto discriminate (Integrated in slip station) Check Read Rate 99% minimum Parsing Formats E-13B only. Programmable to any format Physical A776 Base Unit Dimensions (W x D x H) 6.5 in. x 11.4 in. x 6.6 in. (165.10 mm x 289.56 mm x 167.64 mm) Weight Approximately 8 pounds Power Requirements 24 VDC, 3 Amps.
Chapter 2: About the Printer and Imaging Printer and Imager Specifications (continued) Objects to be Imaged Checks Both personal (2½ x 6 and business 33/4 x 8½) check sizes will be recognized and processed for Magnetic Ink Character Recognition (MICR) Misc. paper 4 inch maxmium width x 11.25 inches maximum length Thickness Bottom Entry: Single part forms 0.003 to 0.005 inch thick. Top Entry: Single part forms 0.0024 to 0.035 inch thick (receipt paper to ID cards).
Chapter 2: About the Printer and Imaging Printer and Imager Specifications (continued) Miscellaneous: Security A776 UG00001 B 10/06 It is up to your management to set up and run all security features associated with using networked printers. Likely your printer uses an Ethernet link, making it potentially a network peripheral, so to secure image files sent over your network you can use set the tag feature provided with the system.
10 Chapter 3: Settng up the Printer Chapter 3: Setting up the Printer Getting Started Before setting up the printer, be sure you read and understand each of the sections in this chapter. The sections are presented in the order they should be performed. 6.6" 11.4" 6.5" A776 Dim left side.eps Choose a location for printer without imaging The A776 printer may be set on or near the host computer.
Chapter 3: Settng up the Printer 11 Choose a location for printer with imaging 6.7" 13.2" 6.5" The A776 printer with an imaging unit requires very little counter space and may be set on or near the host computer. With the RS-232C interface, you can place the printer up to 50 feet from the host computer and power supply, and 15 feet with a USB interface. Try to protect the printer from getting dusty, and make sure it is safe from having coke or coffee spilled on it.
12 Chapter 3: Settng up the Printer Unpack the printer Keep the packaging Check the packing list The packing materials protect the printer and help prevent damage. Be sure to save all the packaging materials, including the cardboard supports in the slip path. Before you set up a new printer, make sure that all of the items listed below are provided.
Chapter 3: Settng up the Printer 13 Returning a printer Follow these instructions if you need to return a printer for servicing. 1. 2. If you are sending the printer to TPG for repair, call TPG for a Return Material Authorization number (RMA#) . Call (877) 209–0156 in USA or Email: support@tpgprinters.com or Go to the TPG Web site at www.tpgprinters.com. Be prepared to answer questions concerning shipping and billing. Request an RMA process be sent to you, if required. 3.
14 Chapter 3: Settng up the Printer Installing new receipt paper for both A776 printers Install paper NO.eps If the online paper status error light blinks, change the paper as soon as convenient to avoid running out of paper part way through a transaction. If the On-line, Paper Status, Error light blinks fast, the paper is out. Change the paper immediately A776 Install Paper 1.epsor data may be lost. The printer can accept and store only a limited amount of data without paper.
Chapter 3: Settng up the Printer 15 Removing and installing a ribbon cassette in A776 printers Change the impact printer’s ribbon cassette if it is printing lightly or produces marks, lines or other inconsistent printing on the slip. CAUTION Use of other than an approved TPG ribbon cassette can void all warranties and cause damage from jamming and other ribbon problems. Ribbon Alone.eps Removing a used ribbon cassette 1.
16 Chapter 3: Settng up the Printer Connect the cables Cable connections are made at the back of the printer. The cash drawer cable connects the printer to one or two cash drawers. CAUTION Be careful to connect the USB cable only to point A (below). Attempts to connect the USB cable at point B can cause permanent damage to the communications circuitry Connect the communications cables first, and then plug in the power supply.
Chapter 3: Settng up the Printer 17 Communication cables The communication cable connects the printer to the host computer. If installing the RS-232C communication cable: 1. Turn off the host computer. 3. Secure the connector by tightening the screws. 2. Plug the communication cable into the connector at the bottom back of the printer. 4. Connect the cable to the host computer. 5. Turn the host computer on. If installing the USB communication cable: 1.
18 Chapter 3: Settng up the Printer If installing the Ethernet communication cable: Ethernet communication connector panel Ethernet connector Power supply connector 1. You don’t need to turn off the computer. Plug the printer end of the Ethernet cable into the Ethernet connector port on the printer (A). Make sure the connector snaps firmly in place. 2. Plug the computer end of the Ethernet cable into the Ethernet port of the computer. Make sure the connector snaps firmly in place. 3.
Chapter 3: Settng up the Printer 19 Cable routing Prevent the printer from being accidentally unplugged by making sure the cables are routed as shown in the illustration below.
20 Chapter 3: Settng up the Printer Test Printout without imaging Paper type can be changed in the configuration menu. Paper types and grades available: Type 0 Type 1 Monochrome grades Kanzaki P-310 Two-color grades Kanzaki P-310 RB Type 4 - Two-color grades Kanzaki P-320 BB Type 5 - Two-color grades Kanzaki P-320 RB See the Programming Guide for more information.
Chapter 3: Settng up the Printer 21 Test Printout with imaging Paper type can be changed in the configuration menu.
22 Chapter 3: Settng up the Printer Printer and imager configurations Printers are shipped with all the functions and parameters pre-set at the factory, but you can change these settings manually. The instructions for accessing the menu appear on the bottom of the test printout receipt. CAUTION • Emulation/software options Printer emulations Be extremely careful changing any of the printer settings to avoid possibility of changing other settings that might affect the performance of the printer.
Chapter 3: Settng up the Printer 23 Configuring the printer CAUTION Be extremely careful changing any of the printer settings to the avoid possibility of changing other settings that might affect the performance of the printer. 1. Open the receipt cover and check if there is paper in the printer. If not, follow the instructions for loading paper. 2. Turn the printer so the back is facing you. 3. Set DIP switch 1 to the On position (down). 4.
24 Chapter 3: Settng up the Printer Communication interface To change the communication interface settings (except Ethernet), enter the configuration menu, select “Set Communication Interface” from the main menu and answer “Yes” to “SET INTERFACE TYPE?” printed on the receipt. CAUTION Be careful changing any of the printer settings to avoid entering changes you don’t intend to make. Press the paper feed button as instructed to select the communication interface you want, either RS232C or USB.
Chapter 3: Settng up the Printer 25 Enable or disable data scope mode The data scope mode test prints a hexadecimal dump of all data sent to the printer. Hexadecimal code is a base 16 numeric system used in computing, where the letters A through F are used for numbers 10 through 15. Your technical staff can use hex code to troubleshoot communication problems. You can enable and disable data scope mode by selecting the “Diagnostic Modes” sub-menu of the configuration menu.
26 Chapter 3: Settng up the Printer Enable or disable receipt test mode The receipt test mode verifies proper receipt printing. Receipt test is enabled and disabled by selecting the “Diagnostic Modes” sub-menu of the configuration menu. See “Configuring the printer” on page 26 for instructions on how to enter the configuration menu. To run the Receipt test mode: To exit the Receipt test mode: 1. Enable the receipt test mode in the configuration menu. 1. Enter the configuration menu again.
Chapter 3: Settng up the Printer 27 Setting the printer emulations and software options Printer emulations determine what commands are available to the printer. To change the printer emulations settings, select the “Emulations/Software Options” sub-menu of the main menu and answer “Yes” to “Set the Printer Emulations?” printed on the receipt. This takes you to the instructions for setting the printer emulation.
28 Chapter 3: Settng up the Printer Select the hardware options sub-menu to set: • Print head setting CAUTION This is the print head energy rating. It must match the rating marked on the front right of the thermal mechanism in the printer. Choose a print density setting no higher than necessary to achieve acceptable print density. Failure to observe this rule may result in a printer service call and may void the printer warranty. Running at a higher energy level reduces the print head life.
Chapter 4: Using the Printer 29 Chapter 4: Using the Printer Printing on forms or checks for both A776 printers For several types of transactions you may need to insert a check or other form into the printer: • Credit card transaction, requiring a merchant verification or authorization slip • Check printing, to print the date, payee, and amount on the check face • Multiple-part forms such as credit transactions or merchandise returns • Check endorsement • The A776 can also print on multi-part for
30 Chapter 4: Using the Printer Proper insertion of multi-forms for both A776 printers CAUTION Failure to insert multi-forms properly can jam the printer and damage the form. Be sure to insert multi-part forms glued-edge-first as shown in the drawings on this page, whether inserting the form from the front, top or side. Glued Edge A776_B780 Forms YES.eps Front insertion printing - glued edge leading Top or side slip-in printing - No perforation holes to right side A776_B780 Forms YES.
Chapter 4: Using the Printer 31 Verifying and validating checks for both A776 printers The printer’s MICR check reader enables check verification and validation by inserting a check in either the front or the top of the printer. Note To make sure that the printer properly verifies and validates a check, make sure that you smooth out any folds and wrinkles and insert the check correctly into the MICR printer.
32 Chapter 4: Using the Printer Inserting checks or cards for imaging (scanning) Place the checks or cards or other media on the top slip table as shown in the figure below for imaging only. Slide the media straight forward into the feed rolls. Note The MICR line of a check cannot be read by the MICR reader in this position.
Chapter 4: Using the Printer 33 Tips for Avoiding Problems Prevent overheating of the print head Overheating of the thermal print head is one of the most common causes of printer problems. To avoid overheating do one or more of the following: 1. Reduce the amount of solid coverage when printing receipts. 2. Reduce the time of continuous printing, or the “duty cycle.” The duty cycle is the percentage of time that the printer can be actively printing in any sixty-second period of time.
34 Chapter 4: Using the Printer Cleaning Cleaning the printer cabinet Clean the outside cabinet as needed, using any household cleaner made for plastics. You may want to test a small unseen area first. Wipe the paper compartment with a clean, damp cloth. The cabinet materials and finish are durable and can tolerate cleaning solutions, lubricants, fuels, cooking oils, and ultraviolet light. Cleaning the thermal print head WARNING Don’t touch the thermal print head, as this can cause burns.
Chapter 4: Using the Printer 35 Paper Jams Clearing a receipt paper jam in all printers To clear a receipt paper jam proceed as follows: 1. On each side of the receipt cover, near where the receipt emerges, there is a lip. Using one finger from each hand, firmly raise the receipt cover. 2. Draw the crumpled portion of the paper out of the printer until the smooth portion extends a few inches over the cabinet front. 3.
36 Chapter 5: Troubleshooting Chapter 5: Troubleshooting The simple design of A776 requires virtually no periodic servicing. However, if problems do occur, they can usually be diagnosed readily by checking the light status indicators, below, then referring to appropriate section of the Troubleshooting guide on the following pages. Status Indications for both A776 printers The on-line, paper status, error light is the light to the rear, on the top edge of the printer.
Chapter 5: Troubleshooting 37 Printer beeps Condition Possible causes What to do Printer beeps in a single, double, or triple pattern at first power on. The on-line paper status error light blinks in the same pattern, and the printer won’t power up. The printer has a problem with its electronics. Contact a service representative. Printer beeps during normal operation. The printer may be programmed to beep during normal operation by the software application used on the host computer.
38 Chapter 5: Troubleshooting On-line, paper status, error light flashes Condition Possible causes What to do On-line, paper status, or Receipt paper is out. error light is blinking. Change the paper immediately. Do not try to complete a transaction without paper, or you may lose data. See “Installing new receipt paper” on page 17. Receipt or front cover is open. Close the cover. The printer can not operate with any of the covers open. The knife is jammed.
Chapter 5: Troubleshooting 39 Check print quality poor Condition Possible causes What to do Printer starts to print, but stops the form is being printed. Communication error or software error. Check the interface cable. Check that while software is working properly. Forms print is light or spotty. Form inserted incorrectly. See “Printing on forms or checks.” on page 33. Impact print head is dirty or defective. Contact a service representative. Improper platen gap.
40 Chapter 5: Troubleshooting Receipt print quality (continued) Condition Possible causes Color print is light. Variations in paper. Incorrect paper setting Inconsistent printing, no two-color print. What to do Increase energy level of print head in “Color Density Adj” of the printer configuration menu. See “Configuring the printer” on page 26. Check diagnostics setting. Paper type used and paper type setting do not match.
Chapter 5: Troubleshooting 41 Knife does not operate Condition Possible causes What to do Receipt is not cut. Paper is jammed. Open the receipt cover, inspect the knife, and clear any jammed paper. All other problems. Contact a service representative. Other conditions The following problems all need to be corrected by a qualified service representative. See the section below, “Contacting a service representative.
42 Chapter 6: Ordering Paper and Supplies Chapter 6: Ordering Paper and supplies Ordering from TPG Printer parts, accessories, and small quantities of paper can be ordered directly from TPG. While the TPG part numbers are listed here for your convenience, keep in mind that these numbers may change before this guide is updated. To place an order or get more information, call your TPG representative or the sales line at (800) 732-8950. TPG can provide paper in small lots for product evaluation and testing.
Chapter 6: Ordering Paper and Supplies Mitsubishi Int’l Corp (USA) Voice: (212) 605–2000 520 Madison Ave. Fax: (212) 605–2597 New York, New York 10022-4223 TP–8065 (Standard) P–5035 (Light) T–8051 (Standard) OJI Paper Company Ltd.
44 Chapter 6: Ordering Paper and Supplies Item Type Number 55-watt power supply with attached cable to printer and U.S. power supply cord A776–K330 75-watt power supply with attached cable to the printer and U.S. power supply cord A776–K331 55-watt power supply, attached cable A776–K301 75-watt power supply, attached cable A776–K302 Power supply cord (to outlet) A776–K320 A776–K321 A776–K322 A776–K323 A776–K324 A795–K326 United States International (no plug) United Kingdom S.E.V.
Chapter 6: Ordering Paper and Supplies 45 Forms specifications The A776 prints on single or multiple part forms in the slip station (up to four-part forms). Forms and slips must meet the following requirements: • Front insertion (minimum) 51 mm (2 inches) wide 68 mm (2.68 inches) long • Side insertion (minimum) 51 mm (2 inches) wide 203 mm (8 inches) long • Single-ply forms should be on paper that is greater than 15 pounds • Multiple-part forms (up to four parts) should be no thicker than 0.
46 Chapter 6: Ordering Paper and Supplies Check specifications Check specifications for paper are defined by American Standards ANSI X9.13 and ANSI X9.18, and International Standard ISO 1004. • Minimum check size: 70 mm (2.75 inch) wide x 152 mm (6 inch) long • Maximum check size: 95 mm (3.75 inch) wide x 222 mm (8.75 inch) long MICR reader – additional information • For best results the check should be flat and free of curls, folds, or wrinkles (especially at the edges).
A776–UG00001 B 10/06