Ethernet Interface Setup Guide
Federal Communications Commission (FCC) Radio Frequency Interference Statement Warning Changes or modifications to this unit not expressly approved by the party responsible for compliance could void the user’s authority to operate the equipment. Note This equipment has been tested and found to comply with the limits for a Class A digital device, pursuant to Part 15 of the FCC Rules.
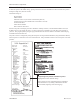
Ethernet Interface Setup Guide Ethernet terminology and default setup For the printer to operate with Ethernet, a series of commands must be set within the printer. These commands can only be set through the host computer and are not configurable through the printer configuration menu. Default setup instructions and sample Ethernet diagnostic printout are on the following page. Note the differences between an Ethernet and a standard RS-232C printout.
Ethernet Interface Setup Guide Ethernet Default Setup To return the printer to the default settings, put the printer in the boot mode and hold down the feed switch until you hear the high-low-high tones (about 10 seconds). The default settings are: Bootp Disabled DHCP Enabled Default IP 192.0.0.192 (in use after 2 minute Bootp time-out) Net mask of 0.0.0.
Ethernet Interface Setup Guide Ethernet setup commands The following commands are designed to set the required printer internal parameters for Ethernet operation. The commands can only be used in the Flash download (boot) mode. Restore default settings ASCII Hexadecimal Decimal US BS NUL 1F 08 00 31 8 0 Restores the Ethernet settings to the preset values.
Ethernet Interface Setup Guide Setting raw TCP/IP port ASCII Hexadecimal Decimal US BS EOT n1 n2 1F 08 04 n1 n2 31 8 4 n1 n2 n1: n2: Low order byte of port # High order byte of port # Default: Port = 9001 Sets the port where the printer will look for raw TCP/IP communications. Setting port number to 0 disables raw TCP/IP communications.
Ethernet Interface Setup Guide DHCP (auto-configuration) ASCII Hexadecimal Decimal US BS BS n1 1F 08 08 n1 31 8 8 n1 n1 = 0: n1 = 1: disabled enabled Default: enabled Enables or disables the use of DHCP at power-up to obtain an IP address. If no address is found within two minutes, DHCP obtains the default IP address.
Ethernet Interface Setup Guide Imager-only ethernet setup commands Set image host address ASCII Hexadecimal Decimal US BS FF n1 n2 n3 n4 1F 08 0C n1 n2 n3 n4 31 8 12 n1 n2 n3 n4 Value of n1 n2 n3 n4: IP address of the host to receive images Default: 192.0.0.1 Configures the printer with the IP address of the host to receive the images. This is used when the printer is acting as a client and the host has a server running to receive the images.
Ethernet Interface Setup Guide Installing an Ethernet Printer on a network with Windows XP/Vista 1) Plug the printer into the network and turn power on. 2) Run a diagnostic sample and get the printer IP address. If there is a problem with the IP address then reset the printer communication parameters and try again. 3) Locate the Windows program Telnet and go to the Start menu, use Run to open a command window; at the command prompt line, change directories to the Telnet location and type ‘Telnet xxx.
TPG-ETHSUG Rev.