
User manual


set time Sets the time of the camera. The time should be entered in 24-hour
format as HH:MM:SS (for example, 20 seconds past 3:15 PM
would be 15:15:20). Before adjusting the clock, make sure that the
correct time zone is set.
Note: A network timeserver can be used to keep time for the camera. See the Cohu 7100
Reference Manual for more information.
After completing the settings on the Server Settings page, the installation wizard is finished.
Click the Done>> link that appears near the bottom of the page to access the camera's Live
Images page.
2.5 Access the Camera
To access the camera after the previous steps have been completed:
1. End any previous web sessions with the camera by closing the browser windows or exiting.
2. Open a new web browser session.
3. Type the camera's IP address into the browser's URL/Location field.
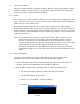
Note: You can add this camera to your host table to associate a text name with the IP address.
When the camera is in the host table, it can be accessed by typing the name in the web
browser instead of typing the IP address. Consult the LAN system administrator for
details about this process.
4. Press Return.
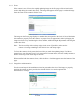
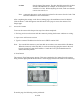
The camera's View Images page appears. This page contains the live images from the camera
along with the digital pan/tilt/zoom controls. The web page should look similar to the following:
From this page, the following can be performed:
20 of 60