
User manual


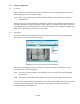
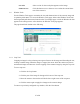

Note: Refer to the Browser-Based Settings Pages, Section 1.5.1, for information on how to use
the browser-based settings pages.
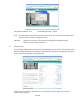
Note: Each setting on the Image Settings page is linked to a comprehensive help page. To
access the help text for a particular setting, click the question mark icon that appears next
to it.
maximum size This setting allows the user to select the maximum area that
the imager is sampled. For instance, the imager is 1288x968 pixels.
The imager can also be sampled at 800x600, 640x480, etc.
Therefore, the maximum size can be utilized to limit bandwidth
usage or to provide a suitable fit for pictures being displayed on the
user's monitor. Also, the maximum size will affect other functions
such as scrolling.
display resolution Select the amount to downsample, or shrink, the image. For
example, selecting 1/3 will downsample the image to 1/3 its
original size. Since smaller images are processed and transmitted
faster, this feature is important if more images need to be
transmitted per second and are not as concerned with the resolution
of the images.
compression Select the level of compression to apply to the image. The level of
compression affects the quality of the image. Low levels of
compression result in high quality images, large file sizes, and
slow transmission times. Conversely, high levels of compression
yield smaller file sizes, poorer image quality, and faster
transmission times. Ideal compression settings will depend on the
minimum image quality and maximum transmission time that are
acceptable. Select medium for an image balanced with acceptable
image quality and reasonable file size.
sharpness This selection increases or decreases the amount of edge detail of
the image. Use sharper images to help improve readability of
words and bar codes. Use default setting for most applications.
lighting Choose the type of lighting that illuminates the camera's
surroundings. The lighting settings control the color corrections
that are needed to account for specific types of lighting. Each
category of lighting correction will change the basic color matrix
the camera uses to process its images.
saturation Increase or decrease the color intensity or reset to default.
contrast, gamma Adjust the midtones, or gray levels, of the camera's image. Select
the value by clicking the Up or Down buttons, or by entering a
number into the text input field. Return to the default contrast
(0.50) by clicking the Default button.
25 of 60