
User manual


3. Select Advanced from the list of Preferences options.
4. Click the radio button next to either Select all cookies or Select only cookies that get sent back
to originating server.
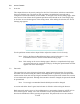
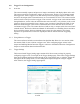
5.3 Access Hours
The 7100 Series cameras feature an access hours setting that allows control of the operating
hours for the camera. Although the browser-based interface does not support setting hours for
individual days, it can configure the operating hours separately for weekdays and weekends. For
both weekdays and weekends, either configure the hours to provide unlimited, 24-hour access or
close the camera completely. To provide flexibility for the operating hours, set specific times
during which the camera will be available to outside users. At times that are outside of the
specified hours of operation, the camera will serve a black image containing a customized
message to any non-privileged users. Privileged users can still see the streaming images at any
time.
weekdays/weekends Adjust the access hours separately for Monday through
Friday, and for Saturday and Sunday. Choose whether the
camera will be on, off, or on during specific hours (timer).
camera is on/off Enter the time that the camera should open (on) or close
(off) in 24-hour time, using HH:MM format. For example,
2:30 PM would be entered as 14:30. Multiple on/off times
for each day cannot be set.
Note: The clock MUST be set or enable a timeserver. See clock time and timeserver
protocol in Section 4.2 for details.
access denied message Enter the message that users will see during off-hours.
message position Set the position of the message relative to
the image window.
To set the operating hours for timer-based access control:
1. Select Timer from the pull-down menus for either Weekdays, Weekends, or both.
2. Enter the time that the camera should open into the Camera Is On field.
3. Enter the time that the camera will close into the Camera Is Off field.
37 of 60