Under Carpet Floor Heater Kit Installation Manual Scan for Installation Support We are here to support you Contact Us Call: 1800 85 75 65 Email: info@coldbuster.com.au Visit: www.coldbuster.com.au WARNING: Failure to read this guide prior to installing your COLDBUSTER heater(s) may result in installation problems that could void your heater warranty.
Contents INTRODUCTION 2 Installation Dos and Do Nots 3 PRODUCT INFORMATION 4 TOOLS REQUIRED FOR HEATER INSTALLATION 4 ELECTRICAL INFORMATION 4 Electrical Preparation 4 Residual Current Device (RCD) 4 Hardwire Connection 4 Plug-In Connections 5 Floor Sensor Preparation (typically provided with your thermostat) 5 UNDERLAY PREPARATION 5 PLANNING HEATER LAYOUT 6 PRE-HEATER INSTALLATION 7 HEATER INSTALLATION 8 MULTIPLE HEATER INSTALLATION 10 LAYING FLOOR COVERING OVER COLDBUSTER FLO
Installation Dos and Do Nots Do: • Ensure all heaters are installed as per these instructions • Start each heater cold tail on the floor below the thermostat point • Plan installation layout before starting, especially when more than one heater is being installed • Protect the heater with cardboard or hardboard if carpet installation is delayed • Test heaters before installing carpet (ensure monitor is connected, turned on, and no siren sounding) • Ensure the heater is connected to an RCD (safety switch) pr
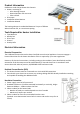
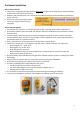
Product Information Coldbuster Under Carpet Heater Kits Contain: • Heater, consisting of: o Inner heating element o Outer aluminium foil mat cover o 3.
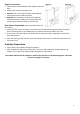
Plug-In Connections • Thermostat mounted between 300 - 600mm from the floor • Power point must be RCD protected • Option A: For cavity walls, fit heater lead and floor temperature sensor inside the cavity • Option B: For brick walls, fit heater lead and floor temperature sensor inside PVC trunking and notch out the thermostat baseplate for cable access Floor Sensor Preparation (typically provided with your thermostat) • Install the floor sensor as shown in the electrical connection drawing, particularly if
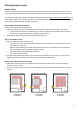
Planning Heater Layout Heater Choice Ensure the heater(s) you have purchased is/are correct size for the area. Installing a heater too small may not produce enough heat to warm the area sufficiently, whereas too big a heater simply won’t fit! It is important to plan the position and layout shape of the heater(s) before starting the installation. The last thing you want to do is to have to pull up your installed heater(s) and restart because you ran out of room or otherwise placed the heater(s) incorrectly.
Pre-Heater Installation Step 1: Place Cold Tail • Connect (e.g.
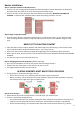
Heater Installation Step 1: Cut Strips of Heater to Reach First Run • The first run may not begin directly below the thermostat point.
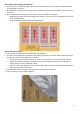
Step 5: Silver Tape All Edges of the Heater • Once each run is secured at beginnings and ends, use the silver tape to secure the carpet heater on the long edges of each run • By completely covering spaces between each run and leaving no element exposed, you ensure earth continuity • Do not substitute silver tape from other sources as not all tape is compatible o Coldbuster provides more than enough tape, however, should you run out additional rolls can be purchased separately o Using alternatively sourced t
Multiple Heater Installation • If you are installing multiple heaters into one single heat zone (and thus using one thermostat), each heater will need to start at the thermostat location MULTIPLE heaters must be connected in PARALLEL • As explained earlier, you may need to cut the mesh between the elements (without cutting the heater element) to enable the heater to be laid in a single line, leading to the start of the next run • Remember to maintain a spacing of 60-80mm when laying the heater element
Laying Floor Covering over Coldbuster Floor Heating: • • • • • • • Additional care should always be taken when working over floor heaters It is recommended that a piece of cardboard or carpet is used to temporarily cover the heaters to avoid accidental damage to the heaters while laying floor covering in other areas Ensure that fitting of the carpet doesn’t change the position of the heaters When stretching carpet, avoid putting the carpet stretcher or knee kicker on top of the heaters Do not cut or join
Damage and Repair If the monitor sounds an alarm and the LED lights up red during installation, stop work immediately and remove the flooring and adhesive where the damage has occurred If the damage is not clearly visible, use an insulation tester set at 1000V connected to the element and the earth screen. This should create a spark where the damage has occurred The repair can be done in the following manner: 1.
Safety & Operating Instructions This is an electrical heating system and must be used strictly in accordance with the manufacturer's instructions: • Heaters must be connected through an RCD (safety switch) circuit breaker • Do not drill holes or drive sharp objects (i.e.
Economy Tips The ideal temperature of the floor depends on the heat required to maintain the desired room temperature. If it is very cold outside, the floor will have to be warmer to maintain the same room temperature than when it is moderately cold outside. Ideal temperature also depends on size of area, ventilation, insulation, ceiling height, etc. Another important factor is whether you are intending to use the floor heating to heat just the floor or to be the primary heat source for the room area.
Warranty Every heater is thoroughly tested before shipping and is guaranteed to be in good working order on dispatch. Coldbuster guarantees its products subject to the following conditions: 1. The product is free of defects at the time it was supplied. The product will be deemed to be defectfree if no defect has been detected and reported to Coldbuster: a) within 20 years (240 months) from date of purchase (for heaters); or b) 3 years (36 months) from date of purchase (for thermostats). 2.
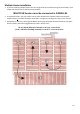
Heater position/layout sketch KEEP FOR FUTURE REFERENCE Record heating layout and test readings on this page to comply with the 20-year warranty. Sketch out the position of your heater(s), walls and other fixed fittings. Keep this manual and diagram for your reference and pass on to future occupants. Record the details below, as this can be used to validate the heater and thermostat warranties.