
Instructions / Assembly


English - 5
Assemble Grill
IMPORTANT: Remove all packing material prior to assembly/use.
During assembly, grill lid should be latched and grill should lie on carpet or cardboard.
Fig. 11
Unlock
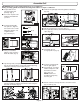
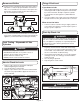
■ Using a screwdriver,
tighten screws to x the
xed side table. (Fig. 6)
■ Rotate clockwise the leg locker into slot until secured.
(Fig. 15 and Fig. 16)
Fig. 4
Fig. 3
Fig. 7 Fig. 8
Fig. 5
Screw Holes
Fig. 6
A
Fig. 15 Fig. 16
Leg locker
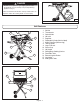
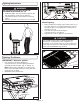
■ Inspect and remove
all components from
package. (Fig. 3)
■ See carton for parts and
hardware included with
your unit.
A (4)
B (2)
C (1)
■ Insert xed side table
into grill case, align the
four screw holes on side
table tube with the ones
on grill brackets.
(Fig. 4 and Fig. 5)
■ Cap the leg ends (outer pair) with leg extensions
(Fig. 7), press the buttons on leg ends and then push leg
extensions until they lock into place (Fig. 8).
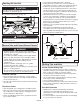
■ Rotate leg extensions to locked position. Assemble
wheels to grill base. Attach each wheel to axle using one
bolt and one washer. (Fig. 9)
Fig. 9
B
Lock
■ Interlock the grill support and the grill base with bolt C.
(Fig. 10)
Fig. 10
C
■ Unlock leg extensions as shown. (Fig. 11)
■ Press grill support rmly downward until legs lock into
clips. (Fig. 12)
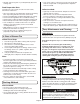
■ Stand grill up to its
storage position. (Fig. 13)
■ Insert the towing handle
into the grill support.
■ Press buttons on towing
handle and push in until
the buttons lock into
place. (Fig. 14)
NOTE: Plastic Feet
should be facing away
from the grill.
Fig. 13
Fig. 12
Clips
Fig. 14
Plastic
Feet