
Instructions / Assembly


English - 6
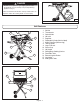
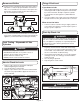
■ Remove plastic cap from
top of propane cylinder
and screw cylinder into
regulator hand tight.
(Fig. 24)
■ Before attaching propane
cylinder make sure both
control knobs are closed.
(Fig. 23)
Installing 1 lb. Propane Cylinder
• NEVER store a spare L.P. gas supply cylinder under the
grill body or inside the grill enclosure or in the vicinity of
any heat producing appliance.
Failure to follow this information exactly could result in an
explosion and/or re causing death or serious injury.
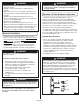
DANGER
Tighten by hand only. DO NOT use tools.
CAUTION
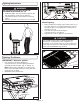
Only cylinders marked “Propane” must be used.
WARNING
This procedure MUST be performed OUTDOORS only!
Read and follow the directions on the cylinder.
WARNING
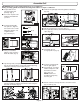
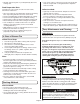
Fig. 26
■ To extend sliding side
table, grasp its handle
beneath the grill and
slide out until fully
extended. (Fig. 26)
DO NOT operate the grill with side tables in storage
position. Damage will occur and void the warranty.
WARNING
■ To open lid, release both
cover latches and lift up.
(Fig. 25)
Fig. 24
NOTE: Your 9959 Series grill is set up from the factory to
use a 1 lb. disposable propane cylinder.
Fig. 25
Fig. 23
Fig. 21
Pull
Pull
Set up the Grill
Fig. 20
Lock
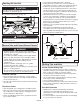
Install the Grease Cup
■ Pull apart the grease cup holder and insert it into drip
hole on bottom center of grill base. (Fig. 21)
■ Squeeze the grease cup holder toward center and attach
the grease cup. (Fig. 22)
■ Rotate counterclockwise the leg locker to release. (Fig. 18)
■ Open up the grill from the folded position. Place one foot
on the towing handle, grasp the carry handle, and lift up
and toward you. Continue to pull up until the grill stand is
fully extended. (Fig. 19)
■ Lock the grill top into the leg hooks as shown. (Fig. 20)
Fig. 22
Fig. 19
Fig. 18
Fig. 17
■ Once handle is locked
in position, the grill
can easily be moved
to any location in your
campsite or backyard
by grasping the towing
handle. (Fig. 17)