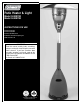
® Patio Heater & Light Model 5040B740 Model 5040B750 INSTRUCTIONS FOR USE Patent # 6,422,232 Patent # 6,499,480 Patent # US D451,988 S © 2003 The Coleman Company, Inc. www.coleman.com IMPORTANT Read this manual carefully before assembling, using or servicing this heater. Keep this manual for future reference. If you have questions about assembly, operation, servicing or repair of this heater, please call Coleman at 1-800-835-3278 or TDD: 316-832-8707. In Canada call 1-800-387-6161.
General Safety Information continued. Contents General Safety Information Assembly Leak Check Mantles Operation Shut Down Procedure Storage Maintenance Troubleshooting Service Warranty Parts List FOR YOUR SAFETY Do not store or use gasoline or other flammable vapor and liquids in the vicinity of this or any other appliance. WARNING: For Outdoor Use Only WARNING General Safety Information This manual contains important information about the assembly, operation and maintenance of this portable heater.
General Safety Information continued. DANGER DANGER • CARBON MONOXIDE HAZARD • This heater is a combustion appliance. All combustion appliances produce carbon monoxide (CO) during the combustion process. This product is designed to produce extremely minute, non-hazardous amounts of CO if used and maintained in accordance with all warnings and instructions. Do not block air flow into or out of the heater.
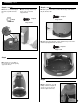
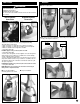
Assembly Step 1 (continued) Step 2 (continued) ■ Attach Post Base to Cylinder Cover Pieces loosely with seven Large Screws. ■ Turn unit over and assemble large screw loosely through Cover Pieces into base of Center Rear Support Bracket. 7 Required Large Screw 1 Required Large Screw ■ Assemble three small screws loosely through Cover Pieces into Center Rear Support Bracket. 3 Req’d Small Screw Step 3 Step 2 ■ Identify Center Rear Support Bracket. It has six holes, various sizes.
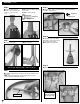
Assembly continued. Step 3 (continued) ■ Attach the second Side Support Bracket loosely with Hex Nut at top. Step 4 (continued) ■ Attach one large screw loosely at base of the second Side Support Bracket. ■ Attach Cylinder Cover Pieces to Base with two large screws horizontally into the Base Tabs. 2 Required 1 Required Large Screw 1 Req’d Hex Nut Large Screw ■ Attach three Support Brackets to Base with three large screws downward through Support Brackets into the Base.
Assembly continued. Step 6 Step 9 ■ Install post onto post base. ■ Decal on post should face front of heater (see photo on front cover). ■ Attach post to post base using four large screws. ■ Tighten screws securely. ■ Using the three screws removed in Step 8, securely attach clamp assembly to support tubes. 3 Required 4 Required Small Screw Large Screw Step 10 Step 7 ■ Load cover onto post. ■ Slide cover down.
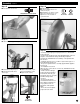
Assembly continued. Step 12 Step 14 ■ Insert studs into screen cover. ■ Support Heater. ■ Locate assembled reflector on 3 studs (ref. Step 12). ■ Install washers on studs & securely tighten acorn nuts but do not overtighten! Use a 7/16" nut driver or open-end wrench. 3 Req’d Brass Reflector Studs 3 Req’d Acorn Nut 3 Req’d Washers Step 13 ■ Load head assembly by inserting hose into post. Step 15 ■ Insert head assembly into post. ■ Control knob should be above decal on post.
Assembly continued. Step 15 (continued) ■ Screw regulator onto hose. Do not cross-thread. ■ Attach regulator to tank. ■ Install tank. ■ Tighten Securely. 8 ■ Install tank. ■ Complete attachment.
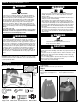
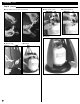
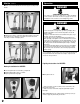
Mantles Leak Check WARNING • • • • ■ Remove 2 glass panels. Perform all leak tests outdoors. Extinguish all open flames. NEVER leak test when smoking. Do not use the heater until all connections have been leak tested and do not leak. Hose/Regulator Connection Regulator/Cylinder Connection ■ Slip mantle onto burners. Align clips in mantle with groove in burner. Be sure clip points away from electrode. • Make 2-3 oz. of leak check solution (one part liquid dishwashing detergent and three parts water).
Mantles continued. Operation ■ Attach second mantle. Illustration below shows proper assembly of both mantles. DANGER • CARBON MONOXIDE HAZARD • For outdoor use only. Never use inside house, or other unventilated or enclosed areas. This heater consumes air (oxygen). Do not use in unventilated or enclosed areas to avoid endangering your life. DANGER ■ Light bottom of mantles evenly. Burn until nothing but white ash remains. Once mantle has been burned it’s very fragile.
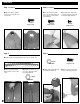
Operation continued. Lighting Instructions for HEATER continued. Match Lighting Instructions for HEATER 3. Pilot Light will ignite and be visible through Pilot Viewing Port (flame may be difficult to see in broad daylight). Continue to push Heater Control Knob in for 30 to 60 seconds after pilot is on, then release knob. Pilot Light must remain on, if not return to step 1. Pilot Viewing Port 1. Turn cylinder valve on. 2.
Operation Shut Down Procedure continued. Match Lighting Instructions for LIGHT 1. Turn cylinder valve on. 2. Remove front glass. HEATER LIGHT 1. Rotate Heater control knob (clockwise) to pilot position. 2. Push in on Heater control knob and rotate (clockwise) to OFF position. 1. Push in and rotate Light control knob (clockwise) to OFF position. The gas supply must be turned off at the LP-gas cylinder when this appliance is not in use.
Troubleshooting Problem Possible Cause Solution Pilot won’t light Cylinder valve is closed Open valve Blockage in orifice or pilot tube Clean or replace orifice or pilot tube Air in gas line Pilot may take 1-2 minutes to light after a propane bottle has been connected Low gas pressure with Cylinder Valve fully open Cylinder is empty. Replace cylinder Igniter fails Use match to light pilot.
Replacement Parts - Patio Heater & Light 14 1 20 19 11 2 7 12 17 16 3 8 10 4 5 13 6 No. 1 2 3 4 5 6 7 8 9 10 11 12 13 14 15 16 17 18 19 20 14 Part No.
Replacement Parts - Table Parts List No. Part No.
Warranty Coleman Limited 7-Year Warranty Coleman will repair or replace, at its option, this product or any component found to be defective in materials or workmanship within seven years of the original retail purchase. This warranty is valid for the original retail purchaser from the date of initial retail purchase and is not transferrable. Keep the original sales receipt. Proof of purchase is required to obtain warranty performance.