Master MarinerTM Stainless Steel 2-Burner Propane Grill Use, Care & Assembly Manual With Lighting Instructions Model 9972 Series ASSEMBLER/INSTALLER: Leave these instructions with the consumer. CONSUMER/USER: Read all instructions and keep in a safe place for future reference. INSTASTART™ Electronic Ignition Propane cylinder not included. IMPORTANT CONSUMER/USER: This instruction manual contains important information necessary for the proper assembly and safe use of the appliance.
DANGER Contents Technical Characteristics . . . . . . . . . . . . . . . . . . . . . . . . . . . . . . . . . . . . . . . . . . 2 General Safety Information . . . . . . . . . . . . . . . . . . . . . . . . . . . . . . . . . . . . . . . . 2 DANGER indicates an imminently hazardous situation which, if not avoided, will result in death or serious injury. Portable L.P. Gas Barbecue Cylinders. . . . . . . . . . . . . . . . . . . . . . . . . . . . . . . . 4 Maintenance . . . . . . . . . . . . . . . . . . . . . .
Only persons who can understand and follow the instructions should use or service this outdoor grill. If you need assistance or outdoor grill information such as an instruction manual or labels, contact The Coleman Company, Inc. DANGER CARBON MONOXIDE HAZARD • This appliance can produce carbon monoxide which has no odor. • Using it in an enclosed space can kill you. • Never use this appliance in an enclosed space such as a boat cabin, boat galley, camper, tent, car or home.
DANGER • CARBON MONOXIDE HAZARD • This grill is a combustion appliance. All combustion appliances produce carbon monoxide (CO) during the combustion process. This product is designed to produce extremely minute, non-hazardous amounts of CO if used and maintained in accordance with all warnings and instructions. Do not block air flow into or out of the grill. • Carbon Monoxide (CO) poisoning produces flu-like symptoms, watery eyes, headaches, dizziness, fatigue and possibly death.
Maintenance WARNING • Do not overheat grill. Stainless steel loses anti-corrosive characteristics when subjected to extreme heat. • About stainless steel - Stainless steel exposed to prolonged periods of high heat will change color and texture. Coleman grills require little preheating. Texture and color change is normal on interior components and will not affect the operation or performance of the product. • Cleaning - Clean the exterior surface after every use. Use soapy water with a soft cloth or sponge.
Grill Assembly IMPORTANT: Remove all protective plastic film from stainless steel parts and any packing materials from grill prior to assembly/use. This film or packing materials are installed at the factory to prevent damage that could occur during shipment and handling. 1. 2. 3. 4. 5. With lid latched, lift up on handle and set grill so it is resting on the back of the case. (Fig. 1) Note: Use a drop cloth to help protect the stainless steel finish.
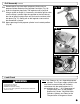
Grill Assembly continued 6. Install grease tray onto tracks at bottom front of grill. (Fig. 6) 7. Insert tab on heat tent into slot on bracket at back of grill. Fig. 6 (Fig. 7) 8. Push down on tab at front of heat tent to lock into slot on grill bracket. (Fig. 8) 9. Install the remaining heat tent as shown. (Fig. 9) 10. Slip right side grill grate under tab at back of grill. (Fig. 10) Fig. 7 Fig. 8 Fig. 9 Fig.
Grill Assembly continued 11. Push down on grate to lock into tabs on right side of grill. 12. 13. 14. 15. (Fig. 11) Insert remaining grill grate under tab at back of grill, then push down on grate to lock into tabs on left side of grill. (Fig. 12) Place warming rack on tabs at left side of grill and push down to lock. (Fig. 13) Press down on other side to lock warming rack into tabs on right side of grill. (Fig. 14) Turn both control knobs on front of grill to OFF position. (Fig. 15) Fig. 11 Fig.
Grill Assembly continued 16. Remove plastic cap from top of propane cylinder and turn Fig. 16 propane cylinder clockwise into regulator hand tight. (Fig. 16) 17. Insert the regulator pipe firmly. The regulator uses a push-on fitting to attach to the grill. It is necessary to hold the grill to make sure the fitting is seated, Align the regulator to the fuel tube on the side of the grill and push on until you hear the retainer “click” into place (Fig. 17).
Operation DANGER CAUTION • DO NOT OVERHEAT GRILL • Stainless steel loses anti-corrosive characteristics when subjected to extreme heat causing damage and discoloration. • CARBON MONOXIDE HAZARD • For outdoor use only. • Never use inside house, camper, tent, vehicle or other unventilated or enclosed areas. This grill consumes air (oxygen). Do not use in unventilated or enclosed areas to avoid endangering your life. CAUTION • Never leave grill unattended when hot or in use.
To Adjust Igniter NOTE: A gap of 1/8” should be maintained between the end of the wire on the electrode and the burner tube for proper ignition spark. (Fig. 21) 1. Set on sturdy, flat surface. 2. Grasp end of wire with a needle nose pliers and carefully bend to adjust to proper spacing from burner tube (Fig. 21). Be careful to not break or crack the ceramic insulator. Fig. 21 1/8” Gap To Light To Match Light Fig. 22 CAUTION Use a long wooden match or a match extension 1. Set on sturdy, flat surface.
To Clean 1. Make sure grill is cool. 2. Always detach the propane cylinder outdoors, away from flame Fig. 26 (including pilot lights) and other ignition sources. 3. The fitting on the regulator has a sliding collar that secures the regulator to the grill fuel line. Slide the collar away from the stove and then pull the regulator off the grill fuel line. (Fig. 26) 4. Detach the propane cylinder from the regulator and replace the plastic protective cap onto the cylinder threads.(Fig. 27) 5.
To Store DANGER Fig. 29 • EXPLOSION - FIRE HAZARD • Never store propane near high heat, open flames, pilot lights, direct sunlight, other ignition sources or where temperatures exceed 120 degrees F (49°C). • The cylinder must be disconnected when the grill is in storage. • Do not store a spare LP-gas cylinder under or near this appliance. Failure to follow the above instructions exactly may result in fire causing death or serious injury. Fig. 30 1.
Trouble Shooting Guide Problem Possible Cause Possible Solution Burner will not light with igniter Igniter electrode covered with grease or residue Clean igniter electrode Igniter/electrode too far from burner Adjust electrode until proper spark appears (see page 11) Igniter/electrode wire loose or disconnected Call Coleman for service Wire is shorted causing spark from wire before electrode Call Coleman for service No spark being generated Call Coleman for service No gas flow Check fuel leve
Replacement Parts List — 9972 Series No. 1 2 3 4 5 6 7 8 9 Description Warming Grate Grill Grate Heat Tent (1 pk.) Thermometer Assembly Regulator Leg Kit (1 pk.) Grease Tray Crumb Tray Igniter/Piezo/Wire Assembly (2 pk.) Part Number 5010000084 5010000083 5010000085 5010000091 5010000081 5010000088 5010000086 5010000087 5010000080 1 2 3 9 4 8 7 5 6 Accessory items (sold separately) — 9972 Series No.
Warranty Limited One Year Warranty The Coleman Company, Inc. (“Coleman”) warrants that for a period of one year from the date of original retail purchase, this product will be free from defects in material and workmanship. Coleman, at its option, will repair or replace this product or any component of the product found to be defective during the warranty period. Replacement will be made with a new or remanufactured product or component.