
User guide


19
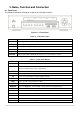
3. Name, Function and Connection
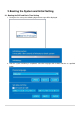
3-1. Front Panel
The following information will help you to operate the front panel controls.
Figure 3.1.1. Front Panel
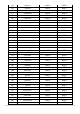
Table 3.1.1. Indication Lamps
Name
Description
CH1~10
Indicating that the channel is being recorded.
HDD
Indicating that the system is accessing the hard disk.
RECORD
Indicating that the system is recording video data.
ALARM
Indicating that when sensor(s) is/are triggered or motion is detected.
NETWORK
Indicating that when Network client connects through the network.
BACKUP
Indicating that USB or DVD-RW storage device is stored images or video.
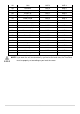
Table 3.1.2. Front Panel Buttons
Name
Description
POWER
POWER ON/ OFF
NUMBER
Channel keys. For channel 10, press the 0 key. For channel 11, press the +10 and 1
key. For channel 16, press the +10 and 6 key.
REW
Press to rewind the footage in playback mode.
F/REW
Jump/Step backward. In playback mode, the position moves 60 seconds backward.
FF
Press to fast forward the footage in playback mode.
F/ADV
Jump/Step forward. In playback mode, the position moves 60 seconds forward.
REC
Press to start or stop manual recording.
PLAY/PAUSE
Press to play/pause the footage in playback mode.
DISPLAY
Press to toggle the screen mode. (Single, Quad, and 10 splits mode)
SEQ
Enable/disable the automatic sequence of display in Single, Quad, and 10 splits mode.
AUDIO
Press to set the audio output mode. (Mute, Single Chanel, or Mix)
PTZ
Press to control Pan/Tilt/Zoom operations.
SETUP
Press to enter SETUP menu.
ALARM
Press to set the alarm output mode. (On or Off)
BACKUP
Press to capture video in jpeg format in live or playback mode.