
User guide


54
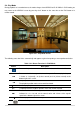
6. PTZ Control
To control the PTZ functions of the camera, select PTZ menu on the screen using the mouse. Select the
item you wish to control the PTZ camera and control them using the mouse or the control button on the
remote control.
Figure 6.1. PTZ
Control Screen
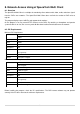
Table 6.1. Button Functions in PTZ Control
Item
Description
INITIALIZE
Initialize the PTZ settings of the selected camera.
PAN / TILT
Select PAN/TILT using the mouse or the control button
and press SEL button on the remote control.
Adjust the tilt (UP/DOWN) / pan (LEFT/RIGHT) position
using the mouse or the control button on the remote
control.
ZOOM /
FOCUS
Select ZOOM/FOCUS using the mouse or the control
button and press SEL button on the remote control.
Adjust the zoom (Mouse Wheel Down or Up/Down button
of the remote control)/focus (Mouse Wheel Up or
Left/Right button of the remote control) position.
OSD
Select the OSD to enter the menu. Control keys are Right,
Left, UP, Down, Select, Far (REW KEY), and Near (FF
KEY). Press the ESC button to return to the main menu.
Press the PTZ button to escape from the OSD menu.
AUTOSCAN
Press the right key on the control button to start auto scan
Press the left key on the control button to stop auto scan.
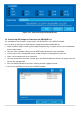
PRESET
Select the PRESET and press the left key on the control
button. Then, number input window will appear. Set the
number (3 digits) using the number key and press the
SEL to set the preset number for the current position.
Press the right key on the control button and set the
number (3 digits) to go to the preset number.
TOUR
Select the TOUR and press the right key on the control
button. Then, number input window will appear. Set the
number (1 digit) using the number key and press SEL to
make the group number work.
Press the left key on the control button to stop tour.
User can set the preset number in the tour group of the
OSD menu.
NUMBER
Available only on the TOUR and PRESET menu.
Press the ESC button to return to the main menu.