
User manual


RS232C Interface Page 8
Columbia Weather Systems, Inc.
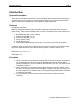
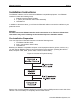
Figure 6: Switch 2 Setting Capricorn Interface as DCE
S2
S2 1 2 3 4 5 6 7 8 RTS
___ ___ ___ ___ ___ ___ ___ ___ ___
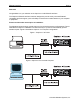
Connecting the Interface
Remove power from both the Capricorn II weather station and your equipment before
connecting or disconnecting the cables. Unless you have the “Memory Keep Alive Battery”
connected to the back of the Capricorn II, the memory will be lost each time the power is
removed.
Replace the Interface cover and gently tighten the four side screws.
Connect the Interface to the Capricorn II console by plugging in the 7” cable supplied with
the Interface. Plug either end into the 20-pin connector on the LEFT side of the Interface
back panel. Plug the other end into the blue connector on the back of the Capricorn II
console labeled “Connect only to Model No. 8232 RS232C Interface Accessory.” The
Interface can then be place on top of the Capricorn II console.
Connect the Interface to the computer or peripheral device with a user-supplied RS232C 8
to 25-conductor cable using the DB25 connector on the RIGHT side of the Interface back
panel.
The S1 settings can be changed with power on and cable connected without causing any
damage. The change takes effect immediately. However, it is recommended that power be
removed from the Capricorn II weather station and your equipment before S2 settings are
changed.