EV SOFTWARE INSTALLATION AND TRAINING QUICK REFERENCE GUIDE
Contents 1.0 Introduction. . . . . . . . . . . . . . . . . . . . . . . . . . . . . . . . . . . . . . . . . . . . . . . . . . . . . . . . . . . . . . 3 1.1 Explanation of Terms . . . . . . . . . . . . . . . . . . . . . . . . . . . . . . . . . . . . . . . . . . . . . . . . . 3 2.0 Installing the Software . . . . . . . . . . . . . . . . . . . . . . . . . . . . . . . . . . . . . . . . . . . . . . . . . . . . . 3 2.1 EV Standard Software . . . . . . . . . . . . . . . . . . . . . . . . . . . . . . . . . . . . . .
11.0 Mean Kinetic Temperature/Lethality/Pasteurisation (EV Pro Only) . . . . . . . . . . . . . . . . . . . . . . . . . . . . . . . . . . . . . . . . . . . . . . . . . . . . . . . . . . . 18 12.0 21 Title CFR Part 11. . . . . . . . . . . . . . . . . . . . . . . . . . . . . . . . . . . . . . . . . . . . . . . . . . . . . . 18 12.1 What is 21 CFR Part 11? . . . . . . . . . . . . . . . . . . . . . . . . . . . . . . . . . . . . . . . . . . . . 18 12.2 Title 21 CFR Definitions . . . . . . . . . . . . . . . . . .
1.0 Introduction This guide is intended as a quick start guide for the EV software. It covers the basics of programming and data retrieval. Please refer to the main manual, which is included electronically with the software as a PDF file in "Help-User Guide", for more comprehensive instructions. 1.
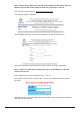
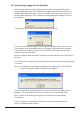
Note : Please ensure when entering the serial number that the letters ‘WO’ are added in front of the serial number if these are not shown on the CD. Now visit the Comark website: www.comarksupport.com The following image will appear: Select Register and type the required information into the following screen: Check the information entered and then select ‘Submit’ to confirm registration. Note: Please be careful when entering the user's e-mail address as this will become the user ID.
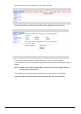
Select Register EV Pro software from the menu options. Enter the number of copies of the software to be registered and select GO. Enter today's date to obtain the daily password. The full serial number e.g. WO12345/67 must be entered. Check the information entered and then select submit. Note : Please ensure that you add ‘WO’ in front of the serial number if these are not shown on the CD. The website will then supply the password for the current day, e.g. EV12345.
2.2.2 Installing EV PRO software Insert the CDROM into the PC disc drive and let the software self-install. When the software has installed select: Start > Programs > EV Professional > EV Pro to run the software. At this point a password must be entered. Enter the EV daily password obtained from the Internet and select OK. 2.2.
The user name must be entered into the name box. Note: The system will not allow two users with the same name. Also, the user name cannot be changed after it has been used to create a task. The First Administrator must be a Super User. It is recommended that when entering passwords for all users they are at least 8 characters long and contain alphanumeric characters. Press OK to finish. The new First Administrator will be required to log on to the software by entering his/her new password in the box shown.
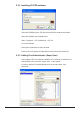
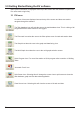
3.0 Getting Started/Using the EV software Basic system information is displayed at the top of the screen after the software is opened (EV Pro users need to login first). 3.1 EV Icons A number of Icons are displayed across the top of the screen and these are used to navigate through the software. The Task database Icon will take the user to the task database view. This is a listing of all programs that have been written for EV loggers.
3.2 Introducing a logger for the first time Select a logger and press the navigation button on the front. Diligence EV loggers must be placed face down in the interface. EVt loggers should be placed face up. For N3000 Graphic Display Monitors, simply connect the comms lead to the connector on the side of the instrument. The EV software will now interrogate the logger or monitor automatically.
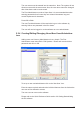
4.0 Writing tasks for EV loggers Tasks must first be written and then programmed into the logger before it can be used. The Task will define the instructions for the logger to perform, i.e. to log data. 4.1 Quick Program First make sure that you have an active logger in the dock/cradle. Press the quick program Icon and the software will display a new task applicable to the logger in the dock. See above. The task can be programmed into the Logger using the ‘Program’ button.
In General Setup, denoted by the display box with scroll bar at the top of the screen (see Section 4.0), there are several options to modify: • • • • • • • Turn channels ON/OFF Set Low Alarm Set High Alarm Set scales for each channel Set scales for graph display (This setting can be changed even after data has been downloaded) Set Alarm Delay Set Units for Alarm Delay Scrolling to the right will reveal that it is also possible to set the Graph Max and Min settings for the Y-Axis of Temperature and RH.
6.0 Logging Modes 6.1 Manual Start/Stop Modes EV and EVt When a logger has been set for manual start then the logger display (if fitted) will show the word MAN in the lower portion of the LCD. In this case the user must press and hold the navigation button on the front of the logger for 6 seconds to start logging. If manual stop is also selected then the logger will require the same key operation in order to stop logging. 6.1.
7.1 Important Note regards EV Pro and 21 CFR Part 11 If a logger has been programmed on a PC running EV Pro software, it will only be possible to to use that logger on the same PC or another PC which is also running EV Pro software. This is to protect the data in accordance with 21 CFR Part 11. 8.0 Graphing Data/Calculations After the data has been downloaded the software will automatically graph the data for the session just downloaded.
10.2 Editing Tasks/Sessions After a task has been created it can only deleted if it has not been programmed into a logger. Once it has been programmed to a logger it can not be deleted, but only archived. Certain elements of the task can be edited after the task has been written, whether or not the data has been downloaded.
10.4 Filtering/Sorting Tasks/Sessions For EV Standard users there is a reduced filtering set. Please refer to section 10.4 of the user guide within the software. At this point it is possible to filter and sort the task database. To select a filter option tick the appropriate box then select/enter the filter criteria. Note: Items below marked # relate to EV Pro only. Status Filter - The tasks will be filtered by one of three options; Unused, Active and Closed.
Model - Use this filter to show only those tasks that apply to a particular model type. Serial Number - Show all the tasks for a particular logger serial number, i.e. a specific individual logger. #Data Date Range - It is possible to filter the tasks by data date range by entering two dates - "from" and "to". #Data last n Days - Filter by the most recently downloaded data. #Creation Date Range - Filter tasks by created date range by entering two dates "from" and " to".
10.5 Filter Recall It is possible to recall a previously used Filter without the need to set up the filter again. Using the Task Database view or the split screen view click on the drop down menu at the bottom of the task database list to reveal the last used Filters. See example below: It is possible to set up a number of favourite filters which can then be recalled at anytime without the need to set them up again.
11.0 Mean Kinetic Temperature/Lethality/Pasteurisation (EV Pro Only) It is possible via the task set up to enter values for: Mean Kinetic Temperature Lethality Pasteurisation Please refer to the user guide within the software for more information on the calculations for MKT/Lethality and Pasteurisation. 12.0 21 Title CFR Part 11 12.
Standard Operating Procedures (SOPs) - Guidelines and rules defined by the organisation implementing Title 21 CFR Part11 compliance to instruct users what they are and are not permitted to do and how they are to perform the relevant tasks. EV Professional Software - The EV Professional Software includes a number of settings and data protection devices that, when used with with the EV, EVG and EVt series of data loggers, will give the user a compliant system if adopted into their SOPs.
Use the mouse to left click the required task in the list of tasks. The selected task will be highlighted in blue. Select Tasks > Sign Task to bring up the dialog box above. If the current user's name is not shown as the current user, select the required user name from the dropdown list. Enter the password for the current user. The task is not signed at this time. Press OK to continue.
Select View/print Audit trail: It is now possible to view the current Audit trail for the software. The Audit trail shows by date/time the action completed, the user, user ID, Task ID and Session ID. There are a number of filters for the Audit Trail: • • • • • Date Range User Task ID Session ID Maximum number of readings to display. The filtered results are then exportable to Excel. The results can be printed in either detailed form or as just the summary information.
22
23
24
Comark Instruments 52 Hurricane Way Norwich, Norfolk, NR6 6JB England Tel: 01603 (+44 1603) 256647 Fax: 01603 (+44 1603) 256644 Email: service@comarkltd.com Website: www.comarkltd.com Comark Instruments PO Box 9090, Everett, WA 98206, USA Tel: (503) 643 5204 Fax: (503) 644 5859 Email: sales@comarkUSA.com Website: www.comarkUSA.