ATV/UTV Winch Thank you for purchasing a Winch. This manual covers operation and maintenance of the winch. All information in this publication is based on the latest production information available at the time of printing. We reserve the right to make changes without notice because of continued product improvement. It has been designed to give safe and dependable service if operated according to the instructions. Read and understand this manual before installation and operation of winch.
I . Safety Requirement WARNING: FAILURE TO READ AND FOLLOW THE SAFETY INSTRUCTIONS IN THIS OWNER’S MANUAL BEFORE INSTALLING OR USING YOUR ATV/UTV WINCH COULD RESULT IN DAMAGE TO YOUR WINCH AND SERIOUS OR FATAL INJURY!! General Rules ! Check all safety and environmental conditions prior to and during use. ! Before use, ensure that you are familiar with all winching performance and operation such as speed & direction.
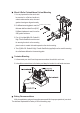
I I . Main Components III . Installation Complete Kit Installation To install the complete kit, you need to mount the winch, roller fairlead/hawse fairlead, contactor, rocker switch, remote socket (option) and remote control (option). Read and understand the following instruction to choose the proper mounting locations.
Winch & Roller Fairlead/Hawse Fairlead Mounting 1. It is very important that the winch shall be mounted on a flat hard surface in order to make sure the motor, drum and gearbox housing are aligned correctly. 2. If a different mounting plate is used, the (Cub 2s / 3s / 4s only) thickness shall be at least 5 mm (3/16”). If different hardware is used, it must be SAE grade 8 minimum. 3. Four (4) included M8x 25L Grade 8.
Remote Socket Mounting (Option) 1. Determine the mounting location for the remote socket. 2. Drill three holes on a plate and install. Rocker Switch Mounting Handlebar mounted rocker switch can be operated without removing your hand from the grip.
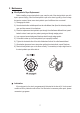
IV . Operation Cable In and Out 1). To determine “Cable Out“, Press to the “Out” position 2). To determine “Cable In“, Press to the “In” position 3). To stop winching, release the rocker level Clutch Function The clutch allows rapid pay-out of the wire rope/synthetic rope for hooking onto a load or anchor points and is operated by a clutch shifter located on the end of the winch. 1). To engage the clutch, turn the clutch shifter counter-clockwise to the positioned point of “Engaged”.
V . Maintenance Wire/Synthetic Rope Replacement Before installing a new wire/synthetic rope, wrap the end of the wire/synthetic rope with tape to prevent fraying. Wind the wire/synthetic rope on the drum by pulling a force to keep the tension constant. Never use a wire/synthetic rope of a different size or material. 1). Disengage the clutch. 2). Have horizontal roller and bolts apart from the roller fairlead, then Spool the old wire/synthetic rope, and then remove it from the drum. 3).
Maintenance Schedule Carry out all inspections below on schedule. All inspections are performed by Daily, Monthly and Quarterly basis. Clean all connections because corrosion on electrical connections will reduce performance or may cause a short.
VI . Trouble Shooting When the winch fails to operate after several attempts, or if there is any fault operation while winching, check followings.
COMEUP INDUSTRIES INC. No.112, Nanyang St., Xizhi Dist., New Taipei City, Taiwan 22152 Tel: +886-2-2694-7011 / Fax: +886-2-2694-7053 Email: winch@comeup.com.tw http://www.comeupwinch.