
User's Manual


5
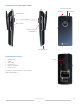
Microphone DM10
5) Getting started
Charging
The Microphone DM10 is chargeable. Charge the DM10
at least 2 hours before using it the first time. An empty
battery is fully charged within 2 hours.
During charging, the function indicator shows red and
a lightning bolt appears through the battery symbol in
the display. Once the battery symbol is filled with green
columns and the functions indicator shows green the
unit is fully charged and switches to automatic float
charging.
Connecting a charger
to the Microphone DM10
Please note:
Only use the charger supplied by Comfort Audio.
Changing the battery without the assistance of an
authorized dealer will void the Limited Warranty.
First time use
Switch on the transmitter by pressing the On/Off button
for around two seconds.
Connect clip-on-microphone or any other microphone if
desired.
DM10 can be attached with its clip to your clothes or
carried around the neck with the delivered neck loop
(2 lengths available).
The Microphone DM10
is a microphone for
closer range.
It works best if worn
approx. 12 inches
(30 cm) from the
mouth.
WARNING!
The necklace should not be used if there is a risk of
getting stuck, e.g. in a machine or other objects.
6) Menu and settings
Menu control
Three different selections can be made:
To access the menu, press the menu control:
Back
Communication
Channel
Pair
Function
Silence button
Push to talk
Push/Cont
FCR
FCR indicator
Settings
PIN-code
Charge
Language
Name
Inputs
Func. indicator
Factory Reset
Key lock
About
Scroll up
Press/select
Scroll down
Back (relates to both the main menu and submenus)
Here you can choose to return to the menu and to the
main display.
Communication
Channel
To use the receiver and the transmitter together, they
must be set to the same channel. The transmitter and
receiver are set to the default channel by the manufac-
turer.
This does not apply to units with both sender and
receiver. In this case the transmitter/receiver are
adjusted as described in chapter
Radio range and
Channels
.