
Installation Guide
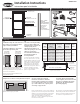
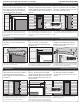

4. Install Door on House
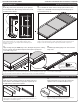
5. Install Top Drip Cap
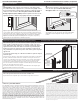
6. Install Latch Rail
Instalación de la puerta en la casa
Instalación del canal de goteo superior
Instalación del larguero del picaporte
SE MUESTRA LA INSTALACIÓN CON LAS BISAGRAS A LA IZQUIERDA
LEFT HINGE INSTALLATION SHOWN.
4a
Place door in the opening with the hinge rail
tight against the entry door frame. Allow an
1/8-in gap between the top end of the hinge
rail and the underside of the opening.
4b
With hinge rail tight against trim, pre-drill holes
with 1/8-in drill bit, and install door installation
screws in all five locations on the outer side of
hinge rail.
4c
Open door. Pre-drill holes with 1/8-in drill bit
and place door installation screws on the inner
side of hinge rail in each location.
Coloque la puerta en la abertura con el larguero de las
bisagras bien ajustado contra el marco de la puerta.
Deje un espacio de 1/8" (3.2 mm) entre el extremo
superior del larguero de las bisagras y la parte inferior
de la abertura.
Con el larguero de las bisagras bien ajustado contra el
marco, pretaladre agujeros con una broca de 1/8" (3.2
mm) y coloque los tornillos de instalación de la puerta
en los cinco lugares en la parte exterior del larguero de
las bisagras.
Abra la puerta. Pre-taladre agujeros con una broca de
1/8" y coloque los tornillos de instalación de la puerta
en el lado interno del larguero de las bisagras en cada
lugar.
5a
Place drip cap on the door frame above the
storm door.
5b
Close door to verify consistent clearance
between door and drip cap. Align drip cap to
end of hinge rail.
5c
Pre-drill with 1/8-in drill bit and install door
installation screws, starting with the screw
closest to the hinge rail.
Coloque el canal de goteo en el marco de la puerta
sobre la puerta contra tormentas.
Cierre la puerta para verificar la consistencia del espacio
entre la puerta y el canal de goteo. Alinee el canal de
goteo con el extremo del larguero de las bisagras.
Pre-taladre con una broca de 1/8" e instale los tornillos
de instalación de la puerta, comenzando con el tornillo
más cercano al larguero de las bisagras.
6a
On the latch side, measure from the underside
of the drip cap to the sill. Subtract 1/8-in.
Measure latch rail. If needed, cut off bottom of
the rail to fit.
6b
Open door and position the latch rail tight
against the drip cap. Align outside edge of latch
rail with end of drip cap. Close door and verify
there is consistent clearance between the door
and the latch rail.
6c
Pre-drill holes and install door installation
screws in all five locations on the outer side of
latch rail.
En el lado del picaporte, mida desde la parte inferior
del canal de goteo hasta el umbral. Sustraiga 1/8" (3.2
mm). Mida el larguero del picaporte. Si es necesario,
corte la parte inferior del larguero al tamaño.
Abra la puerta y ubique el larguero del picaporte ajustado
contra el canal de goteo. Alinee el borde externo del
larguero del picaporte con el externo del canal de goteo.
Cierre la puerta para verificar que exista suficiente
espacio libre entre la puerta y el larguero del picaporte.
Pre-taladre agujeros y coloque los tornillos de
instalación en los 5 lugares de la parte exterior del
larguero del picaporte.
1/8-IN GAP
ESPACIO DE SEPARACIÓN 1/8" (3.2 mm)
#8 x 1" PANHEAD SCREW
TORNILLO CABEZA TRONCOCÓNICA No. 8 x 1"
Actual Size
Tamaño real
#8 x 1" PANHEAD SCREW
TORNILLO CABEZA TRONCOCÓNICA No. 8 x 1"
Actual Size
Tamaño real
#8 x 1" PANHEAD SCREW
TORNILLO CABEZA TRONCOCÓNICA No. 8 x 1"
Actual Size
Tamaño real
PUSH
A PRESIÓN