
Operating instructions


INSTALLATION INSTRUCTIONS for HM2 MIL 18,24 & 33 ACCESSORIES
(Wall Switch, Thermostat, Remote Control)
WALL SWITCH
+ It is suggested by the manufacturer that a qualified individual complete this installation.
+ Your HM2 MIL Series log set is shipped from the factory set up to operate without the use of any
of the accessories. To hook up this accessory you must follow these instructions:
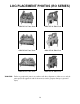
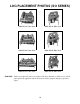
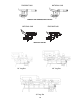
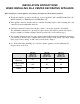
+ Notice the electric terminal block on the control valve, located on the left hand side of the valve
when facing the front of the valve and the two wires that are attached to the back of the ON/OFF
switch. (FIG. 3)
1. Remove the wire that is connected to the two terminals marked TH on the terminal block
and remove the other ends of the wires that are attached to the ON/OFF switch and discard
the wire.
2. Run wire (included) from the log set to the location of the wall switch.
3. It is recommended that only the wire furnished with the thermostat
is used.
4. Attach the two wires to the wall switch, one to each of the terminals on the wall switch.
5. Make sure the wall switch is turned off and install the switch in the wall box (not furnished) and
install the cover.
6. Attach the two wires at the log set to the two terminals marked TH on the terminal block. (Make
sure the wall switch is turned off.)
7. Notice the notch in the metal plate on the right hand side of the ON/OFF knob. This notch is the
line-up mark for the ON/OFF control knob.
8. Follow the safety information on page 16 of this instruction manual.
9. Follow the lighting instructions on page 16 of this instruction manual.
10. After lighting the pilot and turning on the main ON/OFF control knob, turn the wall switch to the
“ON” position. This should cause the gas log set to come on. You can now adjust the HI/LOW knob
to the desired level.
11. You can turn your log set off and on with the wall switch and not use the ON/OFF control knob.
12. It is recommended that you turn the ON/OFF control knob to the “OFF” position when leaving
home for any period of time.
WALL THERMOSTAT
+ It is suggested by the manufacturer that a qualified individual complete this installation.
+ Your HM2 MIL Series log set is shipped from the factory set up to operate without the use of any
of the accessories. To hook up this accessory you must follow these instructions:
+ Notice the electric terminal block on the control valve, located on the left hand side of the valve
when facing the front of the valve and the two wires that are attached to the back of the ON/OFF
switch. (FIG. 3)
1. Remove the jumper wire that is connected to the two terminals marked TH on the terminal block
and remove the other ends of the wires that are attached to the ON/OFF switch and discard the
wire. (NOTE: The ON/OFF switch will no longer have any function once you have installed one of
the accessories.)
2. Run wire (included) from the log set to the location of the wall thermostat.
3. It is recommended that only the wire furnished with the thermostat is used.
THTP
TP TH
PILOT
it
PILOT
S
ON
OFF
LO
HI
FIG. 3
PIEZO
ON/OFF
SWITCH
TH
11