
Warranty
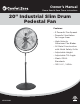

CZHVP20S
www.comfortzoneproducts.com
Fig.3
Fig.4
3
3
Operating Instructions:
1. Adjust the desired speed by rotating the switch:
0--Stop, 1--Low, 2--Medium, 3--High.
2. Adjust the tilt angle by rotating the guard. Loosen the knobs
before rotating and tighten after rotation is set.
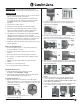
Assemble Instructions:
1. Align the screw hole on the side of the fan head, with the
rubber ring, and the hole on the support frame, then insert the
screw knob to tight them up. Same operation to the other side
of the fan head (fig.1,2.)
2. Loosen the screws, nuts and washers on A and B on the
clamping support (fig.3,4)
m CAUTION: Read and follow all instructions before
operating fan. Do not use fan if any part is damaged or missing.
m WARNING:
1. To reduce the risk of fire or electric shock, do not use this fan
with any solid state speed control device.
2. This appliance has a ground plug which is intended to fit
in an outlet only one way. If this does not fit outlet contact
a qualified electrician. Do not attempt to by‑pass this
procedure.
3. This product is used for indoor.
4. Unplug from electrical supply source before cleaning.
5. If the power cord is damaged, contact your local service
centre or a qualified electrician to install an appropriate
replacement cord to prevent any injury or damage.
6. This appliance is not intended for use by persons (including
children) with reduced physical, sensory or mental
capabilities, or lack of experience and knowledge, unless they
have been given supervision or instruction concerning use of
the appliance by a person responsible for their safety.
7. Children should be supervised to ensure that they do not play
with the appliance.
Rules for Safe Operation:
1. Never insert fingers, pencils, or any other object through
the guard when fan is running.
2. Disconnect the fan when moving from one location to
another.
3. Disconnect the fan when removing grilles for cleaning.
4. Be sure fan is on a stable surface when operating to avoid
overturning.
5. DO NOT use fan in window. Rain may create electrical
hazard.
6. The fan is for commercial use only.
7. Do not leave the fan running unattended.
3. Insert the end with screw holes of the inner pole into the
clamping support. Align the holes on the clamping support
and the inner pole.(fig.5,6)
4. Insert the screw through the holes on the clamping support
and inner pole with washers. Tight up with the nut.
After step 4, you can get a fan head assembled like fig. 8.
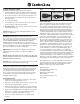
5. Insert the end of the outer pole into the base hole.
(fig.9, 10)
6. Align the hole on the base with the one on the clump weight.
Then insert the L‑shape screw bolt through the holes with the
big washer. (fig.11,12)
7. Insert the decorating cap through the outer pole
(fig.13)
8. Insert the inner pole into the outer pole. And tight up the
screw on the plastic holder (fig.14) IMPORTANT: THERE
IS A SPRING COIL INSIDE THE OUTER HOLE. DONOT TAKE
IT OUT DURING ASSEMBLING.
9. Loosen the screw knob on the inner pole and adjust the fan
to the height you want, then tight up the screw knob.
(fig.15)
▶
▶
▶
▶
▶
▶
Fig.1
Fig.5
Fig.8
Fig.10
Fig.7
Fig.9
Fig.11 Fig.12
Fig.13 Fig.14 Fig.15
Fig.6
Fig.2
Fig.3 Fig.4