
Use and Care Manual

5
5
www.comfortzoneproducts.com
CARE AND MAINTENANCE
Cleaning: CAUTION-Before cleaning the fan be sure to unplug
the power cord from the outlet. Clean the grille surface with a
clean damp cloth. Clean the fan blades with a soft, lightly wet
soapy cloth. Do not use harsh chemical or abrasive cleaners.
DO NOT IMMERSE THE FAN OR ANY WIRES IN WATER.
Replace front grille before fan use. Allow fan to dry completely
before use. Periodic grille cleaning with a vacuum will prevent
dust build up. The motor is sealed and does not require any
interior maintenance, cleaning or lubrication.
Maintenance: The internal motor bearings are permanently
lubricated at the factory and do not require any additional
lubrication.
Repair: DO NOT OPERATE THE FAN WITHOUT THE GRILLE
IN PLACE. DO NOT USE THE FAN IF IT HAS MALFUNCTIONED
OR BECOME DAMAGED IN ANY WAY.
Storage: Keep original carton for storage of the fan. Coil and
tie the power cord to avoid damage during storage.
USAGE
Fan Operation: Always operate the fan on a stable surface. Do
not set on a rug, over furniture, on an uneven oor or on a fabric
surface. Always follow all instructions and recommendations
listed in this manual.
Fan Location: Place the fan in the area of the room that will
provide proper fan cooling. Do not set your fan closer than
4 inches from any surface such as the wall, curtains or any
furniture which could block the air ow.
Fan Connection: Make sure the fan is in the OFF position on
the control panel before plugging in. Plug the fan directly into
120 volt A.C., 60Hz wall outlet. Be sure plug ts tightly into the
outlet. A loose connection may cause overheating and damage
to the plug or fan.
Note: To prevent overloading a circuit, do not plug the fan into a
circuit that is servicing other electrical needs.
Turning Fan On/Off: To start the fan, push the speed button
to the desired fan speed: LOW, MEDIUM or HIGH (0-OFF, 1-Low,
2-Medium, 3-High). Push the OFF button to discontinue use.
Unplug fan when not in use.
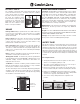
Oscillation: To start fan oscillation, pull the Oscillation Control
Knob up (located above motor housing). To stop oscillation
function press Oscillation Control Knob down.
The fan’s head angle can be horizontally adjusted by pulling the
Oscillation Control Knob up so that it will move on 150 degree
oscillation range. You can set it to the desired position by pushing
the Oscillation Control Knob down in.
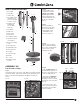
The oscillation control knob may not be attached when the fan
is rst removed from the box. To attach, locate the oscillation
control knob inside the plastic
bag that contains the parts of the
fan. Insert the oscillation control
knob inside the engine body hole
assigned for it and push down
rmly until a “click” sound is heard.
Make sure the oscillation control
knob is correctly assembled.
Oscillation Switch:
Knob
Slide cover to open
This product employs overload protection (fuse). A blown fuse
indicates an overload or short-circuit situation. If the fuse blows,
unplug the product from the outlet. Replace the fuse as per the
user servicing instructions (follow product marking for proper fuse
rating) and check the product. If the replacement fuse blows, a
short-circuit may be present and the product should be discarded
or returned to an authorized service facility for examination and/
or repair.
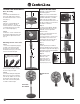
Fuse Replacement:
1. Grasp plug and remove from the receptacle or other outlet
device. Do not unplug by pulling on cord.
2. Open fuse cover by sliding open fuse access cover on top of
attachment plug towards blades. See Fig. 2.
3. Remove fuse carefully. Use a small tool to pry the end of the
fuse from holder cavity. Be careful not to break glass window.
4. Replace fuse. WARNING: Risk of re. Replace fuse only with
identical 2.5 or 5.0 Amp, 125 Volt fuse (3.6mm x 10mm). Make
sure the fuse is properly seated within its cavity.
5. Close fuse cover by sliding it back to its original closed
position.
Fig. 1 Fig. 2 Fig. 3
SAFETY FUSE
Push-Button Control Panel
High Speed
Medium Speed
Low Speed
Off