
Installation Guide


© 2014 Johns Manville Inc. All Rights Reserved | 5
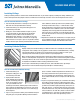
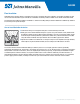
How to Insulate a Vented Crawl Space
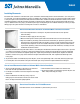
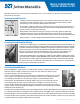
How to Insulate an Unvented Crawl Space
If the sub-floor is already in place, the insulation is installed from below, much as it is installed in ceilings.
In an unvented crawl space, the general rule is to insulate the perimeter walls. This eliminates the need to separately insulate
the water pipes and heating ducts.
When installing Kraft-faced insulation, use wire lacing, screen or stiff wire fasteners to hold the
insulation firmly in place. The fasteners are bowed upwards into the insulation, pressing it gently
against the sub-floor without overly compressing it. Place the fasteners at least six inches from the
end of each batt, and no more than 24 inches apart. The vapor retarder side is installed up against
the subfloor. Where heating ducts between joists are exposed to cold air, insulation should be
installed below the ducts to prevent heat loss.
In cold climates, if water pipes are running through the joists in the crawl space insulation should
be installed below the pipes to protect them from freezing.
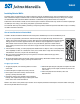
1. Cover the ground with sheets of six-mil plastic film. The
sheets should overlap each other by approximately twelve
inches, and extend a few inches up the walls.
2. Tape the film in place at the walls and hold the seams in
place with tape, scrap lumber, or rocks. After the ground is
covered, you’re ready to install the insulation.
3. Fit the insulation batts into the joists with the Kraft-paper
vapor retarder facing against the sub-floor. Make sure the
insulation fits snugly so that there is no air space between
the flooring and the insulation.
4. Staple the insulation flanges securely to the sides or bottom
of the joists (called “inset stapling”).
1. Cover the ground with sheets of six-mil plastic film. The sheets should overlap each other by
approximately twelve inches, and extend a few inches up the walls.
2. Tape the film in place at the walls and hold the seams in place with tape, scrap lumber, or rocks.
After the ground is covered, you’re ready to install the insulation.
3. Locate the header joists, which run across the ends of the floor joists. Measure and cut pieces of
unfaced insulation and place them against the header joists between each floor joist. Completely
fill the spaces enclosed by the sub-floor, sill, and floor joists.
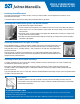
4. Install lengths of standard batts or the wider basement blanket insulation to the sill using
furring strips to nail the insulation to the edge of the sill plate. The insulation should be cut long
enough to hang down the wall and extend two feet into the crawl space. It can also be installed
horizontally in the same manner.
CRAWL SPACES
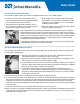
5. Anchor the insulation as close as possible to the wall where it meets the ground using 2x4s.
6. Locate the stringer joists, which run parallel to floor joists. Position an insulation blanket against the underside of the sub-floor
and staple or nail it directly to the stringer joist. Or, attach the blanket to the top of the sill, and wedge smaller pieces between
the sill plate and sub-floor. (This technique takes longer, but provides better thermal protection at the joist.) The insulation
should be cut long enough to hang down the wall and extend two feet into the crawl space. It can also be installed horizontally
in the same manner.
7. Anchor the insulation as close as possible to the wall where it meets the ground using 2x4s.
8. Make sure all pieces of insulation are tightly butted together. Be sure they fit snugly, without gaps between them. Taping is not
usually necessary. An alternate way of fastening basement blankets to the walls in crawl spaces is using a Hilti-type gun to
drive the fasteners into the concrete.