SoundPoint® IP 430 SIP User Guide SoundPoint® IP 430 SIP 2.
Contents Introduction ...................................................... 1 Parts List .......................................................... 1 Installing SoundPoint® IP 430 SIP ......................... 2 Connecting Network and Power Source ...................................... 2 Connecting the Handset and Optional Headset............................ 3 Attaching the Base ................................................................... 3 Features ..................................................
Multilingual Support (Localization) ............................................ 18 Phone Reboot ........................................................................ 19 Optional Features ............................................ 19 Text Messaging ...................................................................... 19 Presence / Status / Buddy Lists ................................................ 20 Troubleshooting ............................................... 22 Safety and Compliance ...........
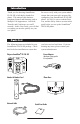
Introduction Thank you for choosing SoundPoint® IP 430 SIP, a full-duplex, hands-free phone. This unit provides business telephony features and functions such as Multiple Call Appearances, Call Hold, Transfer, and Conference over an IP network. In this User Guide, you will find everything you need to quickly use your new phone. Be sure to verify with your system administrator that your network is prepared for configuring your SoundPoint® IP 430 SIP phone.
Installing SoundPoint® IP 430 SIP This section provides basic installation instructions and information for obtaining the best performance with the SoundPoint® IP 430 SIP phone. If you require additional information or assistance with your new phone, please contact your system administrator. The SoundPoint® IP 430 SIP User Guide includes regulatory compliance information that your system administrator should review. It can also be found at www. polycom.com.
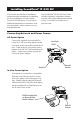
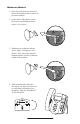
Connecting the Handset and Optional Headset 1. Connect the short, straight end of the phone cord to the handset and the corresponding longer straight end of the cord to the handset jack on the back of the phone. 2. Connect the headset (optional accessory) to the headset jack on the back of the phone. (Optional) For information on headsets, please visit www.polycom.com and choose the Support link.
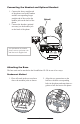
Wallmount Method 1. Place all cords in the recessed area above the modular jacks as shown in previous example. 2. On the back of the phone, remove the key located behind the hookswitch. (See below.) 3. Reposition it so that the end tab (at 45º angle) is facing up. (See below.) This will ensure that the handset remains in place within the cradle in this position. 4. With mounting tab of the base unit facing up, fasten the base unit to wall using wall anchors (not included).
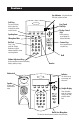
Features Line Indicators Individual multi-color LEDs display a dynamic call state. Soft Keys The screen will display labels for these keys, to identify their contextsensitive functions. Line/Speed Dial Keys Speakerphone Microphone Mute Use the arrow keys to scroll through the displayed information. Dial Pad Feature Keys Display Control Keys Access important features using these keys. These 12 keys provide the 10 digits, alphabetic, and special characters available in context sensitive applications.
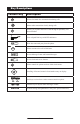
Key Descriptions Feature Key Sel Sel Description Allows for hands-free communication during calls. Sel Sel Sel Sel Del Mutes audio transmission locally during calls. Directories Menu Directories Directories Services Messages Services CallServices Lists Do Not Disturb Call Lists Conference Call Lists Conference Transfer Hold Conference Transfer Redial Redial Transfer Redial Del Allows you to place and receive calls through an optionally conDel nected headset.
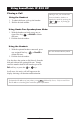
Using SoundPoint® IP 430 SIP Placing a Call During a call, you can alternate between handset, headset, or hands-free modes by pressing the or keys, or picking up Directories Conference the handset. Using the Handset: 1. To obtain dial tone, pick up the handset. 2. Dial the desired number. Services Using Hands-Free Speakerphone Mode: 1. With the handset on-hook, press any assigned line key, , or NewCall to obtain dial tone. 2. Dial the desired number.
1 4 GHI Answering a Call Using the Handset: Pick up the handset. Using Hands-Free Speakerphone Mode: Using the Headset: Directories Conference Del Press to answer the call through an Conference Directories optionally connected headset. Services 2 ABC ABC 5 JKL GHI JKL 77 88 QRS Incoming calls may be ignored Sel by pressing the Reject soft key or invoking Do Not Disturb during Sel ringing. Note that Do Not Disturb stays active when the call is Del dropped and will remain so until toggled off.
Menu Menu Directories Directories Messages Messages Services Services Conference Conference General Key Use 11 22 33 ABCABC DEFDEF ABC ABC DEF DEF Disturb DoDo NotNot Disturb Transfer 44to enter 55 66 Transfer To navigate through menus and MNO GHIGHI JKLJKL MNO data, theseRedial are Sel useful tips: Redial Sel 7777 8888 9999 PQRS TUV WXYZ WXYZ PQRS TUV 1. Use and to scroll through Hold Hold lists. In someSellists the ** and 0 0 ## Del OPER OPER keys can be used as “Page Up” and “PageMenu Down”.
3 3EF 6EF Transferring a Call 1. During a call, press the Trnsfr soft key (the active call is placed on hold). 2. Dial the number to which you want to transfer the call. Transfer may be cancelled during establishment by pressing the Cancel soft key. The original call is resumed. OR Use the arrow keys to access speed dial numbers, missed, placed, and received call lists. From one of these lists, press the Dial soft key. 3. Press the Trnsfr soft key again to complete the transfer.
Sel Sel Call Forwarding Directories Conference To turn call Del forwarding off: Calls may be forwarded to another extension as follows: Del 1. Press the Fwd soft key from the phone’s idle display or press Menu and select Features and Forward. Messages 2. (Optional) If multiple lines are in use, select which line to disable. Do Not Disturb 3. Press the Disabl soft key. 1. Press the Fwd soft key from the phone’s idle display or press Menu and select Features and ABC DEF Forward at1any time.
Time and Date Forward Time and Date is clearly displayed on the ® IP 430 SIP phone. If the Transfer SoundPoint ABC DEF phone cannot obtain a time1 and date 2 from 3 Call Lists the server, the display will flash.ABCContact DEF JKL MNO your system administratorGHI 4if either 5 time6or Speed Dial Conference date is incorrect. You have control over GHI JKL MNO PQRS the format of the display and canTUVturn itWXYZ Redial Forward 77are right 88 for you 99 off.
3 DEF DEF 6 MNO MNO 99 WXYZ WXYZ # Ring Type Sel Many ring types are available including a “Silent Ring”. You can select different rings to distinguish between lines or to have a difDel ferent ring from your neighbor’s phone. If “Silent Ring” is selected, incoming Sel calls can only be answered by pressing the Answer soft key. To change the incoming ring: Del Conference Directories 4. Press Select to change to the selected ring type. 5.
Del To add or edit a contact: 3 DEF DEF Directories 6Conference MNO MNO Services WXYZ 99 WXYZ Call Lists # Buddy Status My Status Redial 1. Press Menu and select Features, Contact Directory. Messages 2. Press More and then Add to enter another contact into the phone’s daDo Not Disturb tabase or highlight an existing entry then press Edit. 3. Directories Enter first and/or last name from the Directories Hold keypad.
Idle display could now be as shown: :. .::. . To dial a number assigned to a Line Key, simply press the line key directly opposite the number on the display. To quickly view a complete list of assigned speed dial entries, press from the idle display. Dial directly from a selected Sel number. Del Menu Multiple Lines Your SoundPoint® IP 430 SIP can support Messages 1 4 GHI GHI 77 PQRS PQRS * 2 up to 3 two lines.
2 Multiple Call Appearances Each line on the phone can be configured to have one or more call appearances. More than one call appearance is useful if there is an active call and an incoming call arrives on the same line. In the example shown, extension 2020 is in an outbound call with 2024. The second figure shows an incoming call from John Brown. To answer this incomingSel call, put the original call on Hold or press the key to access the new call.
Shared Lines The phone supports shared lines**. A shared line is indicated by a different line icon. In the figure, the first line is private and the second line is shared. If two phones share a line, an incoming call to that number will cause both phones to ring. The call can be answered on either phone but not both. If a shared line is in use on one of the phones, it may be unavailable on the other one.
DistinctiveSelRinging / Call Treatment You can set distinctive incoming ringing tones for contacts in your local directory. This allows identification of a contact by Del a specific ring tone. 3 DEF DEF 6 MNO MNO 99 WXYZ WXYZ # ies nce 3s EF EF sNO 6 NO Status 99 tus To set a distinctive ring for a local contact: Del existing value). See Ring Type in 1. Press Menu Directories then Features, and Conference this guide for further details. select Contact Directory. MessagesServices 5.
3 EF EF 6 NO Phone Reboot Periodically, the phone may require a user reboot. Reasons for this include accepting a Sel new configuration or new software. There are two ways to reboot the phone: ► Simultaneously press and hold the Messages,DelHold, and Volume keys (see figure) for more than 3 seconds or until a beep is heard. Menu ► Press and select Settings, Advanced, Restart Phone (the user password is Messages required to access this menu).
es nce 3 EF EF 6 NO s NO tatus XYZ 99 XYZ us # To send a text message: 6. Press the Select soft key to choose from various pre-scripted short messages, 1. Press . 2. Select Instant Messages. 3. (Optional) If multiple lines are in use, first select from which line to send a message. 4. Press the New soft key. 5. Enter the desired extension or SIP URL. Press the 1/A/a soft key to alternate between numeric and upper/lower case alphanumeric modes. OR Press Edit to compose a custom message.
Sel Del To view and change Presence settings: 3. Choose Buddy Status to monitor the status of the contacts within your buddy list. This can also be accessed by pressing the Buddies soft key on the idle display. 4. Choose Watcher List to see which phones are currently monitoring your status. Press the Block soft key to block a watcher. 5. Choose Blocked List to see which phones you have blocked from monitoring your status. Press the Unblk soft key to unblock a contact. Menu 1.
Troubleshooting No Dial-Tone Verify power is correctly applied to the SoundPoint® IP 430 SIP phone: Verify if dial tone is present on any other audio paths: • Check that the display is illuminated. • Make sure the LAN cable is inserted properly at the rear of the phone (try unplugging and re-inserting the cable). • If using inline powering, check that the switch is supplying power to the phone (contact your System Administrator).
No Response from Feature Key Presses Verify phone is in active state: • Press Menu followed by System Status and Server Status to confirm line is actively registered to the server. • Make a call to the phone to check for inbound call display and ringing as normal. If successful, try to press feature keys within the call to access Directory or Buddy Status for example. • Reboot the phone to attempt re-registration to the server.
Modifications by Polycom, Inc. could void the user’s authority to operate the equipment. In accordance with Part 15 of the FCC Rules, the user is cautioned that any changes or modifications not expressly approved Installation Instructions L’Installation doit être exécutée conformément à tous les règlements nationaux applicable au filage électrique. Installation must be performed in accordance with all relevant national wiring rules.
for safe shipment, and it is recommended that they be insured or sent by a method that provides for tracking of the package. Responsibility for loss or damage does not transfer to Polycom until the returned item is received by Polycom. The repaired or replaced item will be shipped to the Customer, at Polycom’s expense, not later than thirty (30) days after Polycom receives the defective product, and Polycom will retain risk of loss or damage until the item is delivered to the Customer.
Limitations of Liability LIMITATION OF LIABILITY.
Permission is hereby granted, free of charge, to any person obtaining a copy of this software and associated documentation files (the “Software”), to deal in the Software without restriction, including without limitation the rights to use, copy, modify, merge, publish, distribute, sublicense, and/or sell copies of the Software, and to permit persons to whom the Software is furnished to do so, subject to the following conditions: THE SOFTWARE IS PROVIDED “AS IS”, WITHOUT WARRANTY OF ANY KIND, EXPRESS OR IMPL
Polycom, Inc. 1565 Barber Lane Milpitas, CA 95035 ©2005 Polycom, Inc. All Rights Reserved. Polycom®, SoundPoint®, and the Polycom logo design are registered trademarks of Polycom, Inc. in the U.S. and various countries. All other trademarks are the property of their respective companies. 1725-12439-001 Rev.