
User guide

SoundPoint IP 550 Quick Start Guide
After it has been connected to the network
and supplied with power, the SoundPoint
IP 550 automatically begins a process of
establishing itself on the network
For more information, see the SoundPoint
IP 550 User Guide, available online at:
www.polycom.com/
Directories
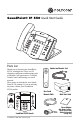
Features
Startup
Directories
Applications
Conference
Transfer
Redial
Menu
Messages
Do Not Disturb
Hold
Dial Pad
Volume Up/Down
Handsfree Microphone
Headset Key
Speakerphone Key
Microphone Mute
Feature Keys
Navigation Keys
Graphical LCD
Call/Message Indicator
Feature
Keys
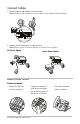
Wallmount Method
Using wall anchors, fasten the
optional wallmount unit to the
wall. Align the base stand tabs
with their corresponding inser-
tion points on the phone, and
then snap the phone into place
(as shown).
Wallmount Unit
(Optional Accessory)
For more information,
see “SoundPoint IP
Telephone Wallmount
Installation” at
www.polycom.com/
N
ote: Wallmount Unit is an
o
ptional accessory, and is not
i
ncluded with this package.
R
emove the button from the slot
b
ehind the hookswitch, rotate it
180 degrees, and then place it
b
ack in the slot (as shown).
Hookswitch
Handsfree
Speaker
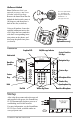
Context-Sensitive
Soft Keys
Hold